8
ENGLISH
•
Children aged 8 and over as well as disabled
persons can use this unit only under supervi-
sion of a person who is responsible for their
safety, if they are given all the necessary and
understandable instructions concerning the
safe usage of the unit and information about
danger that can be caused by its improper
usage.
•
To avoid damages, transport the unit in origi-
nal package only.
•
Never use the unit if the power cord or the
plug is damaged, if the unit works improperly
or after it was dropped. Do not try to repair
the unit by yourself. Contact an authorized
service center for all repair issues.
Keep the unit in a dry cool place out of reach
of children and disabled persons.
THE UNIT IS INTENDED FOR HOUSEHOLD
USAGE ONLY
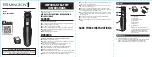
USING THE HAIRDRYER
After unit transportation or storage under
cold (winter) conditions, it is necessary to
keep it for at least two hours at room tem-
perature before switching on.
–
Before switching the unit on, make sure that
your home mains voltage corresponds to unit
operating voltage.
–
Remove any stickers that can prevent unit
operation.
–
Unwind the power cord completely.
–
Insert the power plug into the mains socket.
–
Use the switch (1) to set the required air sup-
ply speed:
«0» – the hairdryer is off;
«
» – low speed;
«
» – high speed.
–
Use the switch (2) to set the required tem-
perature of the air flow:
« » – low heating;
« » – medium heating;
«
» – maximal heating.
Note: During the first operation some for-
eign smell and a small amount of smoke
from the heating element is possible, this
is normal.
–
This model has a cool shot function, use it to
fix your hairstyle. To make a cool shot switch
the hairdryer on, then press and hold the but-
ton (3)
.
Hair care
To get the best results, wash your hair with sham-
poo, remove excessive moisture with a towel and
comb your hair, then start drying and styling it.
Quick drying
Set the switch (2) to maximal heating position
«
», select the required air supply speed using
the switch (1) and dry your hair. Shake excessive
moisture off your hair with your hand or a comb
and constantly move the hairdryer above your hair.
Straightening
Set the switch (2) to maximal heating position
«
», select the required air supply speed using
the switch (1) and dry your hair. When the hair
is almost dry, switch the unit off, set the nozzle
(4), decrease the heating degree using the
switch (2) and reduce the air flow speed using
the switch (1).
Divide your hair into locks, start straightening
from lower layers. Using a plain or round brush,
comb your hair from top to bottom and simul-
taneously direct hot air from the nozzle (4) at
it. Slowly straighten each lock from root to end
this way. After you finish straightening the lower
locks, start to straighten the locks of the middle
layer and finish with locks of the upper hair layer.
Natural wavy hairstyle
Set the switch (2) to the low heating position
« », select the low air supply speed by setting
the switch (1) to the position « », grip locks
between fingers, turn them in the direction of
natural curling. Dry your hair, directing the airflow
at the area between fingers. Once the required
effect is achieved, press and hold the cool shot
button (3)
and fix each lock.
Styling
Install the nozzle (4) in the hairdryer and then set
the switches (2) and (1) to the low heating/speed
position « »/« ».
Divide your hair into locks and style your hair with
a round styling brush. During styling, direct the
air flow straight at your hair.
If you want to fix the hairstyle, direct the cool
shot at each lock for 2-5 seconds. Styling time
depends on hair type; choose it by yourself.
Using the diffuser (8)
The air flow dispersed by diffuser provides soft
drying and adds volume to your hair. Special
MW-2030.indd 8
24.03.2014 16:29:44
Summary of Contents for MW-2030 BN
Page 1: ...MW 2030 BN 3 7 10 13 16 20 MW 2030 indd 1 24 03 2014 16 29 43...
Page 2: ...MW 2030 indd 2 24 03 2014 16 29 43...
Page 3: ...3 MW 2030 BN 1 0 2 3 4 5 6 7 8 30 MW 2030 indd 3 24 03 2014 16 29 43...
Page 4: ...4 8 8 8 8 1 0 2 3 MW 2030 indd 4 24 03 2014 16 29 43...
Page 6: ...6 7 1 1 1 1 220 240 50 1800 2000 3 1902 03 41 MW 2030 indd 6 24 03 2014 16 29 43...
Page 10: ...10 MW 2030 BN 1 0 2 3 4 5 6 7 8 30 MW 2030 indd 10 24 03 2014 16 29 44...
Page 11: ...11 8 8 8 8 1 0 2 3 2 1 2 1 4 2 1 4 MW 2030 indd 11 24 03 2014 16 29 44...
Page 13: ...13 MW 2030 BN 1 0 2 3 4 5 6 7 8 30 MW 2030 indd 13 24 03 2014 16 29 44...
Page 14: ...14 8 8 8 8 1 0 2 3 2 1 2 1 4 2 1 4 MW 2030 indd 14 24 03 2014 16 29 44...
Page 16: ...16 MW 2030 BN 1 0 2 3 4 5 6 7 8 30 MW 2030 indd 16 24 03 2014 16 29 44...
Page 17: ...17 8 8 8 8 1 0 2 3 2 MW 2030 indd 17 24 03 2014 16 29 44...
Page 19: ...19 7 1 1 1 1 220 240 50 1800 2000 3 MW 2030 indd 19 24 03 2014 16 29 44...
Page 24: ...2014 GOLDER ELECTRONICS LLC 2014 MW 2030 indd 24 24 03 2014 16 29 45...