background image

4

5

GB

GB

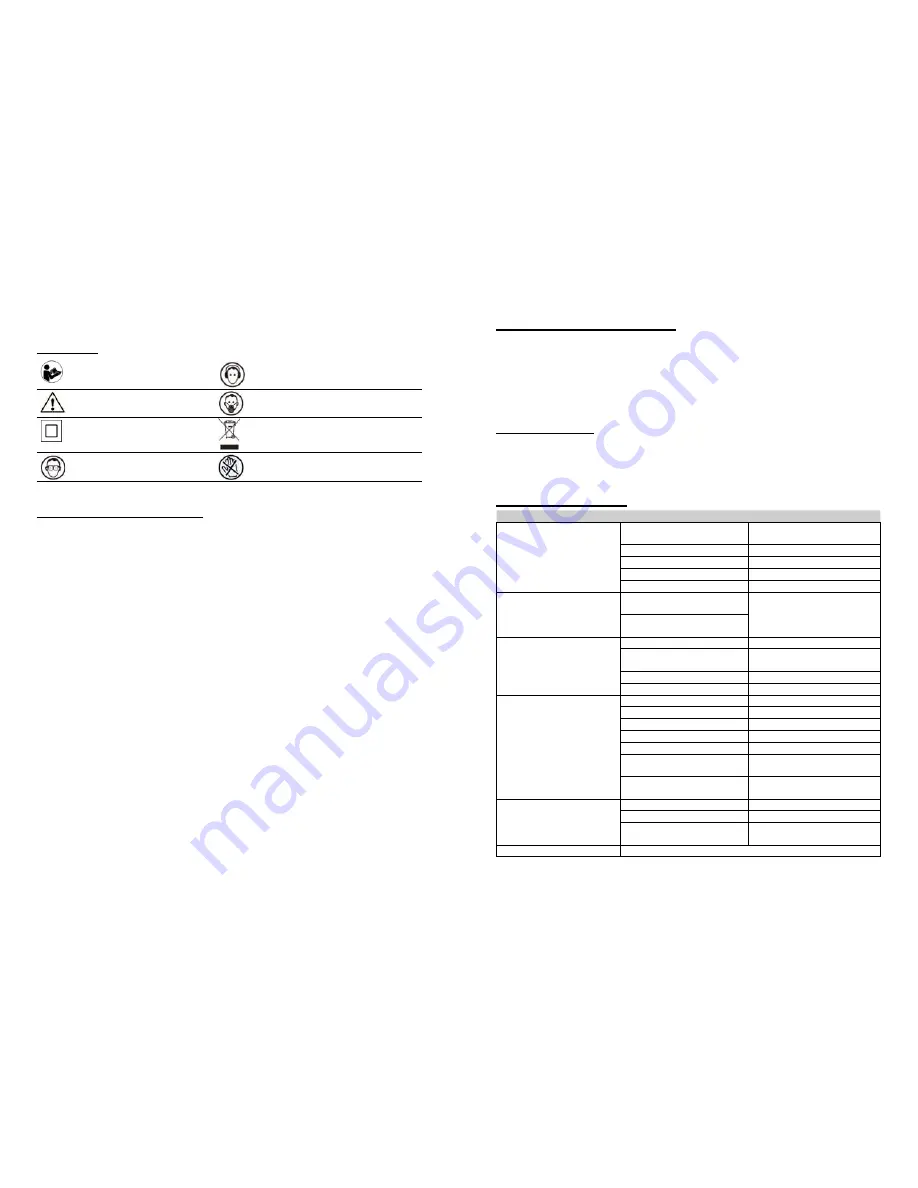
SYMBOLS

Read the manual

Wear ear protection

Warning

Wear dust mask

Double insulation 

Do not dispose of old appliances in the 

household garbage

Wear eye protection

Keep  your  hands  and  feet  away  from  all 

opening

OPERATING INSTRUCTION

PREPARATION FOR THE STARTING

(1) The place to set the compressor should be clean, dry and ventilated

(2) Keep the use voltage /- 5% of the rated

(3) Keep the oil level in the red circle leveler

(4)Recommend compressor oil use SAE30 or L-DAB 100 over 10

℃ ,

 and use SAE 10 or L-DAB 68 below 10

(5) Open the outlet valve, set the knob of pressure switch on (Fig.2), let the compressor run 10 minutes 

with no load to ensure lubricating the moving parts before regular service

OPERATING AND ADJUSTMENT

(1)The compressor is controlled by pressure switch when normal working. It can be stopped automatically 

as pressure increasing to the maximum and restart when pressure decreasing to the minimum. The rated 

pressure has been adjusted when produced. Don’t change it carelessly. As soon as motor switched off the 

compressed air in the discharge pipe should be released through the release valve under the switch. This is 

the necessary condition for restart, or the motor will be damaged. The rated pressure can be adjusted by 

turning the adjusting bolt of the switch (Fig.2).

(2)The output pressure of compressed air can be adjusted by regulating valve (Fig.2)

(3)When the compressor in running need to be stopped, only set the knob of pressure switch in position off

CAUTIONS

(1)Put the cover off first and put on the breath pipe and the air filter before the before the compressor run 

(Fig.3)

(2)Never unscrew any connecting part when the tank is in pressure condition

(3)Never disassemble any electrical part before disconnecting the plug

(4)Never adjust the safety valve carelessly

(5)Never use the compressor in place where voltage is too low or too high

(6)Never use electrical wire more than 5m long with less than the section show in table 1

(7)Never disconnect the plug to stop compressor, set the switch knob in position off instead

(8)If the release valve doesn’t work as motor stopped, find the cause immediately so as not to damage 

motor

(9)Lubricating oil must be clean, oil level should be kept in the red circle of the leveler

(10)Disconnect the plug to cut off power supply and open the outlet valve

MAINTENANCE

(1)Clean crankcase and renew lubricating oil after the first 10 working hours

(2)Clean the oil level after every 20 working hours, and replenish if necessary (Fig.4)

(3)Open drain cock under the tank to exhaust condensate after every 60 working hours

(4)Clean crankcase and renew the oil, clean air filter and safety valve and pressure gauge.

CLEANING AND MAINTANCE

Before any work on the machine itself, pull the mains plug. For safe and proper working, always keep the 

machine and ventilation slots clean. In extreme working conditions, conductive dust can accumulate in 

the interior of the machine when working with metal. The protective insulation of the machine can be 

degraded. The use of a stationary extraction system is recommended in such cases as well as frequently 

blowing out the ventilation slots and installing a residual current device (RCD). Please store and handle 

the accessory(-ies) carefully. If the machine should fail despite the care taken in manufacturing and testing 

procedures, repair should be carried out by an after-sales service centre for Maxpro power tools.

ENVIRONMENT

Do not dispose of electric tools, accessories and packaging together with household waste material - 

in observance of European Directive 2002/96/EC on waste of electric and electronic equipment and its 

implementation in accordance with national law, electric tools that have reached the end of their life must 

be collected separately and returned to an environmentally compatible recycling facility.

TROUBLE SHOOTING

Fault Symptom

Possible Cause

Troubleshooting

Mortor unable running Running 

too slow, or or Getting hot

( 1 ) Fa u l t   i n   l i n e ,   o r   vo l ta ge 

insufficient

(1) 

Check the line

(2)Power wire too thin or too long (2)Replace the wire
(3) Fault in pressure switch

(3)Repair or replace

(4)Fault in motor

(4)Repair or replace

(5)Sticking of main compressor

(5)Check and repair

Sticking of main compressor

(1)Moving parts burnt due to the 

oil insufficient

C h e c k   c r a n k s h a f t ,   b e a r i n g , 

connecting rod, piston, piton ring, 

etc. and replace if necessary

(2)Moving parts damaged, or stuck 

by foreign body

Tarrible shake Or abnormal noise (1)Connecting part loosed

(1)Check and retighten

(2)Foreign  body  got  into  main 

compressor

(2)Check and clean away

(3)Piston knocking valve seat

(3)Replace with thicker paper gasket

(4)Moving parts seriously worn

(4)Repair or replace

Pressure insufficient or discharge

capacity decreased

(1)Mortor running too slow

(1)Check and remedy

(2)Air filter choked up

(2)Clean or replace the cartridge

(3)Leakage of safety valve

(3)Check and adjust

(4)Leakage of discharge pipe

(4)Check and repair

(5)Sealing gasket damaged

(5)Check and replace

(6)Valve plate damaged, carbon 

buildup or stuck

(6)Replace and clean

(7)Piston ring and cylinder worn of 

damaged

(7)Repair or replace

T h e   o i l   C o n s u m p t i o n   t o o 

excessive

(1)Oil level too high

(1)Keep the level within set range

(2)Breath pipe choked up

(2)Check and clean

(3)Piston ring and cylinder worn of 

damaged

(3)Repain or replace

Spare parts list and drawing

Please download files on 

www.maxpro-tools.com

Summary of Contents for MPEAC1500/24

Page 1: ...ONAL Air compressor 1 5 Luft Kompressor 6 11 Compresseur d air 12 17 Compresor de Aire 18 23 Compressor de ar 24 29 30 35 Spr arka powietrza 36 41 MPEAC1500 24 MPEAC1500 50 GB D F E P RU PL AR FA 49 5...

Page 2: ...ajo nuestra sola responsabilidad que este producto est en conformidad con las normas o documentos normalizados siguientes EN 60204 1 2006 A1 09 EN 1012 1 2010 de acuerdo con las regulaciones 2004 108...

Page 3: ...01 2003 Noise Vibration Information LpA sound pressure level 78 0dB A 78 0dB A LWA sound power level 76 0dB A 76 0dB A Uncertainty 3 dB A 3 dB A Vibration emission value Uncertainty The vibration emi...

Page 4: ...ressed air produced by a compressor It is not suitable for breathing purposes WARNING A POTENTIONAL HAZARD THAT COULD CAUSE SERIOUS INJURY OR LOSS OF LIFE 1 Do not weld not the air tank of this compre...

Page 5: ...rankcase and renew the oil clean air filter and safety valve and pressure gauge CLEANING AND MAINTANCE Before any work on the machine itself pull the mains plug For safe and proper working always keep...

Page 6: ...ne vorherige Vorank ndigung vorbehalten unsere Entschuldigung f r eventuelle Entstehen Unannehmlichkeiten daraus Lesen und befolgen Sie die Bedienungsanleitung und die Sicherheitsinformationen vor der...

Page 7: ...nsport notwendig ist Druck muss aus dem Tank vor dem Transport freigegeben 5 Sch tzen Sie den Luftschlauch und Elektrokabel vor Besch digung und Punktion berpr fen Sie sie w chentlich auf schwachen od...

Page 8: ...e h ufiges Ausblasen der L ftungsschlitze und die Installation ein Reststromger t RCD empfohlen Bitte lagern und behandeln Sie das Zubeh rteil en vorsichtig Sollte die Maschine trotz sorgf ltiger Hers...

Page 9: ...due cela Lisez et suivez les instructions de mise en route ainsi que les conseils de s curit avant la premi re utilisation Conserver ce manuel AVERTISSEMENT CHOSES A FAIRE AVANT D OPERER LE COMPRESSE...

Page 10: ...r toutes les pressions dans le syst me avant d installer op rer remettre ou maintenir cet quipement 1 Suivre tous les codes lectriques locaux et s curit ainsi que Codes Electriques Nationaux CEN et S...

Page 11: ...fabrication et aux proc dures de test les r parations doivent tre effectu es par un centre de service apr s vente agr par outillage de Maxpro ENVIRONNEMENT Ne jetez pas les outils lectriques les acces...

Page 12: ...para su compresor de aire se dedica a la mejora y perfeccionamiento de los productos existentes continuamente Por lo tanto el concepto de rendimiento y dise o t cnico de los productos pueden variarse...

Page 13: ...transportarlo 5 Proteger la manguera de aire comprimido cable el ctrico de da os y objetos puntiagudos Inspeccione cada semana sobre partes desgastada y reemplazarlas si es necesario ADVERTENCIA DESCO...

Page 14: ...ente Si la m quina hay aver a por favor toma la atenci n de los procedimientos de producci n y de prueba y debe realizar la reparaci n por un centro de servicio de post venta para las herramientas el...

Page 15: ...eira vez a ferramente Guarde este manual AVISO ANTES DE OPERAR O SEU COMPRESSOR PELA PRIMEIRA VEZ 1 Vai encontrar uma ficha de pl stico branco inserida no Buraco de Enchimento de leo na frente superio...

Page 16: ...e extens o para evitar perda de energia e danos de motor permanentes A utiliza o de uma cabo de extens o anula a garantia Registe o N de Modelo N de S rie e Data de Compra no espa o abaixo No de Model...

Page 17: ...nicas usadas e a transposi o para as leis nacionais as ferramentas el ctricas usadas devem ser recolhidas em separado e encaminhadas a uma instala o de reciclagem dos materiais ecol gica SOLU O DE PR...

Page 18: ...114 0004 220 230V 50Hz 220 230V 50Hz 1500W 1500W 2 2 2800 min 2800 min 206 L min 206 L min 116psi 116psi 24L 50L 2M 2M LpA LWA EN 60745 30 31 31 31 32 33 33 34 34 34 1 2 3 l 2 3 78 0dB A 78 0dB A 76 0...

Page 19: ...32 33 RU RU 1 2 3 4 5 6 7 8 KD PECCOP BO y 1 2 3 31 12 4 5 1 NEC OSHA 2 1 1 2 5 3 4 SAF 30 L DAB 100 10 SAE10 L DAB68 10 5 2 10 1 2 2 2 3 1 3...

Page 20: ...34 35 RU RU 2 3 4 5 6 5 1 7 8 9 10 1 10 2 20 4 3 60 4 Maxpro 2002 96 1 1 2 2 3 3 4 4 5 5 1 1 2 1 1 2 2 3 3 1 1 2 2 3 3 4 4 5 5 6 6 7 7 1 1 2 2 3 3 www maxpro tools com...

Page 21: ...ra s ci gle poprawia i doskonali istniej ce produkty Dlatego wydajno techniczna i koncepcja produkt w mo e wykazywa pewne r nice Przepraszamy za ewentualne niedogodno ci z tym zwi zane Przeczytaj i po...

Page 22: ...ale y zredukowa ci nienie w zbiorniku 5 Zabezpieczy w powietrzny i przew d zasilaj cy przed uszkodzeniem i przebiciem Co tydzie sprawdza przewody pod k tem przetar i oznak zu ycia a w razie potrzeby w...

Page 23: ...lacji urz dzenia r nicowopr dowego RCD Akcesoria powinny by starannie ob ugiwane i przechowywane J li pomimo post powania zgodnie zzaleceniami urz dzenie wyka e wady fabryczne naprawa powinna zosta do...

Page 24: ...42 FA RCD Maxpro 43 FA 1 3 2 3 4 5 6 5 1 7 off 8 off 9 1 10 2 20 4 3 60 4 96 EC 2002 www maxpro tools com 1 2 3 4 5 1 2 3 4 5 1 2 1 2 3 4 1 2 3 4 1 2 3 4 5 1 2 3 4 5 1 2 1 3 2 3...

Page 25: ...44 45 FA FA U 1 2 3 31 12 4 5 1 NEC OSHA 2 3 1 2 5 3 4 10 SAF 30 L DAB 100 10 SAE10 L DAB68 5 2 10 1 2 2 2 3 off...

Page 26: ...46 47 FA FA 1 2 3 4 1 2 3 U U 1 2 3 U U 4 5 6 7 8...

Page 27: ...3 4 5 1 2 3 4 5 1 2 1 2 3 4 1 2 3 4 1 2 3 4 5 6 7 1 2 3 4 5 6 7 1 2 3 1 2 3 MPEAC1500 24 MPEAC1500 50 114 0003 114 0004 220 230V 50Hz 220 230V 50Hz 1500W 1500W 2HP 2HP 2800 min 2800 min 206 L min 206...

Page 28: ...50 51 AR AR RCD Maxpro 2002 EC 96 1 2 5 3 4 SAF 30 L DAB 100 10 SAE 10 L DAB 68 10 5 Fig 2 10 1 LT LS 2 2 2 3 1 3 2 3 4 5 6 5 1 3 60 4 7 8 9 10 1 10 2 20 4...

Page 29: ...52 53 AR AR 1 2 3 4 1 2 1 2 3 4 5 6 7 8 1 2 3 31 12 4 5 1 NEC OSHA 2 3...

Page 30: ...2 51 51 50 50 49 54 AR MPEAC1500 24 MPEAC1500 50 114 0003 114 0004 220 230V 50Hz 220 230V 50Hz 1500W 1500W 2HP 2HP 2800 min 2800 min 206 L min 206 L min 116psi 116psi 24L 50L 2M 2M 78 0dB A 78 0dB A 7...

Page 31: ...www maxpro tools com...

Reviews: