background image

model no. 054-0338-0  |  contact us 1-888-670-6682

22

HEP

A C

ARTRIDGE FIL

TER & MICROFIBRE PRE-FIL

TER

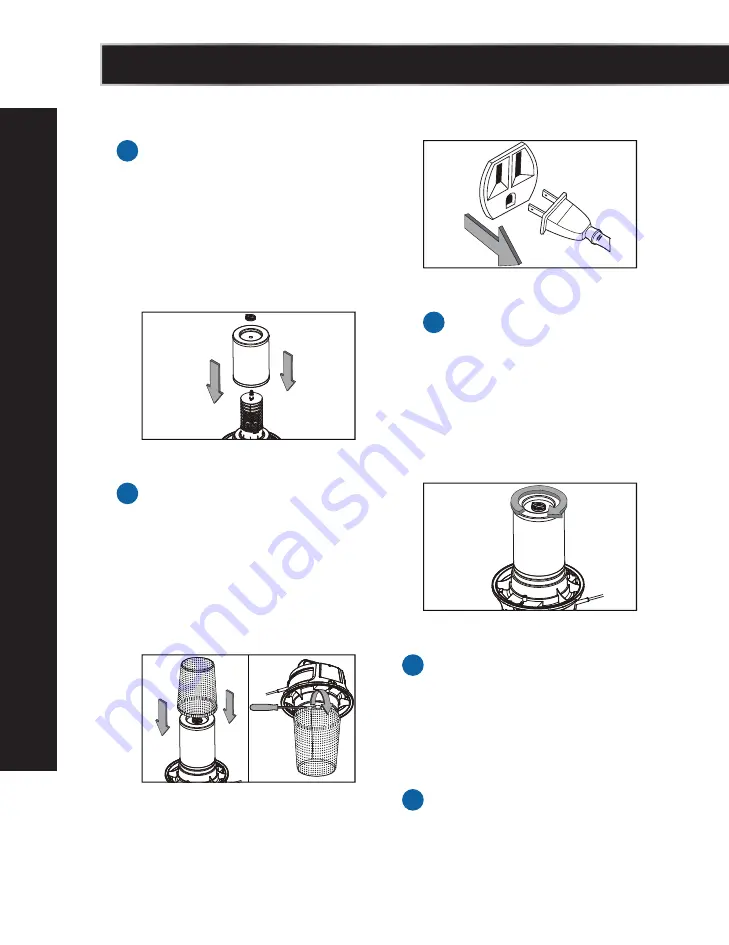
Verify that the power cord is 
disconnected from the outlet.

Place the filter retainer on top of 
the HEPA cartridge filter over the 
raised lip and tighten down by 
turning the retainer clockwise. Do 
not over-tighten.

Remove the power head and place 
in an upside down position. Install 
the HEPA cartridge filter over the 
filter cage with the flat end of the 
filter towards the power head. 
Carefully push filter in until it stops 
against the power head.

Slide the microfibre pre-filter onto the 
assembled HEPA cartridge filter, over 
the lower end cap. Tighten the band 
clamp on the microfibre pre-filter 
with a screwdriver to ensure proper 
installation.

Place the power head back onto the 
collection tank.

1

3

2

4

5

INSTALLING HEPA CARTRIDGE FILTER& MICROFIBRE PRE-FILTER

Summary of Contents for 054-0338-0

Page 1: ...30 L 8 U S Gallons HEPA Wet Dry Vacuum 054 0338 0 ...

Page 2: ......

Page 3: ...free helpline at 1 888 670 6682 TABLE OF CONTENTS TABLE OF CONTENTS PAGE TECHNICAL SPECIFICATIONS 4 SAFETY GUIDELINES 5 SYMBOLS 8 KEY PARTS DIAGRAM 9 GENERAL ASSEMBLY INSTRUCTIONS 11 DRY VACUUM OPERATION 14 WET VACUUM OPERATION 16 MAINTENANCE 18 HEPA CARTRIDGE FILTER MICROFIBRE PRE FILTER 20 FOAM WET FILTER 22 HEPA MATERIAL EXHAUST FILTER 23 WHEN TO CHANGE FILTERS 24 TROUBLESHOOTING 25 ACCESSORIES...

Page 4: ... gallons Power 120 V 60 Hz 11 A Tank Polypropylene Hose 1 7 8 x 10 4 8 cm x3 05 m Water lift 86 at end of hose Airflow 87 CFM at end of hose Noise 73 dBA Filters HEPA Cartridge Filter Microfibre Pre filter Foam Sleeve Wet Filter High Efficiency Collection Bag HEPA Material Exhaust Filter Weight 28 lb 12 7 kg ...

Page 5: ...asoline or other fuels lighter fluids cleaners oil based paints natural gas hydrogen or explosive dusts like coal dust magnesium dust grain dust or gun powder Sparks inside the motor can ignite flammable vapours or dust To reduce the risk of health hazards from vapors or dusts do not vacuum toxic materials Do not store near hazardous materials Do not pick up anything that is burning or smoking suc...

Page 6: ...lugging Unplug before connecting or disconnecting hose or any other accessories Do not put any object into openings Do not use with any opening blocked keep free of dust lint hair and anything that may reduce air flow Keep hair loose clothing fingers and all parts of body away from openings and moving parts Use extra care when cleaning on stairs Use only as described in this manual Use only manufa...

Page 7: ...tand the operator s manual Do not run unattended Do not pick up hot ashes coals toxic flammable materials Do not use around explosive liquids or vapours WARNING Servicing of double insulated wet dry vacuum with a double insulated wet dry vacuum two systems of insulation are provided instead of grounding No grounding means is provided on a double insulated appliance nor should a means for grounding...

Page 8: ... moderate injury NOTICE Without Safety Alert Symbol Indicates a situation that may result in property damage SYMBOLS EXTENSION CORDS When using an extension cord with your Wet Dry Vacuum refer to the following table to determine the required A W G wire size Before using the cleaner make sure the power cord and extension cord are in good working condition Make repairs or replacements before using t...

Page 9: ...9 KEY PARTS DIAGRAM 1 8 12 13 14 17 23 24 25 26 27 28 29 30 31 18 19 20 21 22 15 16 9 10 11 7 2 3 4 5 6 ...

Page 10: ...cessory Adaptor 6 Locking Castor x2 22 Power Tool Adaptor 7 Collection Tank 23 Foam Sleeve Wet Filter 8 Vacuum Port 24 HEPA Cartridge Filter 9 Power Head 25 Microfibre Pre filter 10 On Off Switch 26 High Efficiency Collection Bag 11 Handle 27 Washer x4 12 Filter Cage 28 Hub Cap x2 13 Float Valve 29 R Lock Pin x2 14 Locking Steel Extension Wand 1 30 Wheel Axle 15 Locking Steel Extension Wand 2 31 O...

Page 11: ...ing the wet dry vacuum To reduce the risk of electric shock do not expose to rain CAUTION This vacuum has been specifically designed to clean up hazardous dust Special filters reduce the incidence of airborne dust that would be created by other methods of cleaning During the removal of hazardous dust DO NOT sweep scoop shovel or in any manner handle other than by vacuuming DO NOT at any time attem...

Page 12: ...installed properly Verify that the castors are mounted correctly Remove the contents from inside the collection tank make sure you have all contents as shown on pages 9 and 10 Insert the wheel axle into the rear wheel housing on the vacuum base Insert a washer onto the axle followed by a rear wheel and insert another washer Insert the locking pin into the hole on the end of the axle to lock the wh...

Page 13: ...er to page 20 for installation instructions 8 7 IMPORTANT For vacuuming hazardous dusts it is recommended that the vacuum cleaner is fitted with the dust bag For wet vacuum cleaning remove the microfiber pre filter HEPA cartridge filter and collection bag and install the supplied foam wet filter See page 22 for the foam wet filter installation instructions 9 Place the power head back on the collec...

Page 14: ...orking and that vacuum has power POLARIZED PLUG To reduce the risk of electrical shock this appliance has a polarized plug one blade wider than the other This plug will fit in a polarized outlet only one way If the plug does not fit fully in the outlet reverse the plug If it still does not fit contact a qualified electrician to install the proper outlet Do not change the plug in any way Double ins...

Page 15: ...to damage the bag 3 4 Verify that the power cord is disconnected from the outlet In order to prepare your vacuum for dry vacuuming verify that the HEPA cartridge filter is securely mounted Remove the power head and place in an upside down position Make sure the HEPA cartridge filter is pushed in firmly against the power head Install the flat rubber washer and retainer For installation instructions...

Page 16: ...ers oil based paints gasoline alcohol or aerosol sprays Explosive dusts include but are not limited to coal magnesium grain or gun powder To reduce the risk of health hazards from vapors or dust do not vacuum toxic materials CAUTION NEVER operate the vacuum cleaner without all of the filters installed This includes the HEPA cartridge filter and microfibre pre filter Motor damage loss of operating ...

Page 17: ...the switch to the I ON position and begin vacuuming Once you have completed vacuuming flip the switch to the O OFF position and unplug the power cord from the outlet 8 9 O OFF I ON DO NOT USE THE HEPA CARTRIDGE FILTER AND THE MICROFIBRE PRE FILTER FOR VACUUMING LIQUIDS DO NOT USE THE COLLECTION BAG FOR VACUUMING LIQUIDS WARNING If filters are contaminated or have been used they must be disposed of...

Page 18: ...instructions see page 22 1 3 2 WET VACUUMING WARNING Be sure to read understand and apply information stated in Safety Guidelines Do not vacuum in areas with flammable gases vapours or explosive dusts in the air Flammable gases or vapours include but are not limited to lighter fluid solvent type cleaners oil based paints gasoline alcohol or aerosol sprays Explosive dusts include but are not limite...

Page 19: ...uuming turn the machine off and remove plug from power supply Empty the collection tank clean and dry the inside and outside before storage REMEMBER The foam wet filter must be removed after wet vacuuming and the HEPA cartridge filter must be installed before dry vacuuming again WET VACUUM OPERATION Verify that the switch is in the O OFF position before plugging the power cord into the power outle...

Page 20: ...m the collection tank Place power head on a soft clean surface upside down Disconnect the hose from the vacuum Clear all dirt or debris from the collection tank and hose into a proper waste container 1 3 2 4 EMPTYING THE COLLECTION TANK MAINTENANCE WARNING Always disconnect the plug from a power outlet before removing the power head from collection tank ...

Page 21: ...particles The HEPA cartridge filter should be used for dry pick up only A dry HEPA cartridge filter is necessary to pick up dust If the HEPA cartridge filter is wet it will clog quickly and be very difficult to clean Handle the filter carefully when removing it for cleaning and replacing it Check the filters for tears or small holes A small hole can let dust pass through and out of the filter Do n...

Page 22: ...ad and place in an upside down position Install the HEPA cartridge filter over the filter cage with the flat end of the filter towards the power head Carefully push filter in until it stops against the power head Slide the microfibre pre filter onto the assembled HEPA cartridge filter over the lower end cap Tighten the band clamp on the microfibre pre filter with a screwdriver to ensure proper ins...

Page 23: ... HEPA Cartridge Filter Microfibre Pre filter Wet filters should be removed and allowed to air dry for 24 hours before installing onto the filter cage 1 3 4 5 With the removed power head in an upside down position unlock and remove the filter retainer by turning retainer counter clockwise and carefully remove the HEPA cartridge filter from the filter cage 2 REMOVING CLEANING HEPA CARTRIDGE FILTER M...

Page 24: ...r 24 hours before installing onto the filter cage Remove the power head and place in an upside down position Follow instructions to remove the HEPA cartridge filter and microfibre filter on page 21 Carefully slide the foam wet filter down over the filter cage making sure the cage is completely covered Use a mild soap and water solution to wash the foam wet filter and rinse with clean water 1 1 3 3...

Page 25: ...l exhaust filter door by lifting the locking tab upwards to the release Pull the door out Clean the HEPA material exhaust filter by gently tapping or brushing off dirt For optimal performance it is recommended to replace the old filter with a new filter regularly 1 3 2 4 CLEANING HEPA MATERIAL EXHAUST FILTER HEPA MATERIAL EXHAUST FILTER ...

Page 26: ... no 054 0338 0 contact us 1 888 670 6682 26 Insert the filter door tabs into the upper slots and lock the filter door into place 6 Install the cleaned or new filter into place 5 HEPA MATERIAL EXHAUST FILTER ...

Page 27: ... opening Hazardous materials must be disposed of properly NEVER throw contaminated debris in your usual trash receptacle Place closed collection bag in an OSHA approved bag or container marked with a HAZARDOUS MATERIAL warning and dispose of in accordance with your local Hazardous Waste Regulations CHANGE THE HEPA CARTRIDGE FILTER Replace the HEPA cartridge filter when you have vacuumed hazardous ...

Page 28: ...k Switch in the wrong position Press the ON I button on the power head Dust comes out from the motor cover The HEPA cartridge filter is missing or damaged Attach or replace the HEPA cartridge filter Reduced efficiency and motor speed vibration There are blockages in the nozzle hose or the collection tank inlets Unplug and check nozzle hose and collection tank inlets for blockages The HEPA cartridg...

Page 29: ...054 0352 4 HEPA Cartridge Filter 054 0353 2 Microfibre Pre filter 054 0354 0 High Efficiency Collection Bag 054 0355 8 HEPA Material Exhaust Filter 1 7 8 4 8 cm Accessories 054 0270 8 Utility Nozzle 054 0271 6 Floor Squeegee Nozzle 054 0273 2 Dust Brush 054 0274 0 Crevice Tool 054 0275 8 Extension Wand ...

Page 30: ...model no 054 0338 0 contact us 1 888 670 6682 30 EXPLODED VIEW 8 9 10 11 14 17 15 16 18 19 20 21 22 23 24 25 26 27 1 2 3 13 14 12 4 5 6 7 8 9 ...

Page 31: ...sembly 14 Latch Assembly 15 HEPA Material Exhaust Filter 16 Exhaust Filter Door 17 Hose 18 Crevice Tool 19 Professional Floor Nozzle 20 Steel Elbow with Air Control 21 Locking Steel Extension Wand 1 22 Locking Steel Extension Wand 2 23 Round Dust Brush 24 Power Tool Adaptor 25 Metal Accessory Adaptor 26 Foam Wet Filter 27 High Efficiency Collection Bag If any parts are missing or damaged or if you...

Page 32: ...nce as outlined in the applicable owner s manual or operating instructions d This warranty does not apply to normal wear and tear or to expendable parts or accessories including hose attachments and filters that may be supplied with the product that by their nature have a limited life span and are expected to become inoperative or unusable after a reasonable period of use e This warranty will not ...

Page 33: ...URTHER THE WARRANTIES SET OUT HEREIN ARE IN LIEU OF ALL OTHER WARRANTIES OR CONDITIONS WHETHER EXPRESS IMPLIED OR STATUTORY INCLUDING SUCH AS ARISE UNDER THE SALE OF GOODS ACT OR THE INTERNATIONAL SALE OF GOODS ACT ARISING OUT OF A COURSE OF DEALING OR USAGE OF TRADE OR OTHERWISE INCLUDING SUBJECT TO APPLICABLE LAW ANY IMPLIED WARRANTIES OR CONDITIONS OF MERCHANTABILITY MERCHANTABLE QUALITY FITNES...

Page 34: ...ear to non critical parts or accessories that do not affect the core function of the product 90 Day Satisfaction Guarantee If you are not completely satisfied with the performance of your MAXIMUM product for any reason you can return it within 90 days from the date of purchase with proof of purchase for exchange or a full refund Made in China Imported by MAXIMUM Canada Toronto Canada M4S 2B8 third...

Reviews: