background image

12

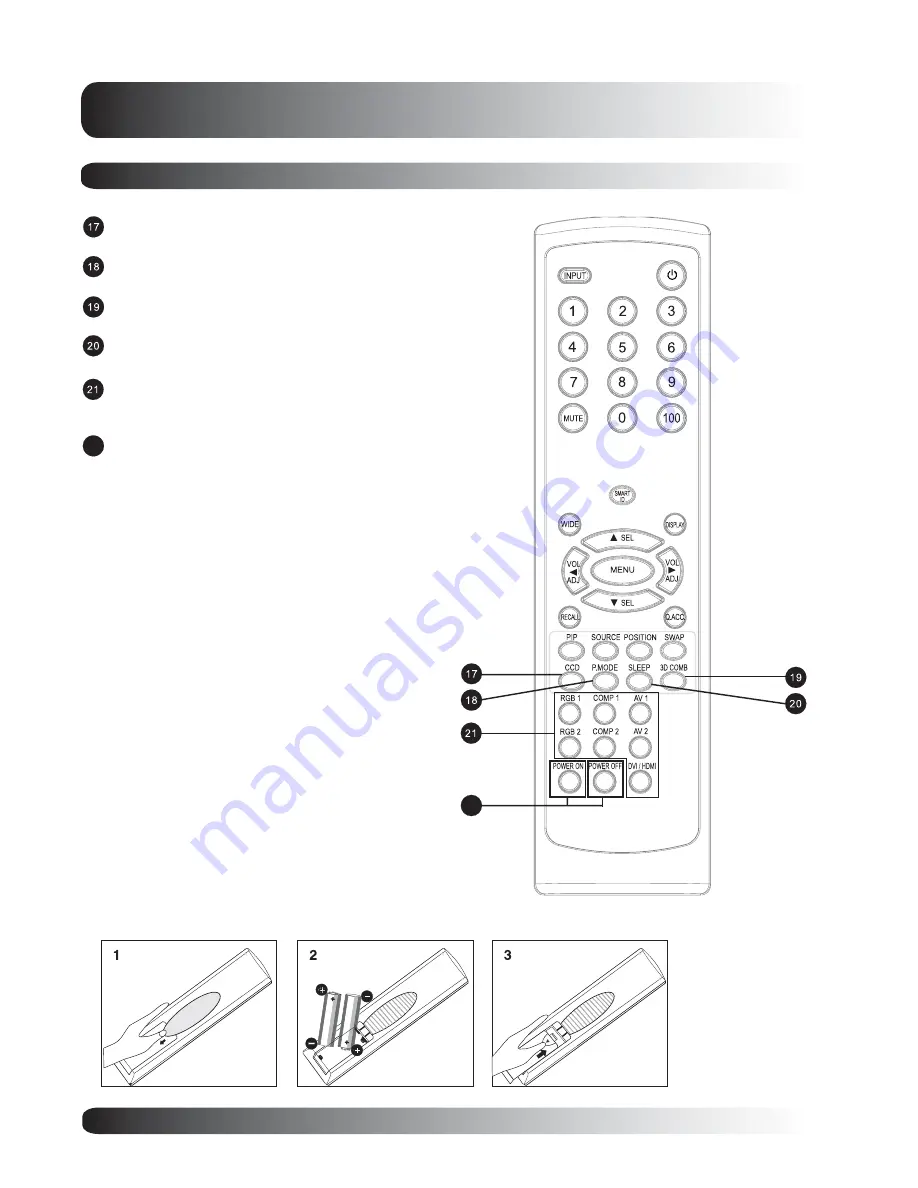
Remote Control (con’t)

Closed Captioning

Turns on Closed Captioning Mode.

Picture Mode

Press to select Picture Modes sequentially.

3D Digital COMB

Filter Direct key. Turns 3D Digital Comb Filter on and off.

Sleep Timer

Engages Sleep Timer settings.

Direct Input Selection Keys

Directly change input signal selection by pressing the
appropriate key.

Discrete Power ON/OFF

Press OFF to send monitor into standby  mode.  Press
ON to power on from standby mode.

Getting to Know Your Display

Battery Installation

22

22

Summary of Contents for MX-42HPM20

Page 1: ...Owners Manual Plasma Flat Panel 42 PDP Monitor ...

Page 2: ...ty If the provided plug does not fit into your outlet consult an electrician for replacement of the obsolete outlet Protect the power cord from being walked on or pinched particularly at plugs convenience receptacles and the point where they exit from the apparatus Only use attachments accessories specified by the manufacturer Use only with the cart stand tripod bracket or table specified by the m...

Page 3: ...rs please remove the speakers prior to moving the display Moving the display with the speakers attached may cause damage or injury Disconnect the unit from the main supply and refer servicing to qualified service personnel under the follow ing conditions Power cord or plug is damaged or frayed Liquid has been spilled into the product and or the unit has been exposed to water or moisture Unit does ...

Page 4: ...s connected Consult the dealer or an experienced radio TV technician for help Warning User must use shielded signal interface cables to maintain FCC compliance for the product Provided with this display is a detachable power supply cord with IEC320 style terminations It may be suitable for connection to any UL Listed personal computer with similar configuration Before making the connection make su...

Page 5: ... Screen Display Menu 28 On Screen Status Display 29 Understanding Widescreen Modes 30 Changing Aspect Ratios 31 Picture Controls 33 Adjusting Picture Settings 34 Picture in Picture 36 Noise Reduction 38 Imagie Shift 39 Adjusting Screen Size 40 Picture Mode 41 Quick Access Menu 42 Sound Controls 43 Adjusting Sound Settings 44 Using Surround Sound 45 Built in Amplification Speaker 47 Fixed Variable ...

Page 6: ...6 Table of Contents ...

Page 7: ...7 Getting to Know Your Display Flat Panel Monitor ...

Page 8: ...8 Getting to Know Your Display Package Contents Flat Panel Display Remote Control Batteries User Manual Warranty Card Power Cord Quick Start Guide ...

Page 9: ...tons Use these buttons to navigate through the On Screen Display menu Menu Button Use this button to engage the On Screen Display menu Input Button Use this button to switch between available inputs Orange Standby Power OFF with AC power detected The LED will illuminate in orange color if the monitor is shut off but the main power cord is plugged into the back of the unit Solid Green Power ON Powe...

Page 10: ...s Y Pb Pr or Y Cb Cr for connecting to the component output of a DVD player or Set Top Box Audio Output Variable or fixed audio output for connecting to an external audio amplifier RGB Input Connect to RGB output of computer or Set Top Box Digital HDMI Inputs Connect to the digital video signals from a Set Top Box RS 232 Connector Connect to a computer serial port Getting to Know Your Display ...

Page 11: ...o navigate through the On Screen Display menu Volume Adjust Up Down Press to turn volume up or down These keys also serve as navigation and adjustment keys when On Screen Display menu is engaged Menu Engages the OSD menu Quick Access Menu Engages Quick Access menu Recall Recalls default picture settings PIP Picture in Picture Button Turns on PIP Picture in Picture feature under HDMI input mode Pre...

Page 12: ...r Direct key Turns 3D Digital Comb Filter on and off Sleep Timer Engages Sleep Timer settings Direct Input Selection Keys Directly change input signal selection by pressing the appropriate key Discrete Power ON OFF Press OFF to send monitor into standby mode Press ON to power on from standby mode Getting to Know Your Display Battery Installation 22 22 ...

Page 13: ...13 Display Connections Flat Panel Monitor ...

Page 14: ... user manual for details Connect the S Video 4 pin DIN connector from the VCR to the S Video input on the back of monitor Connect the Video yellow out connector from the VCR to the Video yellow input on the back of monitor Connect the red R and white L audio output from the VCR to the R and L audio input located next to the Video yellow connector Note There are two sets of composite inputs provide...

Page 15: ... the DVD to the green colored jack of the monitor Connect the red colored labed as PR or CR jack from the DVD to the red colored PR CR jack of the monitor Connect the blue colored labed as PB or CB jack from the DVD to the blue colored PB CB jack of the monitor Connect the red R and white L audio jacks from the DVD to the R and L audio in jacks located next to the PR CR connector Note There are tw...

Page 16: ...ect the S Video 4 pin DIN connector from the DVD to the S Video input on the back of monitor Using Composite Input Connecting a DVD con t Connect the Video yellow out connector from the DVD to the Video yellow input on the back of monitor Connect the red R and white L audio out jacks from the DVD to the R and L audio in jacks located next to the Video yellow connector Note There are two sets of co...

Page 17: ...k of the monitor Connect the red R and white L audio jacks from the Set Top Box to the R and L audio in jacks located next to the PR CR connector Connect the 15 pin D Sub RGB connector from the back of the HDTV Set Top Box to the RGB IN Connector located on the back of the monitor Connect the red R and white L audio out jacks from the HDTV Set Top Box to the R and L audio in jacks located next to ...

Page 18: ...ier Using HDMI Input Notes Some HDTV Set Top Boxes may not have a HDMI output Use Component Video input or RGB input method if this is the case Upon connecting your HDTV Set Top Box to the HDMI input of the monitor it may be necessary to adjust various picture settings on the monitor to correctly match the output of the HDTV Set Top Box This is caused by the different video timings set by various ...

Page 19: ...s to VESA Plug and Play standard to eliminate complicated and time consuming setup of monitors This monitor identifies itself to the computer and automatically sends the PC its Extended Display Identification Data EDID using Display Data Channel DDC protocols How to Set up Your PC for Use with Monitor Windows The display settings for a typical Windows based computer are shown below however actual ...

Page 20: ...Resolutions This monitor supports the following resolutions Note This monitor does not support Macintosh resolutions Resolution with is only available for 42 ED Monitor Resolution with is only available for 42 HD Monitor Resolutions with are type of video signal Horizontal Vertical Frequency Frequency Dot Rate Vertical Horizontal Dot x Line KHz Hz MHz Polarity Polarity 720 x 400 70Hz 31 469 70 087...

Page 21: ...e parameters are required to setup communications with the monitor Command Format and Sequencing Data Structure Overview In order to transmit data from the computer to the monitor the data must be sent in a structured format The format used by this monitor follows a COMMAND DATA sequence All commands and its related data are formatted using a 3 character format separated by a colon in between For ...

Page 22: ...tion PIS PS1 Position 1 PS2 Position 2 PS3 Position 3 PS4 Position 4 PC Status Monitor Status Send command to read power status Monitor rcv s command Sends confirmation of command rcv d to PC Sends actual status of power to PC OFF Rcv acknowledgment of command received Rcv OFF status from monitor Sends confirmation of command completion Rcv confirmation of command complete Send command to POWER ON...

Page 23: ...pect DZM WID 16 9 PAN Panaorama Stretch NOR 4 3 with black bars Image Shift BI3 OFF Turn Off 10S 10 Sec 20S 20 Sec 30S 30 Sec Full White BI4 OFF Turn Off 10M 10 Min 60M 60 Min Multi Color BI5 OFF Turn Off 10M 10 Min 60M 60 Min Picture Mode PTM CNM Cinema VVD Vivid STD Standard USR User Power on Sequence POQ 1ST 1 STEP 2ST 2 STEP Sleep Timer SLP OFF OFF 15M 15 MIN 30M 30 MIN 45M 45 MIN 60M 60 MIN 9...

Page 24: ...24 Display Connections ...

Page 25: ...25 Basic Operations Flat Panel Monitor Basic Operations ...

Page 26: ...to the monitor one for ON and one for OFF Because signals are discrete these keys can be used by third party universal remote controls for macro programming POWER Toggle To turn off power simply press the button If the monitor is already turned off pressing this button will have no effect To turn power on simply press the button If the monitor is turned on already pressing this button will have no...

Page 27: ...r Remote Control Direct Input Selection Keys Using MUTE To turn up sound volume press VOLUME on either the front panel of monitor or on the remote control VOLUME To turn down sound volume press VOLUME on either the front panel of monitor or on the remote control If you would like to silence the volume on a temporary basis simply press the key to silence the volume When the monitors volume is muted...

Page 28: ... remote control or using the front panel control keys OSD Menu Timeout Setting OSD Menu will automatically disappear after a preset period of time so that it doesn t remain on the screen To change the OSD timeout period please follow the steps below Access the OSD menu select SETUP submenu Use keys to highlight OSD TIMEOUT Press keys to confirm selection The OSD Timeout window is displayed Use key...

Page 29: ...us display automatically appears whenever there is a change in the state of the monitor such as channel change or input change The status display will automatically disappear after a timeout period To manually show the Status Display simply press the key on the remote control Note When using AV1 and AV2 priority is given to the S Video input When using S video connection AV1 and AV2 the status dis...

Page 30: ... preserved but black bars are used to fill the the extra space on the left and right 16 9 FULL The original 4 3 image is proportionally stretched to fill the entire screen This is the default setting from factory For 4 3 Square Content Content from traditional TV VCR and some DVD s are formatted using a square 4 3 format When viewing content in this Square format the following viewing modes are su...

Reviews: