Maxent ML-3731HLT Owner'S Manual Download Page 28

Using the On-Screen (OSD) Menu

28

DELL CONFIDENTIAL 

 PRELIMINARY 12/6/06 

 FOR PROOF ONLY

Block Control


 Turns on or off all your parental control settings

NOTE: 

You can use Clear All to unblock the channels and programs that you have set.

Setting an Access Code

After you enter the 

Parental Control

 menu for the first time, you can set your own four-digit 

access code. 

1

In the 

Parental Control

 menu, select 

Change Code

.

2

Using the number pad on the remote control, enter a new access code.

3

Select 

Exit

.

NOTE: 

Parental Control 

ACCESS CODE 

can be reset by pressing 

Channel down

 and 

Volume


down 

keys on front control panel simultaneously for 10 seconds. 
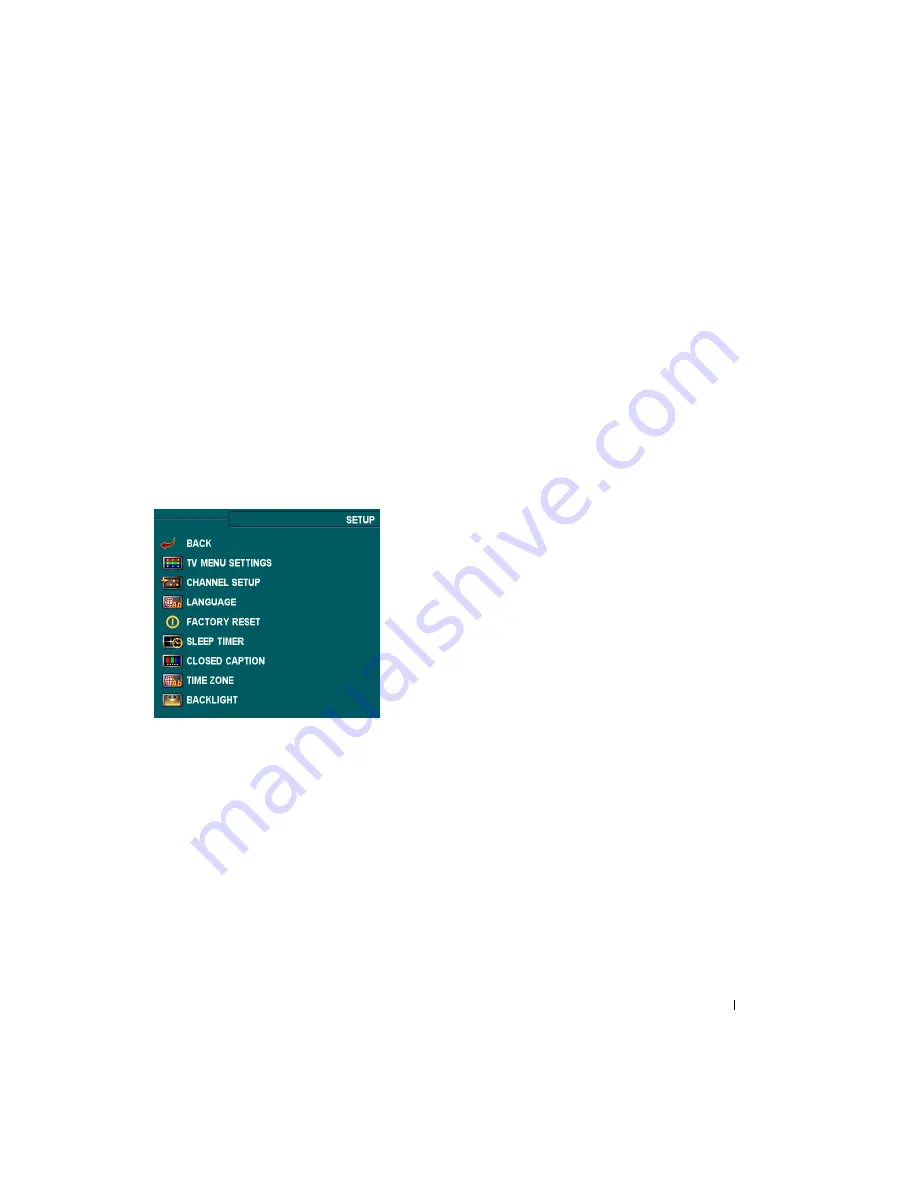
Setup

Setup allows you to adjust the appearance of the 
OSD Menu, preset viewable cable channels, change 
the language of the OSD Menu and to restore factory 
settings.
In the 

TV Menu Settings

 menu, use 

TV Menu Hold 

Time

 to increase or decrease the amount of time the 

TV Menu appears. The maximum amount of time is 
60 seconds. You can select 

TV Button Lock

 to lock 

the buttons on the bottom panel. When this option is 
enabled, only the power button functions. Hold the 
volume increase and the channel increase buttons 
together for 10 seconds to unlock the buttons.

Channel Setup

 allows you to adjust the settings for individual channels and preset the 

viewable channels. If you are using the TV input source, you can preset the viewable 
channels. Go to the 

Main Menu

, select 

Setup

, select 

Channel Setup

, and then select 

Channel Search

.

Language

 enables you to choose the TV Menu language. 

Select 

Factory Reset

 to reset the OSD Menu settings to the factory default values.

Sleep Timer

 allows you to set an increment of time after which the TV automatically turns off.

Select 

Closed Caption

 to turn on and off closed captioning and set several other CC 

options.

Time Zone

 allows you to set the time zone and daylight saving settings. 

Summary of Contents for ML-3731HLT

Page 1: ...FILE LOCATION E workarea customer MAXNET 061101_ML 3731Manual revisions fronte fm DELL CONFIDENTIAL PRELIMINARY 12 5 06 FOR PROOF ONLY ML 3731HLT LCD TV Owner s Manual...

Page 2: ...in this document is subject to change without notice 2006 Regent USA Inc All rights reserved TSXT technology is incorporated under license from SRS Labs Inc Trademarks used in this text Maxent the Ma...

Page 3: ...Left View 7 Rear View 8 Package Contents 9 2 Setting Up Your TV Proper Location for Your TV 12 Connecting Your TV 13 3 Remote Control Installing Batteries 18 Using Your Remote Control 19 Using Your Un...

Page 4: ...contents fm DELL CONFIDENTIAL PRELIMINARY 12 6 06 FOR PROOF ONLY 5 Troubleshooting Problems With Your TV Troubleshooting Tips 30 General Problems 31 TV Menu Messages 35 Remote Control Problems 35 Usin...

Page 5: ...nual revisions ch1e fm DELL CONFIDENTIAL PRELIMINARY 12 7 06 FOR PROOF ONLY 1 About Your TV Front View 1 IR Receiver Senses the signal from the remote control 2 Power indicator light LED The light is...

Page 6: ...a digital camera or a DVD player 2 Audio connector R Use this connector if you have connected a device to the composite connector SIDE or the S Video connector SIDE 3 Audio connector L Use this conne...

Page 7: ...nel up down button Push to select the previous next channel or navigate through the TV Menu 3 Volume up down button Push to increase decrease the volume or to select a TV Menu option 4 TV Menu button...

Page 8: ...ual revisions ch1e fm DELL CONFIDENTIAL PRELIMINARY 12 7 06 FOR PROOF ONLY Rear View 1 DVI audio connectors L R Connect to the DVI audio connectors if you have connected a device such as a DVD player...

Page 9: ...5 Composite video and audio out connectors Connect a device such as a VCR if you have connected an antenna or cable TV through the ANT Cable connector 6 S Video connectors AV2 Connect devices such as...

Page 10: ...Only a licensed technician should service the TV Do not disassemble the TV Before cleaning the TV unplug it from the electrical outlet To clean the surface of the panel slightly dampen a soft clean li...

Page 11: ...rea customer MAXNET 061101_ML 3731Manual revisions ch1e fm DELL CONFIDENTIAL PRELIMINARY 12 7 06 FOR PROOF ONLY Do not use chemicals such as benzene thinner ammonia or any type of abrasive cleaner Do...

Page 12: ...nvironmental factors while deciding the position of your TV Make sure you allow adequate ventilation Do not place the TV in locations that are exposed to high heat and humidity direct sunlight dusty e...

Page 13: ...r cable connector to your TV The coaxial connector is labelled TV To locate the TV connector see Rear View on page 8 Quality Cable and connector When to Use Description Composite The composite connect...

Page 14: ...connectors see Rear View on page 8 Excellent HDMI HDMI High Definition Multimedia Interface assures that the best video signal is sent from source HDTV signal DVD player to the TV This is achieved by...

Page 15: ...or a camcorder use the composite connector on the right side of the TV see Left View on page 7 2 Connect your device to the TV using the composite audio and video cable 3 Plug in the power cords for...

Page 16: ...26 for more information Using the HDMI Connector 1 Turn off the TV and unplug the power cord 2 Connect your device using the HDMI connector 3 Plug in the power cords for the TV and devices and turn th...

Page 17: ...fm DELL CONFIDENTIAL PRELIMINARY 12 7 06 FOR PROOF ONLY Using the Composite Video and Audio Out Connectors 1 Turn off the TV and unplug the power cord 2 Connect the video and audio out cables to your...

Page 18: ...NLY Remote Control 18 3 Remote Control Installing Batteries Before you can use your remote control install two AA batteries in the remote control as follows 1 Open the battery cover 2 Install the batt...

Page 19: ...19 Remote Control FILE LOCATION E workarea customer MAXNET 061101_ML 3731Manual revisions ch3e fm DELL CONFIDENTIAL PRELIMINARY 12 7 06 FOR PROOF ONLY Using Your Remote Control...

Page 20: ...Push to view the next previous channel 10 MUTE Press to turn the sound on and off 11 INFO Displays information about your TV for example in TV mode it displays the channel you are watching 12 MENU En...

Page 21: ...uch as a DVD player or VCR made by other brands To do so you must program the Universal Remote control according to the instructions contained within the Quick Start Guide NOTE Not all devices may can...

Page 22: ...s appear along the bottom of the screen 2 Use the left and right navigation buttons to move between the icons The icon appears highlighted as you move through the menu 3 To select an option press the...

Page 23: ...enu You can also press MENU on the remote and select INPUT SELECT from the main menu If you are using the TV input source you can preset the viewable channels Go to the Main Menu select SETUP CHANNEL...

Page 24: ...e bottom of the TV AV SIDE COMPOSITE 2 Select when you have a video device such as a video game system connected to the composite connector on the side of the TV AV SIDE S VIDEO 2 Select when you have...

Page 25: ...ets are Natural Normal Cool Warm Audio The Audio Menu allows you to set the audio to best fit the type of show you are watching SRS TruSurround XT Delivers virtual surround sound over two speakers fro...

Page 26: ...n an attached audio receiver Select Variable if you want to adjust the volume using the TV remote or front panel buttons Using Variable adjusts the TV volume out not the volume on an attached audio re...

Page 27: ...ie in wide screen mode NOTE Most DVDs have information about the supported aspect ratio on the case Parental Control Parental Control allows you to block certain channels or programs so children canno...

Page 28: ...gs menu use TV Menu Hold Time to increase or decrease the amount of time the TV Menu appears The maximum amount of time is 60 seconds You can select TV Button Lock to lock the buttons on the bottom pa...

Page 29: ...ENTIAL PRELIMINARY 12 6 06 FOR PROOF ONLY Select Backlight to change backlight brightness to a preferred level NOTE The actual time is set through use of the ATSC tuner with a digital antenna Without...

Page 30: ...t having the correct input selection Each connector on the TV side and bottom is associated with an input selection which is labelled AV1 through AV4 in the Input Select menu AV1 Composite connector o...

Page 31: ...f connector For example if you are using the composite connector on the bottom try connecting the device to the composite connector on the side of the TV display See About Your TV on page 5 for the lo...

Page 32: ...alog TV broadcast using a high definition display There is an inherit limitation of NTSC TV therefore try to get HD content from your cable or satellite service provider Nothing appears on my TV 1 Ens...

Page 33: ...device change the input source in the TV Menu See Input Select on page 26 for more information 5 Connect the device using a different connector For example if you are experiencing the problem using a...

Page 34: ...nt device Ensure that you properly connect the cables and update the input source in the OSD Menu 4 Reset the original factory defaults Press Menu on the remote control select Setup and then select Fa...

Page 35: ...a computer connected to the TV display and there is no signal detected the TV display goes in to sleep mode The power light is amber when the TV display is in sleep mode Self Test Appears for computer...

Page 36: ...ainst a black background While in self test mode the power light remains blue and the self test pattern scrolls through the screen continually This box also appears during normal system operation if t...

Page 37: ...connect the TV from the computer and test to see if the TV volume works No video NOTE If you see a self test it means there is a problem with your video card or you are using the wrong input source 1...

Page 38: ...isplay capabilities Additional features SAP capable Yes CC capable Yes Parental control capable Yes Physical Dimensions Display with stand 962 x687 6 x 133 1 mm W x H x D Weight with stand 24 4 Kg Nat...

Page 39: ...de TV IN coaxial 1 rear right side Audio RCA L R 6 pairs in total side and rear right side HDMI 1 bottom Computer RGB for use as PC monitor 1 bottom Audio PC 1 bottom Outputs Video Composite CVBS 1 re...

Page 40: ...7 7 3 0 1 1 4 2 1 6 P0 A...

Reviews: