background image

8

PB

MAXDATA PLATINUM 00 I M9

Setting up the System

Powering up the System

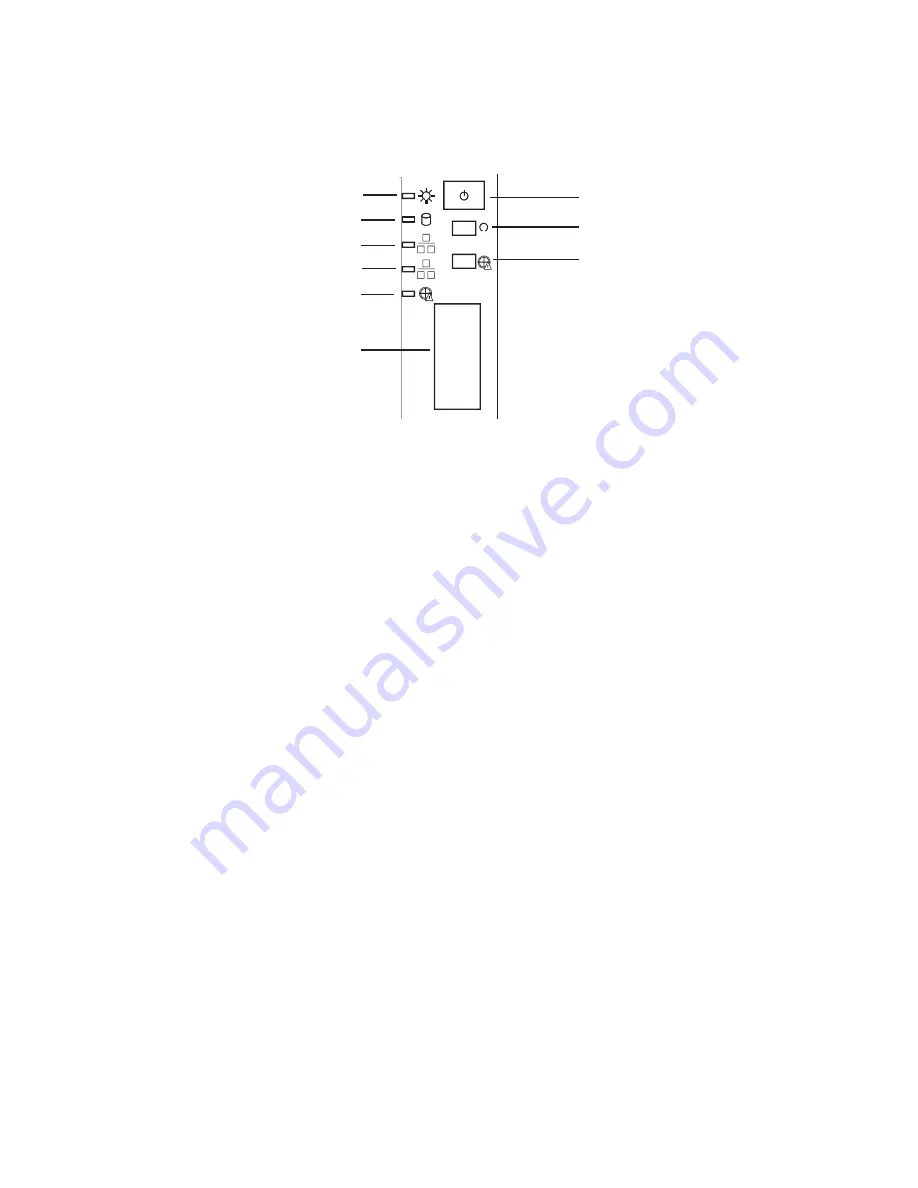
At the front of the case, you can find the necessary controls like power button and the HDD LEDs. 
Press the power button one time briefly in order to boot the server.

Figure 2. PLATINUM 200 I Controls

A.

Power LED

F.

Front USB ports

B.

HDD LED

G.

Power switch

C.

NIC2 LED

H.

Reset switch

D.

NIC1 LED

I.

Disable backplane alarm*

E.

Critical backplane temperature*

*  Only  for  PLATINUM  00  I  with  SAS  /  S-ATA  backplane  option.  A  critical 
temperature is signaled by the backplane via LED and at the same time by an 
acoustic warning. This may hint at a fan failure.

G

H

I

A

B

C

D

E

F

Summary of Contents for PLATINUM 200 I

Page 1: ...User s Manual MAXDATA PLATINUM 200 I ...

Page 2: ... Contents Contents ...

Page 3: ... the Bezel Assembly 13 Removing the Chassis Cover 14 Installing 5 25 inch Drive DVD streamer 14 Installing SATA or SAS Hot Swap Drives 14 Installing or Replacing a Processor 16 Installing a Processor 16 Installing the Heat Sink 19 Removing a Processor 20 Installing a PCI Card 20 Installing and Removing Memory 21 Installing DIMMs 21 Replacing the Backup Battery 22 4 Server Utilities 25 Using the BI...

Page 4: ...nk 19 17 Installing DIMMs 21 18 Removing the Battery 23 Tables 1 NIC LEDs 7 2 Feature Summary 9 3 Board Connectors and Components 10 4 Keyboard Commands 26 5 300 W Power Supply Output Rating 35 6 350 W Power Supply Output Rating 35 7 Product Certification Markings 37 6 Technical Reference 35 Power Supply Specifications 35 300 W Single Power Supply Input Voltage 35 300 W Single Power Supply Output ...

Page 5: ...ION Because the electronics in your computer can be damaged by jarring no mechanical devices should be placed on the same surface as the server This is especially important for impact printers whose vibrations could damage the hard disk CAUTION Hazardous conditions devices and cables Hazardous electrical conditions may be present on power telephone and communication cables Turn off the server and ...

Page 6: ...of the power supply There are no serviceable parts in the power supply Return to manufacturer for servicing Power down the server and disconnect all power cords before adding or replacing any non hot plug component When replacing a hot plug power supply unplug the power cord to the power supply being replaced before removing the power supply from the server CAUTION If the server has been running a...

Page 7: ...o Port F Diagnostic LED 4 M NIC 1 top default management port two USB ports bottom G Diagnostic LED 3 N NIC 2 top two USB ports bottom The NIC LEDs at the right and left of each NIC provide the following information Table 1 NIC LEDs LED LED State Description Left Off No network connection Solid Green Network connection in place Blinking Green Transmit receive activity Right Off 10 Mbps connection ...

Page 8: ...he server Figure 2 PLATINUM 200 I Controls A Power LED F Front USB ports B HDD LED G Power switch C NIC2 LED H Reset switch D NIC1 LED I Disable backplane alarm E Critical backplane temperature Only for PLATINUM 200 I with SAS S ATA backplane option A critical temperature is signaled by the backplane via LED and at the same time by an acoustic warning This may hint at a fan failure G H I A B C D E...

Page 9: ...Two RJ45 network ports for 10 100 1000 Mbps Four USB 2 0 ports back panel Two USB 2 0 ports front Internal connections One 2x5 USB connector for two USB 2 0 ports One vertical type A USB connector One 2x5 connector for serial port B Six SATA II ports with integrated RAID support Matrix Storage RaidTechnology Raid 0 1 5 10 One port for an optional remote management module 3 Video On board controlle...

Page 10: ...System fan 1 E Slot 4 PCI Express Gen2 x4 x8 connector W IPMB F Slot 5 PCI Express Gen2 x8 x8 connector X SATA_SGPIO G Slot 6 PCI Express Gen2 x8 x16 connector Y HSBP H CMOS battery Z Type A USB port I Ethernet and dual USB combo AA SATA port 0 J Ethernet and dual USB combo BB SATA port 3 K System fan 4 CC SATA port 1 L Video port DD SATA port 4 M External serial port EE SATA port 2 N Main power c...

Page 11: ...a 24 pin SSI front panel connector The following figure shows the pin out for this connector Figure 5 SSI Front Panel Connector A Power LED D Reset Button B HDD LED E NIC1 LED C Power Button F NIC2 LED 3 2 J1F5 3 2 J1F2 3 2 J1F3 3 2 J1F1 3 2 J1A2 A B C D E F BMC Force Update Default CMOS Clear Password Clear BIOS Recovery ME Force Update Enabled Default Enabled Default Recover Default Password Cle...

Page 12: ... g DIMM_A2 DIMM_B2 Within a channel DIMM sockets with a lower number must be populated before sockets with a higher number Supported Memory Modules 1 5 V DDR3 DIMMs registered RDIMMs or unbuffered UDIMMs Mixing of RDIMMs and UDIMMs is not permitted The following DIMM and DRAM technologies are supported RDIMMs Single dual and quad rank x8 DRAM with 2 Gbit technology DDR3 1333 only single and dual r...

Page 13: ...nstalling the Bezel Assembly To remove the bezel assembly follow these instructions 1 Unlock the two plastic tabs on top of the bezel assembly by pressing lightly see Figure 6 point A 2 Rotate the bezel assembly no more than 40 degrees forward and pull it diagonally upwards To install the bezel assembly follow these instructions 1 Place the bezel assembly with bezel hooks on the metal ridge on the...

Page 14: ...each to the both left and right sides of the drive The green handles should face outwards 4 Remove the blank cover from the relevant 5 25 inch bay chassis and bezel 5 Finish inserting the drive into the bay until the drive rails lock into place 6 Connect the drive to the power supply and data cable according to the manufacturer s instructions 7 Replace the chassis cover and reconnect the bezel ass...

Page 15: ...ive carrier using the four screws that were formerly attached to the plastic retention device Ensure that the connector end of the hard drive is facing the back of the drive carrier The label side of the hard drive should be facing up in the drive carrier Figure 9 Securing Hard Drive to Drive Cage 5 With the black lever open insert the drive carrier into the drive cage Once inserted rotate the bla...

Page 16: ...e following 1 Touch the metal chassis before touching the processor or server board Keep part of your body in contact with the metal chassis to dissipate the static charge while handling the processor 2 Avoid moving around unnecessarily Installing a Processor 1 Observe the safety and ESD precautions above and at the beginning of this book 2 Turn off all peripheral devices connected to the server T...

Page 17: ...se Figure 13 Removing Protective Covering from the Load Plate 10 Take the processor out of the box and remove the protective shipping covering 11 Align the processor with the socket in such a way that both notches match up with the processor socket pins Gently insert the processor into the socket Figure 14 Inserting the Processor REMOVE AF003187 Grosse Point Server Board AF003187 ai 11 May 2009 He...

Page 18: ...e see letter A close the socket lever and ensure the load plate tab engages under the socket lever when fully closed see letter B and C Figure 15 Closing Load Plate and Socket Lever 13 Attach the heat sink see next page AF003191 Grosse Point Server Board AF003191 ai 11 May 2009 Heideman Assoc A B D C ...

Page 19: ...four captive screws with the four posts surrounding the processor 2 Loosely screw in the captive screws on the heat sink corners in a diagonal manner Do no fully tighten one screw before tightening another 3 Gradually and equally tighten each captive screw until each is firmly tightened Figure 16 Installing the Heat Sink 4 Reinstall and reconnect any parts you removed or disconnected to reach the ...

Page 20: ...y processor socket and reinstall the chassis cover Installing a PCI Card Peripherals and add in cards are not included in your system and must be purchased separately The PCI slots support full height add in cards or low profile PCI add in cards If a low profile card is installed in the standard full height riser card it must be equipped with a standard full height PCI mounting bracket 1 Observe t...

Page 21: ... server s cover 5 Locate the DIMM sockets see figure 3 Figure 17 Installing DIMMs 6 Make sure the clips at either end of the DIMM socket s are pushed outward to the open position 7 Holding the DIMM by the edges remove it from its anti static package 8 Position the DIMM above the socket Align the small notch in the bottom edge of the DIMM with the keys in the socket see inset in Figure 17 9 Insert ...

Page 22: ...stellers AVERTISSEMENT Danger d explosion en cas de remplacement incorrect de la pile Remplacez la uniquement par une pile du même type ou d un type équivalent recommandé par le fabricant Mettez au rebut les piles usagées en vous conformant aux instructions du fabricant OSTRZEŻENIE Nieprawidłowa wymiana baterii grozi eksplozją Wymieniać tylko na taki sam lub równoważny typ zalecany przez producent...

Page 23: ... server s cover and locate the battery 5 Lift the battery retention mechanism see Figure 18 6 Remove the battery from its socket Figure 18 Removing the Battery 7 Dispose of the battery according to local ordinance 8 Remove the new lithium battery from its package and being careful to observe the correct polarity insert it in the battery socket 9 Close the chassis 10 Run Setup to restore the config...

Page 24: ......

Page 25: ...d condition when CMOS NVRAM has been corrupted you will see other prompts but not the F2 prompt Warning CMOS checksum invalid Warning CMOS time and date not set In this condition the BIOS will load default values for CMOS and attempt to boot IfYou Cannot Access Setup If you are not able to access BIOS Setup you might need to clear the CMOS memory For instructions on clearing the CMOS see Clearing ...

Page 26: ...bmenus when the selected feature is a sub menu or to display a pick list if a selected feature has a value field or to select a sub field for multi valued features like time and date If a pick list is displayed the Enter key will undo the pick list and allow another selection in the parent menu Esc Exit The ESC key provides a mechanism for backing out of any field This key will undo the pressing o...

Page 27: ...he configuration RAM 1 Power down the system and disconnect the AC power 2 Open the server 3 Move the jumper from the normal operation position at pins 1 and 2 to the CMOS Clear position covering pins 2 and 3 4 Wait 5 to 10 seconds 5 Return the CMOS Clear jumper to the Normal location covering pins 1 and 2 6 Close the server chassis 7 Reconnect the AC power and power up the system ...

Page 28: ...alphanumeric ASCII characters 3 Use the arrow keys to select the RAID level 0 1 5 10 press enter 4 Select the drives to be used in the RAID array only if there are more than two drives available press enter 5 Select the stripe size only for RAID 0 5 and press enter 6 Enter the size of the volume If you select less than the maximum volume size you can create a second RAID array on the remaining por...

Page 29: ...iver either Intel R ICH9R SATA RAID Controller for Intel Matrix Storage Technology RAID set or Intel Embedded Server RAID Technology for LSI technology RAID set 3 Finish the Microsoft Windows installation and install all necessary drivers 4 Install the monitoring software included with your motherboard or after downloading it from the Internet LSI MegaRAID Storage Manager or Intel Matrix Storage M...

Page 30: ......

Page 31: ...nated with a letter that is used in the installation guide The middle rail B is slid inside the external rail A and the internal rail C in turn is inside the middle rail B End Bracket Round head screw large Round head screw small Nut Perforated Plate with threaded holes NOTE Countersunk screws are not required Tip Customers with a MAXDATA rack can simplify installation of the server by taking the ...

Page 32: ...the distance between the front and rear breadboard section of your cabinet At tach the silver end brackets D to the external rail A with two screws E and two nuts G each Be careful to make sure that the distance between the fastening bracket for the external rail A and the end bracket D is the same as the distance between both bread board sections of your server cabinet ...

Page 33: ...n Finish by inserting the screws E from the front through the breadboard and the fastening bracket to the perforated plates H 5 Attach the internal rails C with the locking device in the rear of the server housing with the small screws F 6 When finished you can slide the server into the server cabinet by pushing the inner rail C into the middle rail B To be able to slide the server completely insi...

Page 34: ...34 ...

Page 35: ... W Power Supply Output Rating Voltage Maximum Current 3 3 V 20 A 5 V 20 A 5 V Standby 2 5 A 12 V 2 power supply rails 24 A 16 A for one power supply rail 12 V 0 5 A 350 W Redundant Power Supply Input Voltages 100 240 V at 50 60 Hz 3 6 A max 350 W Redundant Power Supply Output Voltages The table below lists the total wattage available for supplying power from the power subsystem for each voltage Ta...

Page 36: ...36 ...

Page 37: ...d to comply with the following electromagnetic compatibility EMC regulations EN 55022 Class A Radiated Conducted Emissions European Union EN 55024 Immunity European Union CE EMC Directive 89 336 EEC European Union Product Regulatory Compliance Markings This product is marked with the following Product Certification Markings Table 7 Product Certification Markings CE Mark Electromagnetic Compatibili...

Reviews: