background image

17

5. ASSEMBLY INSTRUCTION

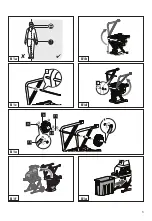
5.1 Wear full eye and ear protection, substantial 
footwear, and long trousers at all times while 
operating the product. Do not operate the 
product when barefoot or wearing open
sandals. (B1a)
5.2 Swing one leg up. Note: Make sure that the 
product is secured so that it does not tip over. 
(B1b)
5.3  Insert the wheel shaft. (B1c)
5.4  Swing the other leg up. Make sure that the 
wheel shaft goes through the hole in the leg. (B1d)
5.5
a) Insert the flat washer onto the wheel shaft. (B1e)
b) Insert the shaft sleeve onto the wheel shaft. 
c) Insert the wheel onto the shaft sleeve. 
d) Insert the lock nut onto the wheel shaft. 
e) Tighten the nut using the wheel wrench. 
f) Do the same as the other side.
5.6 Turn the product on its legs. (B1f)
5.7 Insert the collection bin. (B1g)
5.8 Pull up the safety switch. Note: The product 
only functions only if the safety switch is 
engaged. (B1h)
5.9 Connect the product to a power outlet. (B1i)


ATTENTION : Take care when tiling the  

 unit onto its wheels as the unit has an 

uneven weight distribution when tilted and 

during wheeled transportation.

6. OPERATION

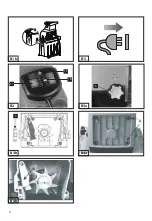
TO START AND / OR STOP (B2)

1. Press the Forward/Reverse switch (17) 
to


position.

2. Press the On/Off switch (18) to ON (I) postion to 
start the motor.
3. Press the On/Off switch (18) to OFF (O) postion 
to stop the motor. 


CAUTION

Damage to the machine due to improper 
operation.

Incorrect handling can result in machine damage.
Only feed materials to be shredded after the 
machine was switched on. Do not feed materials 
to be shredded after the machine was switched 
off.

NOTE :

The machine is equipped with a safety switch to 
prevent it from being switch on again accidentally 
after a power failure.

OVERLOAD PROTECTION (B2)

This machine isequipped with an overload 
protection system. To protect the motor 
from being damaged, the safety switch will 
automatically switch off the power. When the 
motor is overloaded.
Wait at least 1 minute before restarting by first 
pressing the reset button and then the On/
Off switch. If the motor does not restart, do the 
following :
1. Press the safety switch(19).
2. Press the Forward/Reverse Button (17) to 
REVERSE  


position.

 ATTENTION :

Always wear safety gloves when executing the 

steps mentioned above.

INSTRUCTION FOR USE

1. Place the material to be shredded in the 
opening on the right side. It will the be 
automatically drawn into the machine be the 
cutter as it turns anticlockwise.
2. Do not stuff the opening completely full to 
avoid jamming the machine.
3.Alternate feeding branches and small litter that 
is a bit wet and decomposed. This will also help to 
avoid jamming the cutter.
4.Squashy kitchen rubbish must be composted, 
never put it through the shredder !
5.Branches with leaves must always be entirely 
through the shredder and out of the way before 
feeding new material into the machine. Make sure 
the shredded material is able to fall unobstructed 

Summary of Contents for 320.300.150

Page 1: ...1 Originalbetriebsanleitung LEISEH CKSLER Translation of the original instructions SILENT SHREDDER DE UK Vertaling van de oorspronkelijke gebruiksaanwijzing FLUISTERHAKSELAAR NL Traduction de la notic...

Page 2: ...2 1 2 5 6 4 7 8 3 12 9 10 18 19 17 11...

Page 3: ...3 B1a B1c B1f B1e B1b B1d B1g a b c d e 13 15 16 8 14...

Page 4: ...4 B1h B2 B3a B4a B1i B3b B4b 5 5 18 19 17...

Page 5: ...nen Boden 6 Benutzen Sie das Ger t nicht auf einem Asphalt oder Schotterboden wo ausgeworfenes Material Verletzungen verursachen k nnte 7 berpr fen Sie vor dem Starten des Ger ts ob alle Schrauben Mut...

Page 6: ...und vorsichtig Benutzen Sie kein Elektrowerkzeug wenn Sie m de sind oder unter dem Einfluss von Drogen Alkohol oder Medikamenten stehen Ein Moment der Unachtsamkeit beim Gebrauch des Elektrowerkzeugs...

Page 7: ...Arbeitsbedingungen und die zu erledigenden Aufgaben Der Gebrauch von Elektrowerkzeugen f r andere als die vorgesehenen Aufgaben kann zu gef hrlichen Situationen f hren 1 3 Wartung Lassen Sie Ihre Ele...

Page 8: ...tehen Sie beim Bef llen des Gartenh ckslers niemals h her als der Boden des Ger ts 3 Halten Sie sich beim Bedienen des Ger ts immer vom Auswurfbereich fern 4 Seien Sie beim Bef llen des Ger ts besonde...

Page 9: ...f der anderen Seite 5 6 Stellen Sie das Ger t auf seine Beine B1f 5 7 Setzen Sie den Sammelbeh lter ein B1g 5 8 Ziehen Sie den Sicherheitsschalter nach oben Hinweis Das Ger t funktioniert nur wenn der...

Page 10: ...UNGSARBEITEN UND WARTUNG Stellen Sie vor dem Durchf hren von Reinigungs und Wartungsarbeiten sicher dass der Gartenh cksler ausgeschaltet ist und sein Netzstecker gezogen wurde Tragen Sie beim Reinige...

Page 11: ...Sie kein Material auf den Oberfl chen des Gartenh ckslers trocken und hart werden Dies hat einen unmittelbaren und negativen Einfluss auf die Leistung des Gartenh ckslers 3 Stellen Sie sicher dass der...

Page 12: ...h cksler aus OFF Ziehen Sie das Material aus dem Einzugstrichter heraus Schalten Sie den Gartenh cksler wieder ein ON und geben Sie dickere Zweige erneut so ein dass das Schneidwerk nicht sofort wiede...

Page 13: ...s Maintenance and storage 1 When the machine is stopped for servicing inspection or storage or to change an accessory shut off the power source disconnect the unit from the power supply make sure that...

Page 14: ...dy positions Ensure that you are standing firmly and keep your balance at all times This will enable you to control the electrical tool better in the event of unexpected situations Wear suitable cloth...

Page 15: ...ent work etc Always allow the machine to cool down before storing Never transport the unit with the engine running Protect the device from becoming damaged during transportation 2 PREPARATION 1 Before...

Page 16: ...15 Lock nut 16 Wheel wrench 17 Forward reverse switch 18 On off switch 19 Safety switch Whenever the machine is in use safety goggles must be worn to safeguard againet flying object As must ear protec...

Page 17: ...to improper operation Incorrect handling can result in machine damage Only feed materials to be shredded after the machine was switched on Do not feed materials to be shredded after the machine was sw...

Page 18: ...d by the shredded material 7 Continuous shredding of thick wood or branches can cause the machine to jam 8 Soft material like leaves or sprigs can easily block the inlet use a push stick to poke it in...

Page 19: ...aterial is jammed in the feeding funnel Switch the shredder OFF Pull the material from the feed funnel Switch the shredder back ON and re feed thick branches such that the blade dose not immediately e...

Page 20: ...ez que toutes les vis crous boulons et autres fixations sont correctement fix s et que les protections et les crans sont en place Remplacez les tiquettes endommag es ou illisibles Entretien et rangeme...

Page 21: ...l outil lectrique permettra de r duire les risques de blessures corporelles vitez de d marrer l outil accidentellement Veillez ce que l outil lectrique soit hors tension avant de le brancher sur le s...

Page 22: ...vous assurer qu elles sont bien serr es Les transformations les modifications ind pendantes et l utilisation de pi ces non homologu es ne sont pas autoris es Utilisez uniquement des pi ces de rechang...

Page 23: ...t ger des projections Il convient galement d utiliser des protections auditives telles qu un casque insonoris Afin de prot ger l ou e de l op rateur Si l op rateur travaille dans une zone o il existe...

Page 24: ...s rez le manchon d arbre sur l essieu des roues c Ins rez la roue sur le manchon d arbre d Ins rez l crou de blocage dans l essieu des roues e Serrez l crou l aide de la cl molette f Faites la m me ch...

Page 25: ...peuvent facilement obstruer l entr e utilisez le b ton poussoir pour la d gager 9 V rifiez toujours la pr sence de clous et de pierres dans les d bris avant le broyage car ils peuvent s rieusement en...

Page 26: ...imentation Remettez le broyeur en marche et r introduisez des branches paisses de mani re ce que la lame ne r engage pas imm diatement les entailles pr c dentes Les mat riaux broyer sont trop mous Ins...

Page 27: ...der bevestigingsmateriaal goed vast zitten en of de beschermingen en dekplaten op hun plaats zitten Vervang beschadigde of onleesbare etiketten Onderhoud en opslag 1 Wanneer u de machine stopzet voor...

Page 28: ...mende helm of oorbeschermers afhankelijk van het type en gebruik van het elektrisch gereedschap vermindert het risico op letsel Voorkom het onbedoeld starten van het apparaat Zorg ervoor dat het elekt...

Page 29: ...ontroleer alle schroeven regelmatig om er zeker van te zijn dat ze goed vastzitten Ombouwen eigenmachtige ingrepen en het gebruik van niet goedgekeurde onderdelen zijn niet toegestaan Gebruik alleen o...

Page 30: ...helm Ter bescherming van uw gehoor Als u in een zone werkt waar het risico op vallende voorwerpen bestaat moet u ook een veiligheidshelm dragen Draag handschoenen om uw handen te beschermen Houd omsta...

Page 31: ...eiligheidsschakelaar omhoog Opmerking dit product werkt alleen als de veiligheidsschakelaar is ingeschakeld B1h 5 9 Sluit het product op een stopcontact aan B1i LET OP wees voorzichtig wanneer u het a...

Page 32: ...inhakselaar is uitgeschakeld en losgekoppeld van de netvoeding Draag altijd stevige leren handschoenen bij het schoonmaken van de messen Om optimale prestaties van de tuinhakselaar te waarborgen moet...

Page 33: ...einiger of stromend water Gebruik een borstel om vuil en plantenresten die in het spiraalvormige snijwerk verstrikt zijn geraakt te verwijderen Veeg de buitenkant van de tuinhakselaar schoon met een d...

Page 34: ...0 14 EC 2011 65 EU 2002 95 EC 2006 42 EG 93 68 EEC 2014 30 EU Matrix GmbH Postauer Str 26 D 84109 W rth Isar Germany Fax 49 0 8702 45338 98 E Mail info matrix direct net Tino Switon Gesch ftsf hrer DE...

Page 35: ...Zubeh rbedarf wenden Sie sich bitte an die hier aufgef hrte Kundendienstzentrale nderungen vorbehalten Matrix GmbH Service Postauer Str 26 D 84109 W rth Isar Tel 49 0 1806 841090 Fax 49 0 8702 45338...

Page 36: ...TIE NL Dit apparaat is een kwaliteitsproduct Het is ontworpen conform de actuele technische kennis en zorgvuldig vervaardigd uit voor het doel geschikt materialen De garantieperiode bedraagt 24 maande...

Page 37: ...chased at in city street Name of customer Street address Postal code city Telephone Date signature Fault description FR GARANTIE Achet chez ville rue Nom de l acheteur Rue N CP ville T l phone Date si...

Reviews: