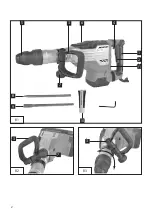
Matrix 120.700.110 Original Instructions Manual Download Page 16

16

4. 

Layout 

(B1)

1. Handle

2. ON/OFF switch

3. Additional handle

4. Lock button

5. Tool chuck

6. Inspection window / Oil filler opening

7. Locking knob

8. Spit chisel

9. Flat chisel

10. Grease

11. Speed selector

5. Proper use

This machine is designed for heavy duty 

demolition and chiseling work using the 

appropriate chisel.

The equipment is to be used only for its 

prescribed purpose. Any other use is deemed to 

be a case of misuse. The user / operator and not 

the manufacturer will be liable for any damage or 

injuries of any kind caused as a result of this.

Please note that our equipment has not been

designed for use in commercial, trade or 

industrial applications. Our warranty will be 

voided if the machine is used in commercial, 

trade or industrial businesses or for equivalent 

purposes.

6. Before starting the equipment

Before you connect the equipment to the mains

supply make sure that the data on the rating 

plate are identical to the mains data.

Always pull the power plug before making

adjustments to the equipment.

Check the drilling point for concealed electrical

cables, gas and water pipes using a cable/pipe

detector.

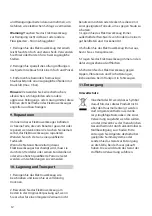
6.1 Additional handle (B2,B3)

For safety reasons you must only use the

demolition hammer with the additional 

handle.

The additional handle (3) enables you to achieve

better stability whilst using the demolition 

hammer.

For safety reasons the machine must not be used

without the additional handle (3).

The additional handle can be turned into any 

required position. To do so,Undo the locking 

knob of auxiliary handle (7). Then turn the handle 

into the most comfortable working position.

6.2 Inserting the tool (B4)

• Clean the tool before fitting it and apply a thin

coating of grease to the tool shaft.

• Press the Tool chuck (5) as far as possible.

• Insert the tool into the groove and push it in as 

far as possible.

• Check the lock by pulling the tool.

6.3 Removing the tool

Press the Tool chuck (5) again, direct pull out the 

tool and release it.

7. Starting up

Important.

To avoid danger, the machine must only be 

held using the two handles. 

Otherwise you may 

suffer an electric shock if you chisel into cables.

7.1 Switching on and off (B6)

To switch on:

Summary of Contents for 120.700.110

Page 1: ...Translation of the original instructions DEMOLITION HAMMER Originalbetriebsanleitung ABBRUCHHAMMER DE UK ABBRUCHHAMMER EDH 1700 2 Art No 120 700 110...

Page 2: ...2 B1 B2 B3 5 2 7 3 11 8 9 10 7 1 6 3 4 3...

Page 3: ...3 2 3 H C H B6 4 5 B4 B5 11...

Page 4: ...sen verringern das Risiko eines elektrischen Schlages b Vermeiden Sie K rperkontakt mit geerdeten Oberfl chen wie von Rohren Heizungen Herden und K hlschr nken Es besteht ein erh htes Risiko durch ele...

Page 5: ...dass diese angeschlossen sind und richtig verwendet werden Verwendung einer Staubabsaugung kann Gef hrdungen durch Staub verringern 1 4 Verwendung und Behandlung des Elektrowerkzeuges a berlasten Sie...

Page 6: ...ng mit der Bauweise und Ausf hrung dieses Elektrowerkzeugs auftreten 1 Gesundheitssch den die aus Hand Arm Schwingungen resultieren falls das Elektrowerkzeug ber einen l ngeren Zeitraum benutzt nicht...

Page 7: ...usatzhandgriff 4 Sperrknopf 5 Werkzeugaufnahme 6 Schauglas leinf ll ffnung 7 Arretierung des Zusatzhandgri es 8 Spitzmei el 9 Flachmei el 10 Schmiermittel in Fl schchen 11 Geschwindigkeitsauswahl Ausp...

Page 8: ...m glich heraus Werkzeug in den Rille einf hren und bis zum Anschlag schieben Verriegelung durch Ziehen am Werkzeug pr fen 5 3 Werkzeug entnehmen Dr cken Sie erneut auf das Werkzeugaufnahme 5 ziehen Si...

Page 9: ...jedem Gebrauch auf Sch den Benutzen Sie das Elektrowerkzeug nicht wenn Sie Besch digungen oder Verschlei erscheinungen feststellen 2 Vergewissern Sie sich vor dem Einschalten dass sich keine Montage u...

Page 10: ...darunter liegende Bauteile zu gro wird berlasten Sie Decken und tragende Bauteile nicht mit Schuttmassen Abriss Wanddurchbr che Warnung Abbrucharbeiten insbesondere das Einrei en von W nden m ssen im...

Page 11: ...n zur ckzuf hren die vom Benutzer selbst behoben werden k nnen berpr fen Sie das Elektrowerkzeug deshalb vor dem Kontaktieren einer Fachkraft anhand der untenstehenden Hinweise In den meisten F llen l...

Page 12: ...ng Tauchen Sie das Elektrowerkzeug zur Reinigung nicht in Wasser oder andere Fl ssigkeiten Stromschlaggefahr 1 Reinigen Sie das Elektrowerkzeug mit einem leicht feuchten Tuch und etwas Seife Verwenden...

Page 13: ...ers and refrigerators There is an increased risk of getting an electric shock if you are electrically grounded Keep the tool away from rain and moisture wet conditions Penetration of water into an ele...

Page 14: ...f is dangerous and must be repaired Pull the plug out of the socket and or remove the battery before making any adjustments to the tool changing accessories or put the tool down This precaution elimin...

Page 15: ...level LwA 105 dB A 105dB when you are carrying out work during which the deployed tool may come into contact with concealed power cables or its own power cable Contact with a live wire may make expos...

Page 16: ...e making adjustments to the equipment Check the drilling point for concealed electrical cables gas and water pipes using a cable pipe detector 6 1 Additional handle B2 B3 For safety reasons you must o...

Page 17: ...m Impact force 40J Protection class II Weight 11 kg Chiseling Vibration emission value ah max 20 989 m s2 K uncertainty 1 5 m s2 Sound pressure level LpA 81 52 dB A Uncertainty KpA 1 15 dB Guaranteed...

Page 18: ...owing data when ordering replacement parts Type of machine Article number of the machine 11 Disposal and recycling The unit is supplied in packaging to prevent its being damaged in transit This packag...

Page 19: ...ECNOLOGICI Sede Legale e Uffici Via Donatori di sangue 9 46024 Moglia MN W rth Isar den 24 07 2018 Art Nr 120 700 110 2006 42 EC 87 404 EEC R TTED 1999 5 EC 2000 14 EC_2005 88 EC 2011 65 EU 2006 95 EC...

Page 20: ...ubeh rbedarf wenden Sie sich bitte an die hier aufgef hrte Kundendienstzentrale nderungen vorbehalten WARRANTY UK This appliance is a quality product It was designed in compliance with current technic...

Page 21: ...urchased at in city street Name of customer Street address Postal code city Telephone Date signature Fault description DE GARANTIE gekauft bei in Ort Stra e Name d K ufers Stra e Haus Nr PLZ Ort Telef...

Reviews: