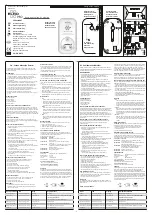
background image

7

ASSEMBLY

STEP 3

Secure control panel (6) to smoker 
body (1) with phillips screws (A).

Note:  Do not over tighten.

STEP 4

Attach rear handle (7) to back of 
smoker body (1) using phillips 
screws (A) as shown.

NOTE: 

Do not lift unit by rear handle.

6

A

A

A

1

7

12

HOW TO USE CONTROL PANEL & REMOTE CONTROL

Note

:  Direct sunlight may interfere with ability to read LED display, block light if needed.

To set temperature:

•Press ON button.
•Press SET TEMP button once-LED display will blink.
•Use +/- to set temperature.
•Press SET TEMP button again to lock in temperature.
Note:  Heating will not begin until timer is set.

To set timer:

•Press SET TIME button once-LED display for hours will blink.
•Use +/- to set hours.
•Press SET TIME button again to lock in hours.  The minutes LED will start blinking.
•Use +/- to set minutes.
•Press SET TIME to lock in minutes and start cook cycle.

Heat will turn off when time has expired.

To use meat probe:

• Insert meat probe into center of meat to get most accurate reading. 
• Press and hold MEAT PROBE button-LED display will show internal temperature of meat. 
• Once MEAT PROBE  button is released-LED display will return to set temperature or set time.

To use light:

• Press LIGHT button to turn light on.
• Press LIGHT button to turn light off.

To RESET control panel:

If control panel shows an error message, turn electric smoker off, unplug unit from outlet, wait
ten seconds, plug unit back into outlet, then turn electric smoker on.  This will reset control panel. 

Summary of Contents for 20071011

Page 1: ...ide homes vehicles tents garages or any enclosed areas Use only outdoors where it is well ventilated This manual contains important information necessary for the proper and safe use of this unit Read and follow all warnings and instructions before using smoker and during use Keep this manual for future reference Some parts may have sharp edges handle with care Failure to follow these warnings and ...

Page 2: ...oes not cover rust of the unit Masterbuilt requires reasonable proof of purchase for warranty claims and suggests that you keep your receipt Upon the expiration of such warranty all such liability shall terminate Within the stated warranty period Masterbuilt at its discretion shall repair or replace defective components free of charge with owner being responsible for shipping Should Masterbuilt re...

Page 3: ...ing food from electric smoker All surfaces are HOT and may cause burns Use protective gloves or long sturdy cooking tools Do not cover cooking racks with metal foil This will trap heat and cause severe damage to electric smoker Drip tray is only for the bottom of electric smoker Do not put drip tray on cooking racks this may damage electric smoker Wood tray is HOT when electric smoker is in use Us...

Page 4: ...NIA TO CAUSE BIRTH DEFECTS OTHER REPRODUCTIVE HARM OR CANCER THE MATERIALS USED IN THIS PRODUCT MAY CONTAIN LEAD A CHEMICAL KNOWN TO THE STATE OF CALIFORNIA TO CAUSE BIRTH DEFECTS AND OTHER REPRODUCTIVE HARM WARNING 16 WOOD SMOKING GUIDE FOR MEATS WOOD FLAVOR POULTRY FISH HAM BEEF PORK LAMB Hickory Pungent smoky bacon like flavor Mesquite Sweet and delicate flavor Alder Delicate wood smoke flavor ...

Page 5: ...e of cold ashes by placing them in aluminum foil soaking with water and discarding in a non combustible container For the interior glass in door light cover meat probe and exterior of smoker simply wipe down with a damp cloth Do not use a cleaning agent Make sure to dry thoroughly Door seal and inside seam that seal attaches to MUST be cleaned with a damp cloth after each use to keep seal in prope...

Page 6: ...t isn t heating Controller does not adjust heat Interior light does not come on Meat probe temperature does not show on display Remote will not control smoker CAUSE Not plugged into wall House fuse tripped Wire connector on controller not properly connected to smoker Controller malfunctioning Unit plugged into an extension cord Door not closed properly Controller malfunctioning Door alignment Dama...

Page 7: ...ds of each other A short beep will occur after each button press HOW TO USE CONTROL PANEL REMOTE CONTROL CAUTION Keep batteries away from small children If battery is swallowed consult a physician immediately Be sure to insert batteries correctly Improper installation may result in leaks and or possible explosion Do not dispose of batteries in fire Do not mix old and new batteries Do not mix alkal...

Page 8: ...on once LED display for hours will blink Use to set hours Press SET TIME button again to lock in hours The minutes LED will start blinking Use to set minutes Press SET TIME to lock in minutes and start cook cycle Heat will turn off when time has expired To use meat probe Insert meat probe into center of meat to get most accurate reading Press and hold MEAT PROBE button LED display will show intern...

Page 9: ...Add more chips as needed Wood chip loader must be pulled out completely from smoker when checking wood chip level ADDING MORE WOOD DURING SMOKING PROCESS Caution Keep smoker door closed when adding wood chips Note Wood chip loader will be HOT even if handle is not To add wood turn handle to Load position on smoker Pull wood chip loader from smoker Place wood chips in wood chip loader and re insert...

Page 10: ... inside smoker below heating element as shown Make sure drip pan hole aligns with hole in bottom of smoker 10 12 10 ASSEMBLY STEP 9 Slide brackets on back of grease tray 15 onto tabs on back of smoker body 1 until grease tray stops Note Wheels will not operate while grease tray is in place Remove grease tray to push pull smoker STEP 10 Insert wood chip loader 11 into side of smoker as shown 1 15 1...

Reviews: