52
EN
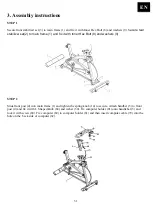
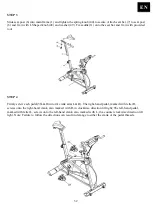
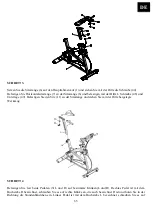
STEP 3
Slide seat post (6) into main frame (1) and tighten the spring knob (44) to secure. Attach seat bar (7) to seat post
(6) and fix it with L Shaped knob (48) and washer (49). Fix saddle(11) onto the seat bar and fix it with provided
tool.
STEP 4
Firmly screw each pedal(31L&R) into it's crank arm(L & R). The right-hand pedal, marked with letter R,
screws onto the right-hand crank, also marked with R, in clockwise direction till tight; The left-hand pedal,
marked with letter L, screws onto the left-hand crank, also marked with L, in a counter clockwise direction till
tight. Note: Failure to follow the directions can result in damage to either the crank or the pedal threads.
Summary of Contents for X-17
Page 1: ...1 CZ CYKLOTRENAŽÉR MASTER X 17 UŽIVATELSKÝ MANUÁL ...
Page 14: ...14 CZ 7 Celkový nákres ...
Page 17: ...17 SK CYKLOTRENAŽÉR MASTER X 17 UŽIVATEĽSKÝ MANUÁL ...
Page 30: ...30 SK 7 Celkový nákres ...
Page 33: ...33 PL Rower spiningowy MASTER X 17 INSTRUKCJA OBSŁUGI ...
Page 45: ...45 PL 7 Kompletny układ ...
Page 48: ...48 EN SPIN BIKE MASTER X 17 OWNER S MANUAL ...
Page 60: ...60 DE RADSIMULATOR MASTER X 17 BENUTZERMANUAL ...
Page 72: ...72 DE 6 Entwurf ...


