Page 14
Page 13
OPERATION
1. Check the direction-of-rotation selector
for the correct setting (forward or
reverse).
2. Use a vise or clamps to secure the
material to be drilled to keep it from
turning as the drill bit rotates.
3. Hold the cordless drill/driver firmly, and
place the bit at the point to be drilled.
4. Depress the trigger switch to start the
cordless drill.
5. Move the drill bit into the workpiece,
applying only enough pressure to keep
the bit cutting.
6. Do not force the cordless drill/driver or
apply sideways pressure to elongate a
hole. Allow the tool to do the work.
7. When drilling hard, smooth surfaces,
use a center punch to mark the desired
location of the hole. This will prevent the
drill bit from slipping off-center when
the hole is started.
8. When drilling metal, use light oil on the
drill bit to prevent it from overheating.
The oil will prolong the life of the bit and
will increase the drilling efficiency.
9. If the bit jams in the workpiece or if
the drill/driver stalls, stop the tool
immediately. Reverse the direction of
rotation and gently squeeze the trigger
to remove the bit from the workpiece.
Investigate and correct the cause of
jamming before resuming work.
WARNING:
Be prepared for binding
when the bit breaks through the workpiece,
because the drill/driver has a tendency
to grab and kick opposite to the direction
of rotation, which could cause a loss of
control. If the operator is not prepared, this
loss of control could result in serious injury.
REMOVING A bIT (FIG. 11b)
1. Lock the trigger switch by placing the
direction-of rotation selector in the OFF
(center) position.
2. Open the jaws of the chuck (rotate in the
“OPEN” direction.)
3. Remove the drill bit.
GENERAL DRILLING (FIG. 12)
WARNING:
Always wear safety
goggles or safety glasses with side shields
during power tool operation or when
blowing dust. If the operation is dusty, also
wear a dust mask.
17 19 21 23
FIG.11b
17 19 21 23
FIG.12
OPERATION
DRILLING MODE OPERATION
For drilling in wood, use twist bits, spade
bits, power auger bits or hole saws.
1. When drilling “through” holes, place a
block of wood behind the workpiece to
prevent ragged or splintered edges on
the back side of the hole.
2. Select the desired speed to match the
planned operation.
3. Begin drilling at a very low speed to
prevent the bit from slipping off the
starting point, and then increase the
speed as the drill bit bites into the
material.
4. If the drill/driver stalls, it is usually
because it is being overloaded. Release
the trigger switch immediately, remove
the drill bit from the work, and determine
the cause of stalling.
5. Keep the motor running when pulling
the bit back out of the drilled hole. This
will prevent jamming.
For drilling in metal, use high-speed steel
twist drill bits.
1. Use light oil on the drill bit to keep it
from overheating; the oil will prolong the
life of the bit and increase the drilling
action.
2. When drilling a large hole, first use a
smaller bit to drill a small pilot hole to
prevent the larger bit from slipping.
3. Select the desired speed to match the
planned operation.
4. Begin drilling at a very low speed to
prevent the bit from slipping off the
starting point. Maintain a speed and
pressure that allows cutting without
overheating the bit.
5. If the drill/driver stalls, it is usually
because it is being overloaded. Release
the trigger switch immediately, remove
the drill bit from the work, and determine
the cause of stalling.
6. Keep the motor running when pulling
the bit back out of the drilled hole. This
will prevent jamming.
SCREWDRIVER OPERATION
1. Select the desired speed/torque range
to match the planned operation.
2. Attach the desired fastener accessory
into the chuck.
3. Make a few practice runs in a scrap
piece before working.
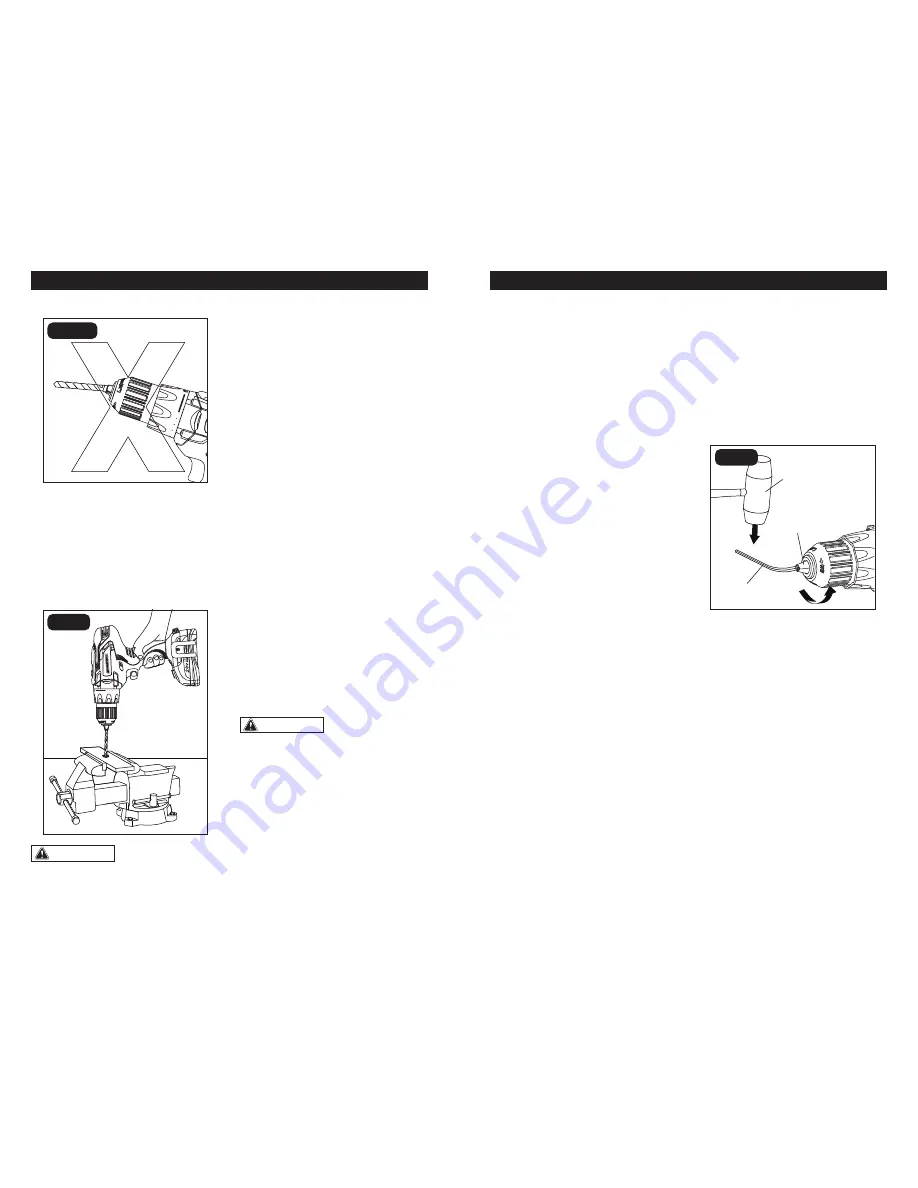
CHUCk REMOVAL (FIG. 13)
The chuck can be removed and replaced
with a new one.
1. Remove the battery.
2. Lock the trigger switch by placing the
direction-of-rotation selector in the
center position.
3. Open the chuck jaws. Using a
screwdriver, remove the chuck screw by
turning it clockwise,
4. Insert a 5/16-in. or larger hex key into
the chuck of the drill/driver and tighten
the chuck jaws securely.
5. Tap the hex key sharply with a mallet in
a counter-clockwise direction. This will
loosen the chuck for easy removal.
6. Attach a new chuck to the spindle and
tighten the chuck screw.
FIG.13
Hex wrench
Chuck jaws
Mallet


