background image

4

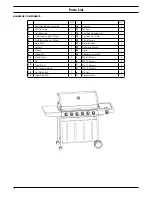
Parts List

QTY

QTY

1

BBQ Hood Body Assembly

1

16

Drip Tray

1

2

Left Front Leg

1

17

Fat Cup

1

3

Left Back Leg

1

18

Cast Iron Cooking Grill

1

4

Right Front Leg For Wheel

1

19

Cast Iron Hot Plate

1

5

Right Back Leg For Wheel

1

20

Flame Tamers

2

6

Base Shelf

1

21

Warming Rack

1

7

Castors

2

22

Rotisserie Bracket

1

8

Wheels

2

23

Hose

1

9

Wheel Axis

1

24

Regulator Assembly

1

10

Wheel Caps

2

a

M6-50 Screws  

8

11

Pin

1

b

M5-10 Screws

4

12

Front Panel

1

c

M4-10 Screws

6

13

Gas Cylinder Hook

1

d

M6-12 Screws

4

14

Left Side Shelf

1

e

M6 Nuts

4

15

Right Side Shelf

1

f

Fibre Washers

2

BARBECUE COMPONENTS

Summary of Contents for VACATIONER 6 S2

Page 1: ...RT VACATIONER 6 S2 OWNER S MANUAL Please read these instructions carefully before assembly to reduce risk of fire burn hazard or other injury Keep these instructions in a safe place for future use This manual covers the Masport Vacationer 6 S2 Barbecue ...

Page 2: ...l dealer for clarification before you use your barbecue The unit must be correctly assembled before use Failure to follow the manual s instructions could result in serious damage or injury Personal Safety The use of alcohol prescription or non prescription drugs may impair the consumer s ability to properly assemble or safely operate this barbecue The barbecue should be carefully checked for opera...

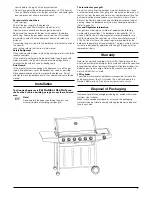
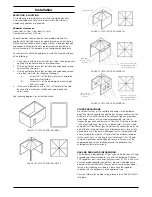
Page 3: ...ill The location for your grill Do not use your gas grill in garages porches breezeways sheds or other enclosed areas Your gas grill is to be used outdoor only at least 43cm from the back and side to any combustible surface The grill should not be placed under any surface that will burn Do not obstruct the flow of combustion and ventilation air around the grill housing Keep this barbecue away from...

Page 4: ... Right Back Leg For Wheel 1 20 Flame Tamers 2 6 Base Shelf 1 21 Warming Rack 1 7 Castors 2 22 Rotisserie Bracket 1 8 Wheels 2 23 Hose 1 9 Wheel Axis 1 24 Regulator Assembly 1 10 Wheel Caps 2 a M6 50 Screws 8 11 Pin 1 b M5 10 Screws 4 12 Front Panel 1 c M4 10 Screws 6 13 Gas Cylinder Hook 1 d M6 12 Screws 4 14 Left Side Shelf 1 e M6 Nuts 4 15 Right Side Shelf 1 f Fibre Washers 2 BARBECUE COMPONENTS...

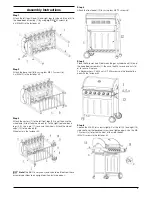
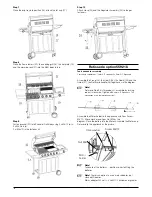
Page 5: ...he wheels 8 Wheel axle in the fastener kit Note The BBQ is very heavy and should be lifted from these assembly positions to an upright position by two persons Step 4 Attach the front panel 12 by using four M4 10 screws c Step 5 Place the fibre washers f between the gas cylinder hook 13 and the hood body assembly 1 then use the M6 screws and nuts d e to secure it in place 2 x fibre washers 2 x M6 n...

Page 6: ...25 the Rod B 26 and the Guide 27 the Rotisserie handle 28 together as in the diagram Note Rotisserie Rod 26 is threaded LH assemble by turning rod anti clockwise Tighten with 8mm A F Spanners This connection must remain spanner tight 25 24 26 27 28 Place inside of grill Assemble the Motor holder to the appliance with 2pcs Screw M6 10 2 fibre washer and 2pcs Nut M6 as the diagram Place the battery ...

Page 7: ...al wall area Both ends open 30 percent or more in total of the remaining wall area is open and unrestricted Open side at least 25 of total wall area FIGURE F5 OUTDOOR AREA EXAMPLE 5 FIGURE F4 OUTDOOR AREA EXAMPLE 4 FIGURE F3 OUTDOOR AREA EXAMPLE 3 OTHER PRECAUTIONS Do not obstruct any of the ventilation openings in the barbecue body Should you need to change the gas cylinder confirm that the cylin...

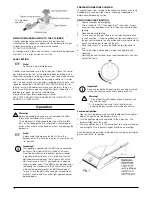
Page 8: ... all gas valves on the BBQ are closed in the OFF position prior to opening the gas cylinder valve If the BBQ valves are open prior to opening the cylinder valve the Excess Flow Control will be activated and prevent the BBQ from being lit To reset close the BBQ valves and gas cylinder valve wait for 1 minute and use correct lighting procedure as detailed below PREPARATION BEFORE COOKING To prevent ...

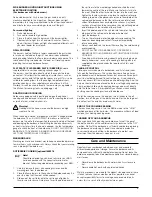
Page 9: ...and slide the meat towards the centre of the rod Make sure the fork is fully into the meat Slide the other fork onto the rod into the meat and tighten the thumb screw once in place For optimal rotisserie cooking food must be placed securely onto the middle of the spit rod and balanced so that the rotisserie can rotate freely without interference from any barbecue surfaces Any loose sections of mea...

Page 10: ...s of corrosion in time Stainless steel is definitely not a maintenance free material Cleanliness and Stainless Steel are closely related The cleaner stainless steel can be kept while in storage or during use the greater the assurance of optimum corrosion resistance In order to maintain the good looks and life of your BBQ follow these summary tips on the care of stainless steel When new or when cle...

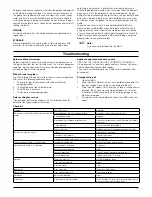
Page 11: ... Incorrect assembly between burner and valve Re assemble Yellow or orange flames with gas order Incomplete combustion Call our Customer Service centre Low heat with knob in Hi position Gas hose bent or kinked Straighten Burner or orifice blocked Clear Low gas pressure Check Cylinder Regulator refer to pg 12 Grill not preheated Preheat the grill for 15 minutes Flare up Excessive meat fat Cut off fa...

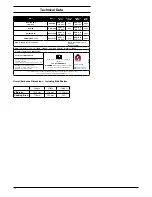
Page 12: ...ides 430mm From Rear 430mm Complies to EU Directive 2009 142 EC Distributed by MASPORT Ltd Read the instructions before using the appliance USE OUTDOOR ONLY WARNING Parts of this appliance may be very hot keep young children away Manufactured by 558772 1 37 Mt Wellington Highway Panmure Auckland 1060 NZ PO Box 14349 Panmure Auckland 1471 NZ MASPORT AUSTRALIA PTY LTD 1 40 Abbotts Road Dandenong Sou...

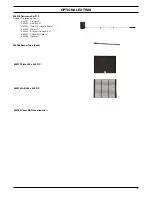
Page 13: ... items 556297 Prongs x2 559223 Rod 550 x1 559224 Rod 400 Handle End x1 559239 Motor x1 559260 Bracket Fasteners x1 559497 Alignment Collar x1 559769 Handle x1 559272 Plate 395 x 435 P C 559273 Grill 395 x 435 P C 559195 Cover BBQ Vacationer 6 S2 559266 Burner Tube Each ...

Page 14: ...Head Office New Zealand 1 37 Mt Wellington Highway Panmure Auckland 1060 P O Box 14 349 Panmure Auckland 1741 ...

Reviews: