5
Assembly Instructions
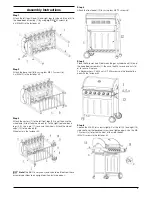
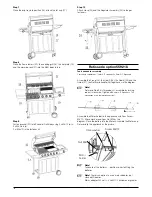
Step 1
Attach the left legs (2) and (3) and right legs for wheels (4) and (5) to
the hood body assembly (1) by using eight M6*50 screws (a).
8 x (M6x50) in the fastener kit.
Step 2
Attach the base shelf (6) by using four M5-10 screws (b).
4 x (M5x10) in the fastener kit.
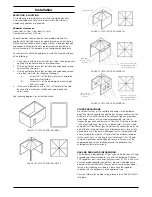
Step 3
Attach the castors (7) to the left front legs (2,3) and, then use the
wheel axle (9) to attach the wheels (8), to the right front and back
legs (4,5). Use a pin (11) to secure the wheels. Attach the wheel
caps (10) to the wheels (8).
Wheel axle in the fastener kit.
Note!
The BBQ is very heavy and should be lifted from these
assembly positions to an upright position by two persons.
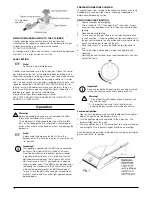
Step 4
Attach the front panel (12) by using four M4*10 screws(c).
Step 5
Place the fibre washers (f) between the gas cylinder hook (13) and
the hood body assembly (1), then use the M6 screws and nuts (d,
e) to secure it in place.
2 x fibre washers, 2 x M6 nuts & 2 M6 screws on the bracket in a
box with the fastener kit.
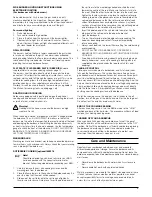
Step 6
Loosen the M6-50 (a) screws slightly. Put the left (14) and right (15)
side shelf over the loosened screws and tighten again. Use the M4-
10 screws (c) to fasten the front of the side shelves.
(M4x10) screws in the fastener kit.


