Maschinenfabrik Reinhausen TAPCON 230 expert Operating Instructions Manual Download Page 63

© Maschinenfabrik Reinhausen 2009

2226817/00 EN

 TAPCON

®

-trol

5 Functions and settings

63

A connection can be established if you have correctly undertaken the commu-
nication settings and if you know the device communication options:

2. Select the "Connect" button.

The connection to the device is established.

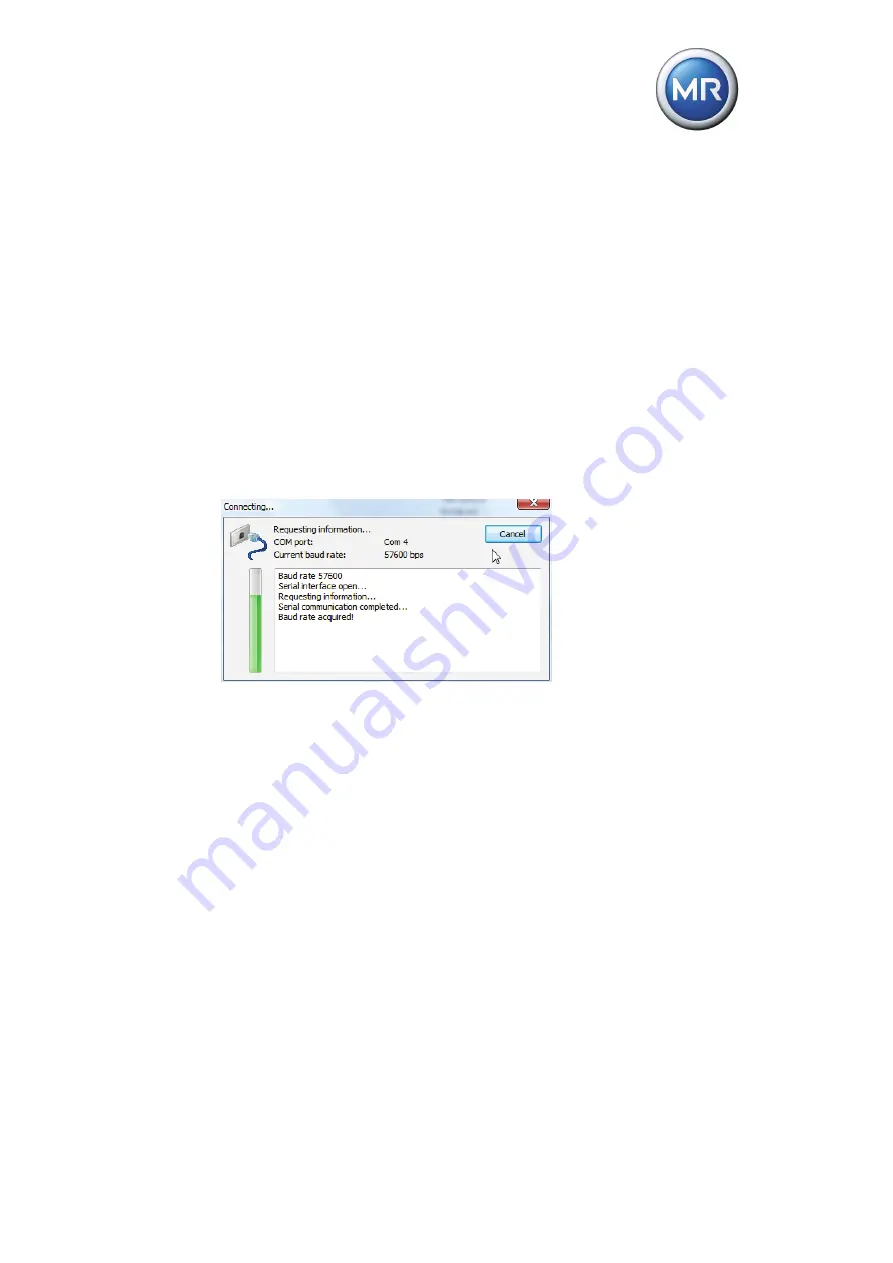
Once you have installed the software, the "Automatic baud rate selection" is 
activated for communication. COM1 has been preselected as the communica-
tion interface. You can however change the settings at any time.

Using the automatic speed query, starting at 115,200 bauds, the PC software 
tries to query all possible speeds down to 9600 bauds without you needing to 
know the baud rate set on the TAPCON

®

230. The baud rate currently set is 

saved within the software and used as a guideline for active "Automatic baud 
rate selection". This guideline is extended if the connection does not come 
about using the speed search described. The following window ("Connect...") 
opens:

Once the baud rate has been established, the visualization software automati-
cally initiates querying of the device data.

Figure 47

Window - connecting

Summary of Contents for TAPCON 230 expert

Page 1: ...TAPCON trol for TAPCON 230 Operating Instructions www reinhausen com...

Page 2: ...s All rights reserved in the event of the grant of a patent utility model or ornamental design registration The product may have been modified after this document went to press We expressly reserve th...

Page 3: ...2 1 6 1 Abbreviations used 13 1 6 2 Information concept 14 1 6 3 Typographic conventions 14 2 Installation 15 2 1 Typical installation 15 2 2 Custom installation 16 2 3 Selecting device 18 3 Product d...

Page 4: ...2 Opening device 54 5 2 3 Deleting device 59 5 2 4 Archiving device data 60 5 2 5 Connecting 62 5 2 6 Changing device data 65 5 2 7 Changing parameter information 66 5 3 Menu item Parameter set 67 5 3...

Page 5: ...re 8 Toolbar with action button 25 Figure 9 Selecting language 27 Figure 10 Dialog box communication options 29 Figure 11 Dialog box communication selection 30 Figure 12 Automatic baud rate selection...

Page 6: ...ete group 48 Figure 32 Dialog box information 49 Figure 33 Menu bar and toolbar create new device 51 Figure 34 Determining device data 51 Figure 35 Dialog box initialization General settings 52 Figure...

Page 7: ...ion tree cut parameter set 68 Figure 53 Menu bar and toolbar download parameters 70 Figure 54 Dialog box download parameters 71 Figure 55 Menu bar and toolbar upload parameters 72 Figure 56 Dialog box...

Page 8: ......

Page 9: ...usen 2009 2226817 00 EN TAPCON trol Index of tables 9 Index of tables Table 1 Abbreviations 13 Table 2 Typographic conventions 14 Table 3 Scope of delivery 21 Table 4 Init string basic settings 34 Tab...

Page 10: ......

Page 11: ...steinstrasse 8 93059 Regensburg Tel 49 9 41 40 90 0 Fax 49 9 41 40 90 7001 E mail sales reinhausen com Please contact this address or visit www reinhausen com if you require more information about the...

Page 12: ...scope of delivery Also note the generally valid statutory and other binding regulations in Euro pean and national legislation and the accident prevention and environmental protection requirements of...

Page 13: ...d Table 1 Abbreviations Abbreviation Meaning CD Compact Disc PC Personal Computer USB Universal Serial Bus TCP Transmission Control Protocol IP Internet Protocol a o and or CAN Controller Area Network...

Page 14: ...and improve understanding of particular operational procedures In this technical file they are laid out as follows 1 6 3 Typographic conventions In this technical file typographic conventions are lai...

Page 15: ...ypes of setup Typical Custom You can select the setup type which best meets your requirements Both are described below 2 1 Typical installation If you select the Typical setup type the software is ins...

Page 16: ...ntinue by going to Section 2 3 Selecting device on page 18 2 2 Custom installation If you select the Custom setup type you can select the program features which are installed Proceed as follows to per...

Page 17: ...sponding symbols to select the features needed 4 If necessary select the installation path under Change w hlen 5 Select Next button The visualization software is installed with all the selected featur...

Page 18: ...MR TAPCON trol Suite can be started The suite comprises all MR software installed on your PC All software installed for the respective devices can be found in the list function under Equipment select...

Page 19: ...2 Select the corresponding device which is to communicate with the PC from the list function 3 Select the Execute button 4 The MR Suite starts the corresponding visualization You can undertake all ot...

Page 20: ......

Page 21: ...software to assist with input 3 1 Scope of delivery The following components are included in the scope of delivery Check the shipment for completeness on the basis of the shipping documents The scope...

Page 22: ...nto the formats PDF XLS BMP etc Setting parameters Undertaking maintenance The visualization software allows the status of remote hardware to be queried Depending on the equipment of the TAPCON 230 th...

Page 23: ...ce the ini tialization data has been downloaded during an online connection you can then edit or adapt this offline so that it can be transferred back to the hardware during a subsequent online connec...

Page 24: ...ture is split into 5 areas All parts of the main screen can be enlarged or shrunk using the mouse as is standard in Windows The last settings are restored when the software is restarted Figure 7 Descr...

Page 25: ...on of the command is shown when the mouse pointer hovers above the corresponding symbol The bar contains the following action button Figure 8 Toolbar with action button 1 Create device 2 Open device 3...

Page 26: ......

Page 27: ...one using a list func tion Proceed as follows to select the language 1 Settings Paths Language 2 Select the language you want from the list function 3 Press the Apply button to confirm Since standard...

Page 28: ...s set 4 2 Menu item Settings You can use the Settings menu item for the following settings Communication Serial communication Modem Update Quick parameter download Proceed as described in the followin...

Page 29: ...ation with TAPCON 230 Serial connection RS232 via zero modem Modem TCP IP network connection Proceed as follows to set the communication options 1 Settings Communication The Communication options dial...

Page 30: ...s apply Displaying mode selection If you tick the Display mode selection checkbox the mode selection is dis played when setting up the serial connection Communication by modem or net work is the stand...

Page 31: ...ct the COM port 1 Settings Communication Serial communication 2 Select COM port from the list function The dialog displays all known serial interfaces The baud rate can be defined and or established i...

Page 32: ...utomatic baud rate selection checkbox Regardless of the type of communication selected you can use further options to determine which transfer properties are in place for the online connection to the...

Page 33: ...gs 33 3 Select Option in the dialog The Port settings window opens The settings for data bits parity stop bits and flow control must be identical to the settings in Figure 14 otherwise a connection ca...

Page 34: ...ng Bluetooth etc An initialization string is needed to initialize a modem for communication The precise initialization commands Hayes code for this can be found in the modem manual Init string basic s...

Page 35: ...Maschinenfabrik Reinhausen 2009 2226817 00 EN TAPCON trol 4 Basic settings 35 3 Confirm with OK The initialization string is entered Figure 15 Entering Init string...

Page 36: ...ws 1 Settings Communication Update 2 Enter interval for status information in ms units in the Information status field 3 Enter interval for graphics display in ms units in the Remote display field 4 C...

Page 37: ...tings 37 4 2 2 Other settings Alongside communication options you need to define other settings These include Setting path Defining visualization language Setting report Open the options dialog using...

Page 38: ...ation folders under Paths Main directory Device data Archive Download Proceed as follows to define the path 1 Settings Path Paths 2 Select any directory 3 Look for path using the button after the resp...

Page 39: ...producing reports This option dialog always appears as soon as you want to perform print ing Proceed as follows to call up the display 1 Settings Path Report 2 If required tick the Show dialog box on...

Page 40: ...of the language settings for the visualization If you remove the selection before Continue to display this dialog box this report is suppressed in subsequent operations This definition can be reverse...

Page 41: ...structure is based on the following basic categories Group Device Parameter set Database modules 5 1 Menu item Group Groups are a way of creating order within the visualization Devices and param eter...

Page 42: ...ld 3 If necessary enter description in Description field 4 Confirm with OK The group is inserted Figure 22 Dialog box group details The relevant abbreviation is needed to state a description which is...

Page 43: ...the function tree proceed as follows 1 Right click in the function tree 2 Select Add group w hlen The Group details dialog box opens see Figure 22 3 Enter abbreviation in Abbreviation field 4 If nece...

Page 44: ...roups you can read in group data which has been saved in a directory Proceed as follows to display the group data 1 Group Open The Search for folder dialog box opens 2 Select the corresponding group d...

Page 45: ...ation dialog Alongside the current groups you can also select groups and parameter sets Once you have clicked on the Integrate button the selected data is transferred into the visualization database I...

Page 46: ...delete a group or device using the menu bar proceed as follows 1 Highlight group which is to be deleted in the function tree 2 Group Delete The Delete dialog box opens 3 Select the YES button The gro...

Page 47: ...you want to delete a group or device using the mouse proceed as follows 1 Highlight group which is to be deleted in the function tree 2 Right click 3 Select Delete group The Delete dialog box opens 4...

Page 48: ...nction is identical to the Save device data function You receive a compressed ZIP file This file is saved in the archive directory Proceed as follows to save the group data using the menu bar 1 Group...

Page 49: ...EN TAPCON trol 5 Functions and settings 49 3 Enter any name for the file in the File name field 4 Select Save to save The Archive information dialog box appears 5 Confirm with OK The file is saved in...

Page 50: ...ral devices in the sense of a directory or folder Individual parameter data records are saved under the devices Each TAPCON 230 has a code known as an Identcode The software uses this code to distingu...

Page 51: ...e toolbar If you want to create the device using the menu bar proceed as follows Device New Or using the toolbar Select Create device button from toolbar The Determine current device data dialog box o...

Page 52: ...lable in the visualization database it is read out automatically After the download process the basic details for the TAPCON 230 and the associated parameter set can be provided The following general...

Page 53: ...w window central window of main screen In contrast the user is free to select entries for Location and Description and these are used to differentiate between different TAPCON 230 These are shown both...

Page 54: ...be inserted into the visualization You can also insert devices using TAP files You can set the device you want to create using the menu bar or the toolbar If you want to open the device using the men...

Page 55: ...Maschinenfabrik Reinhausen 2009 2226817 00 EN TAPCON trol 5 Functions and settings 55 2 Select zip archive The Archive integration dialog box opens see Figure 39 Figure 38 Open dialog box...

Page 56: ...s the group Identcode and under this the brief description of the parameter set Devices can also be inserted without the asso ciated data If the Integrate devices automatically option is not used the...

Page 57: ...Reinhausen 2009 2226817 00 EN TAPCON trol 5 Functions and settings 57 During initialization i e when adding new TAPCON 230 the settings under taken can be changed in any way later on Figure 40 Dialog...

Page 58: ...nfabrik Reinhausen 2009 58 Once the device information has been created the information for the associ ated parameter set is defined If you insert a parameter set as a TAP file you perform these steps...

Page 59: ...ice group or an individual device using the menu bar proceed as follows 1 Highlight the device which is to be deleted in the function tree 2 Device Delete Or using the toolbar 2 Select the Delete devi...

Page 60: ...receive a compressed ZIP file This file is saved in the archive directory Proceed as follows to save the device data using the menu bar 1 Device Archive The Open dialog box opens 2 Open file which is...

Page 61: ...en 2009 2226817 00 EN TAPCON trol 5 Functions and settings 61 5 Select Save to save 6 Close dialog box with Finish The file is saved in ZIP format You can insert archive files using the Device Open me...

Page 62: ...device using the Connection button in the toolbar or using the menu bar Proceed as follows to establish the connection using the menu bar 1 Device Connect Or using the toolbar 1 Select the Connection...

Page 63: ...nterface You can however change the settings at any time Using the automatic speed query starting at 115 200 bauds the PC software tries to query all possible speeds down to 9600 bauds without you nee...

Page 64: ...zation has connected with a device you receive status information as in Figure 48 Figure 48 Status information about the device 1 Connection exists yes no 2 Enter password yes no 3 Last 4 digits of se...

Page 65: ...gnment to groups or directories and to TAPCON 230 Proceed as follows to change the device data 1 Highlight directory in middle window The Change description button appears in the bottom part of the wi...

Page 66: ...parameter information 1 Highlight parameter set in middle window The Change description button appears in the bottom part of the window 2 Select the Change description button w hlen The Edit parameter...

Page 67: ...in and con text menu These functions are described in detail below 5 3 1 Cutting All selected objects are moved into the interim storage This includes the mod ule data There are 2 ways of cutting the...

Page 68: ...e markings parameters and configurations are copied to the computer s interim storage for further use free from historical measurements The original data is not affected by the following steps If you...

Page 69: ...tion 1 Highlight the location where the entry is to be pasted 2 Parameter set Paste The entry is pasted at the location you want 5 3 4 Deleting If you delete a group device or parameter data record an...

Page 70: ...rrent TAPCON 230 parameters have been downloaded those parameters which differ from the parameters saved in the visualization are displayed in the update dialog see Figure 54 Identical parameters are...

Page 71: ...Maschinenfabrik Reinhausen 2009 2226817 00 EN TAPCON trol 5 Functions and settings 71 The data is updated automatically The device parameters are updated Figure 54 Dialog box download parameters...

Page 72: ...rpose You can transfer the parameters using the menu bar or toolbar Proceed as follows to upload the parameters using the menu bar 1 Parameter set Upload Or using the toolbar 1 Select the Upload param...

Page 73: ...Functions and settings 73 The data is compared with the software parameters to be transferred After the upload there is another alignment to check whether the selected parameters have been adopted Fi...

Page 74: ...ngside the menu the function tree is the most important element of the visu alization Figure 57 Function tree Device group collection of sev eral devices Device entry location descrip tion Parameter s...

Page 75: ...ines The main and sub groups of the parameters can be selected using the function tree and group table These parameter groups are adopted when reading out device data and basically correspond to the d...

Page 76: ...e g min max These parameter limits are checked during input The All parameters item also allows the parameter values saved in the groups to be displayed in one common list Figure 59 Dialog box change...

Page 77: ...ms and tables this information can be converted into Excel format XLS The conversion process can be undertaken using the menu bar or toolbar Proceed as follows to undertake conversion via the menu bar...

Page 78: ...5 Functions and settings TAPCON trol 2226817 00 EN Maschinenfabrik Reinhausen 2009 78 2 Enter name and storage location 3 Click on the Conversion button The process is complete...

Page 79: ...r be set with the aid of the control panel Microsoft operating system or using the visualization software The print function can basically be performed for 2 areas Parameters and configuration data Gr...

Page 80: ...sponding table and or graphics are printed depending on the current display If there is no print function provided for a display the print function of the parameters of the parameter record currently...

Page 81: ...communication due to self monitoring of device s monitoring systems Set communication to Offline mode and wait 30 seconds until the device is again ready for communication Parameters cannot be change...

Page 82: ......

Page 83: ...2226817 00 EN 0310 Maschinenfabrik Reinhausen GmbH Fon 49 0 941 4090 0 Falkensteinstra e 8 Fax 49 0 941 4090 7001 93059 Regensburg Germany E Mail sales reinhausen com www reinhausen com...

Reviews: