background image

© Martin Engineering GmbH

10

M3682UK-09/17

Preparing for the installation

 3. The delivery should include the following parts, depending on 

the scope of the order:

• Martin

®

 SQC2™ Secondary Cleaner

• Two Martin

®

 SQC2™ tensioners

• Two Crushing Hazard Warning Labels

Part No. 30528

• Two Conveyor Products Warning Labels:

Part no. 23395

• Two label for tension values:

Part No. SQC2-10002G

• Installation instructions.

 4. Report any missing or damaged parts to Martin Engineering or 

one of its authorised dealers.

4.1.3

Removal of the tensioner

The Martin

®

 QC™ #2 tensioners must first be removed to prepare 

for the installation. The following steps must be taken for both spring 
tensioners.

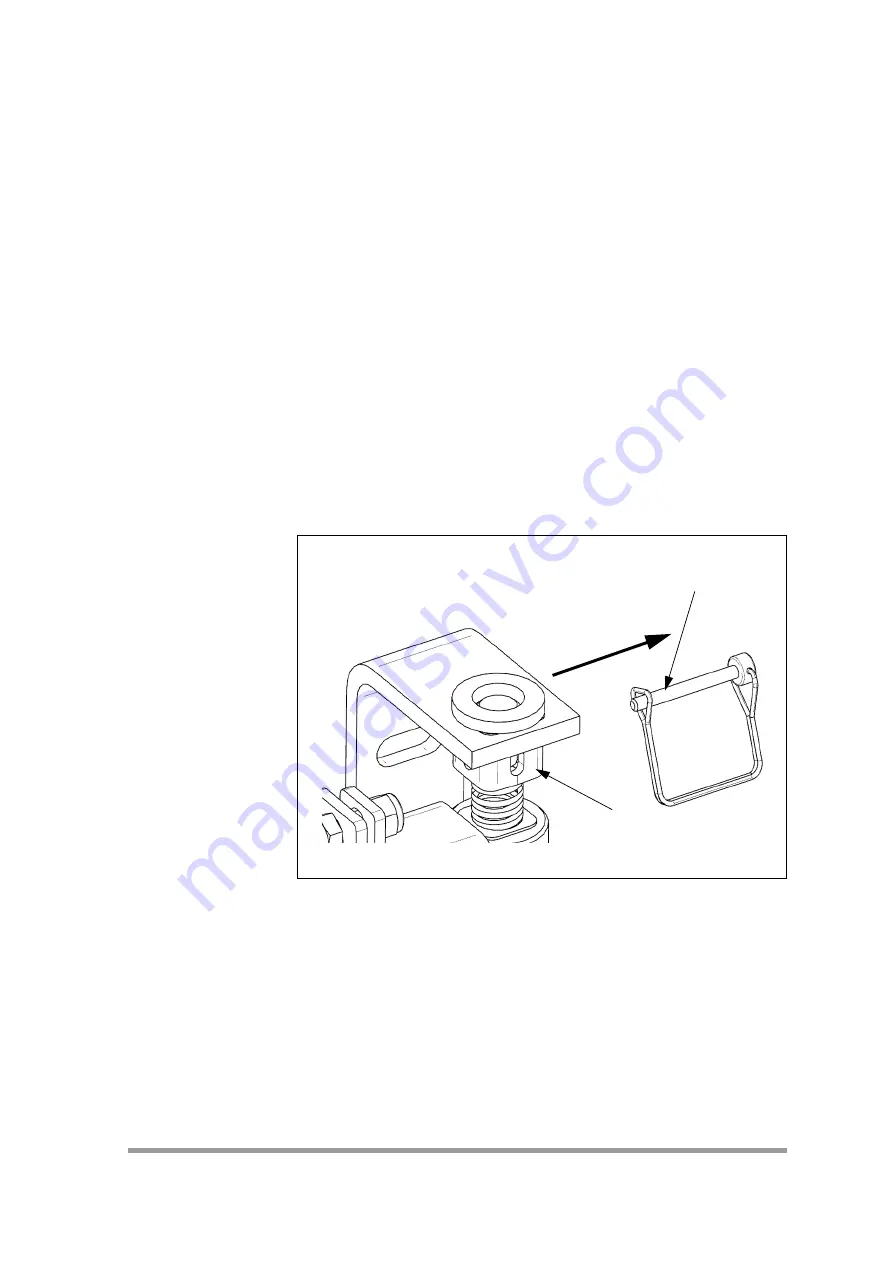
 1. Pull the wire lock pin (7, Fig.1) out of the upper bearing bush

(5, Fig.1).

Fig. 1: 

7

5

Summary of Contents for SQC2

Page 1: ...MARTIN SQC2TM Secondary cleaner Installation Instructions M3682UK...

Page 2: ...Martin Engineering GmbH M3682UK 09 17...

Page 3: ...ners 8 3 3 Type designation 8 4 Preparing for the installation 9 4 1 Before the installation 9 4 1 1 Required materials and tools 9 4 1 2 Preparatory measures 9 4 1 3 Removal of the tensioner 10 5 Ins...

Page 4: ...9 1 Explanation of part numbers 44 9 2 SQC2 tensioner 46 9 3 SQC2 blades 46 9 4 Inspection doors 47 9 5 Installation manuals 47 9 6 Various parts 47 9 7 Warning labels Warning tags 48 9 8 SQC2 seconda...

Page 5: ...al changes without prior notification Earlier documents then lose their validity Martin Engineering s General Terms of Sales and Delivery shall apply 2 1 3 Exclusion of liability Martin Engineering gu...

Page 6: ...IEC Guide 37 Installation instructions for products used by consumers 1995 Edition DIN 1421 Arrangement and numbering in texts Edition 1983 01 DIN EN 12100 Machine safety basic definitions general des...

Page 7: ...nts a possibly hazardous situation which could lead to serious bodily injuries or death if not avoided CAUTION Represents a possibly hazardous situation which could lead to minor bodily injuries and o...

Page 8: ...ves can assist with the position or with special solutions in cases where the installation conditions are complicated such as insurmountable static components or a head pulley as the tensioning statio...

Page 9: ...ore the system is started up The flawless execution of all operating steps must be tested before the conveyor system can be started up again Please observe all information on the installation and star...

Page 10: ...o the general state of the art The SQC2 secondary cleaner can be operated exclusively with the following tensioner MARTIN SQC2 tensioner part no SQC2 35701 XX 3 3 Type designation Den MARTIN SQC2 seco...

Page 11: ...f the transport packages appear to be undamaged Does damage to the packaging exist which indicates damage to the product contained inside 2 Always record any incompleteness or transport damage discove...

Page 12: ...Conveyor Products Warning Labels Part no 23395 Two label for tension values Part No SQC2 10002G Installation instructions 4 Report any missing or damaged parts to Martin Engineering or one of its auth...

Page 13: ...upper bearing bush 5 Fig 2 from the installation panel 1 Fig 2 3 Remove the holding arm together with the threaded rod 11 Fig 3 and lower bearing bush 2 Fig 3 from the installation panel 1 Fig 3 4 Ke...

Page 14: ...ed in by rotating parts or by the moving conveyor belt Before any installation or maintenance work is carried out ensure that all power sources to the conveyor belt system and its accessories are swit...

Page 15: ...installation instructions An overview of the installation steps follows Various on site conditions requiring different work steps are possible for the installation These are presented as follows Insta...

Page 16: ...he secondary cleaner should ideally be installed near a head pulley or a counter pressure roller The clearance should be between 50 and 100 mm Fig 4 Item Description A Centre point of the driving drum...

Page 17: ...3 mm max 165 mm 41641 min 88 mm max 100 mm Tab 3 Dimensions of the installation position Fig 5 Item Description A Centre point of the driving drum B Perpendicular on the lower conveyor belt level C Ex...

Page 18: ...m in the conveying direction D Fig 1 from the point at which the belt leaves the head pulley C Fig 4 4 Draw a vertical line at this position E Fig 4 going downwards at a right angle to the conveyor be...

Page 19: ...lation 8 Repeat steps 1 to 6 on the opposite side of the chute wall WARNING RISK OF INJURY The secondary cleaner is heavy and can cause serious injuries if it is dropped during lifting or moving Alway...

Page 20: ...l must first be dismantled from the tensioner before it can be installed see Section 4 1 3 and then installed in the installation holes created in Fig 5 Note the alignment of the panel as shown in Fig...

Page 21: ...t joint blockand lower bearing bush with proper alignment Fig 9 into the installation panel 1 Fig 9 3 Insert the pivot joint block 6 Fig 10 and the upper bearing bush 5 Fig 7 4 Remove the hexagon head...

Page 22: ...ning pin from the blade cartridge 2 Remove the blade cartridge NOTE The following steps 1 and 2 are only intended to make installation easier and can be used for the SQC2 cleaner With cleaners having...

Page 23: ...ert the cleaner mainframe into both sides of the tensioner through the installation opening Fig 14 NOTE Note before inserting the mainframe that the installed retaining pin is positioned on the far si...

Page 24: ...UK 09 17 Installation 4 Tighten the tensioner locking bolts for the cleaner mainframe by hand Fig 15 NOTE Tighten the locking bolts firmly enough that the cleaner mainframe does not become skewed when...

Page 25: ...mbH 23 M3682UK 09 17 Installation 5 If the blade cartridge has been removed it is reinserted in the cleaner mainframe locking mechanism While doing so take care to ensure that the cartridge is not til...

Page 26: ...09 17 Installation 6 When using the cleaner with part number SQC2 secure the locking bolts of the blade cartridge with the rope on the mainframe as shown in Figure 17 7 Reinsert the retaining pin int...

Page 27: ...lley 2 Cleaners SQ2 41605 41641 3 Cleaners SQ2 SAF3 CAUTION RISK OF DAMAGE Off track running can cause damage to the conveyor belt edge and or the cleaning elements Alignment of the secondary cleaner...

Page 28: ...arances A and B between the edge of the cleaning elements and the conveyor belt edge 2 Shift the secondary cleaner so that clearance A is equal to clearance B Fig 20 Item Description 1 Chute wall 2 Dr...

Page 29: ...aligning the secondary cleaner in parallel to the conveyor belt 1 Measure the clearance on both sides between the mainframe and the head pulley or counter pressure roller Fig 21 Item Description 1 Top...

Page 30: ...h respect to the head pulley or check whether the blade rests evenly against the conveyor belt 2 Tighten the tensioner clamping screws Once the dimensions are correct and the secondary cleaner aligned...

Page 31: ...dary cleaner If all of the dimensions are correct and the secondary cleaner aligned then it can be attached on both sides by the hexagon head screw 16 Fig 23 and the square head screw 18 Fig 23 of the...

Page 32: ...al damage Always tighten the belt cleaners in accordance with the specification and also ensure uniform tightening whenever dual Inline Reversing tensioners are used Note the information on the warnin...

Page 33: ...Martin Engineering GmbH 31 M3682UK 09 17 Installation 3 Use the tensioner s wire lock pin 7 Fig 25 to secure the threaded rod 4 Fig 25 4 Repeat steps 1 to 3 on the far side Fig 25 4 7...

Page 34: ...3395 on the chute wall where they can be seen by the system operator also refer to Fig 27 on page 34 NOTE Read through this section completely before starting any work on the belt cleaner or on the cu...

Page 35: ...lk materials must accumulate between the blades and return side 7 Follow the corresponding instructions in Section 7 Troubleshooting for cases of excess wear bulk material accumulation or other proble...

Page 36: ...full revolution For cleaners with urethane shock ring Turn the nut of the threaded rod until all blades make contact with the conveyor belt uniformly To tighten turn another 2 full revolutions Teilenr...

Page 37: ...cleaner tension and re tighten if necessary 5 Check the blades for wear damage and missing parts NOTE Maintenance inspections must be performed at least once a week Shorter maintenance intervals may b...

Page 38: ...r system until the cause of the problems has been recognised and eliminated CAUTION RISK OF DAMAGE The SAF 3 blades must not be worn out beyond the wear line this can cause serious material damage Ins...

Page 39: ...the belt cleaner for longer than 15 minutes on the running unloaded conveyor belt A risk of damage due to overheating exists for the belt cleaner and or the conveyor belt Never operate the belt clean...

Page 40: ...emove the wire lock pin 7 Fig 25 from the threaded rod 4 Fig 25 of the tensioner 2 Slacken the tensioner by turning the lower hexagon of the threaded rod anticlockwise 3 Repeat steps 1 and 2 on the fa...

Page 41: ...H 39 M3682UK 09 17 Maintenance 4 Loosen the square head screw 18 Fig 26 and the hex head screw 16 Fig 26 of the clamp 3 Fig 26 on the operator side 5 Remove the locking bolt from the cleaner mainframe...

Page 42: ...nance 6 Remove the blade cartridge from the locking mechanism and the chute 7 Insert a new blade cartridge 8 Inspect the installation as described in Section 5 4 9 Re tighten the tensioner 10 Follow t...

Page 43: ...e 2 Loosen and remove the lower screw fittings for the specific blade 1 Fig 32 3 Repeat step 2 for every additional blade to be replaced 4 Remove the blade from the cleaner mainframe 5 Attach a new bl...

Page 44: ...s too tightly tensed on the conveyor belt Reduce the tension Tension values see fig 22 page 28 Insufficient cleaning performance and material accumulation The cleaner is not tensed enough or is tensed...

Page 45: ...ected against direct sunlight The best storage conditions are at temperatures ranging from 0 C to 30 C and 60 relative humidity Martin Engineering guarantees that the stored products will remain fully...

Page 46: ...de design C Tungsten carbide Structural steel plate orange H Tungsten carbide Structural steel plate orange R Tungsten carbide Structural steel plate orange S Stainless steel stainless steel plate c C...

Page 47: ...ss steel 1 4571 E4 Extended in length stainless steel 1 4571 f Tensioner options without tensioner T with tensioner S Stainless steel 1 4571 41605 aabbccddeef gg a Belt width in inches b Blade design...

Page 48: ...leaning width in inches d Shockmount type MR Standard e Mainframe options P painted RAL 2004 C Painted C5M RAL 2004 A4 Stainless steel 1 4571 f Tensioner options without tensioner T with tensioner S S...

Page 49: ...A 1218 Door with rubber cover 457 x 610 mm CYAR 1824 Steel door 457 x 610 mm CYA 1824 Door with rubber cover 610 x 610 mm CYAR 2424 Steel door 610 x 610 mm CYA 2424 Description Document Inspection doo...

Page 50: ...ngineering GmbH 48 M3682UK 09 17 Part numbers 9 7 Warning labels Warning tags Description Part No Crushing Hazard Warning Label 30528 Conveyor Products Warning Label 23395 Label for tension values SQC...

Page 51: ...Martin Engineering GmbH 49 M3682UK 09 17 Part numbers 9 8 SQC2 secondary cleaner with aluminium blade cartridge 0...

Page 52: ...WHQGHG PDLQIUDPHV DOVR DYDLODEOH 9HUOlQJHUWH FKVHQ DXFK YHUI JEDU WHP 3RV 4W Q HVFULSWLRQ HVFKUHLEXQJ 3 1 7HLOH 1U 64 PDLQIUDPH EVWUHLIHUDFKVH V V 7 64 EODGH H WUXVLRQ EVWUHLIHUEODWWKDOWHUXQJ V V 7 V...

Page 53: ...Martin Engineering GmbH 51 M3682UK 09 17 Part numbers 3DUW QXPEHU 7HLOHQXPPHU 3 1 LWHP 7HLOHQU 3RV 4W Q 64 64 7 64 64 6 64 66 3DUW QXPEHU 7HLOHQXPPHU 3 1 WHP 7HLOH 1U 3RV 64 6 64 5 6 5 64 6 64 6 6 6...

Page 54: ...Martin Engineering GmbH 52 M3682UK 09 17 Part numbers 9 9 SQC2 with SAF2 blades 0 5...

Page 55: ...replaced by Pos 4 Pos 8 dient nur zu Transportzwecken und wird gegen Pos 4 ausgetauscht Part number Teilenummer Part number Teilenummer Blade color Abstreiferblattfarbe Description Beschreibung 2 SQC2...

Page 56: ...00 2800 1380 SQC2 35694 54XX E SQC2C 54X48X3XX SQC2 54X54X3XXX E 54 1372 2200 2800 1380 SQC2 35694 54XX E SQC2C 54X54X3XX SQC2 60X54X3XXX E 54 1372 2350 3000 1530 SQC2 35694 60XX E SQC2C 60X54X3XX SQC...

Page 57: ...tter s C s T 2 s C s T SQC2S 3 SAF blade SQC2S 3 SAF Abstreiferblatt 38718 UXX 3 s C s T SQC2S 3 SAF blade w TC insert SQC2S 3 SAF Abstreiferblatt mit Hartmetalleinsatz 38718 TXX 4 s C s T Blade back...

Page 58: ...XX SQC2 35696 483 14 0 7 14 SQC2C 48U48X3XX SQC2 35696 483 16 0 8 16 SQC2C 54U48X3XX SQC2 35696 543 16 0 8 16 SQC2C 54U54X3XX SQC2 35696 543 18 0 9 18 SQC2C 60U54X3XX SQC2 35696 603 18 0 9 18 SQC2C 60...

Page 59: ...QC2 35696 723 2 20 11 22 SQC2C 72T72X3XX SQC2 35696 723 2 22 12 24 SQC2C 78T72X3XX SQC2 35696 783 2 22 12 24 SQC2C 78T78X3XX SQC2 35696 783 2 24 13 26 SQC2C 84T78X3XX SQC2 35696 843 2 24 13 26 SQC2C 8...

Page 60: ...Martin Engineering GmbH 58 M3682UK 09 17 Part numbers 9 11 SQC2 secondary cleaner without aluminium blade cartridge 5 0...

Page 61: ...VVHPEO ODWWEDXJUXSSH V F V 7 V V 7 64 WHQVLRQHU 6SDQQYRUULFKWXQJ V F V 7 V V 7 VFUHZ 0 1 6HFKVNDQWVFKUDXEH V V 7 H QXW 0 1 6HFKVNDQWPXWWHU V V 7 DVKHU IODW 0 1 8QWHUOHJVFKHLEH V V 7 DVKHU VSULQJ 0 1 H...

Page 62: ...Martin Engineering GmbH 60 M3682UK 09 17 Part numbers 3DUW QXPEHU 7HLOHQXPPHU 3 1 LWHP 7HLOHQU 3RV 4W Q 7 64 6 64 66 3DUW QXPEHU 7HLOHQXPPHU 3 1 WHP 7HLOH 1U 3RV 6 5 6 5 6 6 6 6...

Page 63: ...Martin Engineering GmbH 61 M3682UK 09 17 Part numbers 9 12 SQC2 mini secondary cleaner 5 0...

Page 64: ...OVR DYDLODEOH 9HUOlQJHUWH FKVHQ DXFK YHUI JEDU WHP 3RV 4W Q HVFULSWLRQ HVFKUHLEXQJ 3 1 7HLOH 1U 64 0LQL 0DLQIUDPH DXSWDFKVH V F V 7 V V 7 64 0LQL EODGH 0LQLEODWW V F V 7 V V 7 64 WHQVLRQHU 6SDQQYRUULF...

Page 65: ...Martin Engineering GmbH 63 M3682UK 09 17 Part numbers 3DUW QXPEHU 7HLOHQXPPHU 3 1 WHP 7HLOH 1U 3RV 5 05 6 0 055 05 6 0 05 3DUW QXPEHU 7HLOHQXPPHU 3 1 LWHP 7HLOHQU 3RV 4W Q 7 64 6 64 66...

Page 66: ...Martin Engineering GmbH 64 M3682UK 09 17 Part numbers 9 13 SQC2 tensioner...

Page 67: ...FKVH 7HQVLRQ URG HZLQGHVWDQJH 7RS EXVKLQJ 2EHUH DJHUEXFKVH RUPHG DUP DOWHDUP LUH ORFN SLQ UDKWVWLIWYHUVFKOXVV RUPHG KLQJH FODPS OHPPVFKHOOH OHYLV SLQ DVW VHQERO HQ RWWHU SLQ 6SOLQW VFUHZ 6HFKVNDQWNRSI...

Page 68: ...l number not required meets the following requirements Machinery Directive 2006 42 EC DIN EN 618 Equipment and systems for bulk materials The following harmonised standards in particular were applied...

Page 69: ...f Germany Tel 49 6123 97820 Fax 49 6123 75533 info martin eng de www martin eng de Turkey Martin Engineering Makina Sanayi ve Ticaret Ltd Sti Yukari Dudullu Imes Sanayi Sitesi B Blok 205 Sokak No 6 34...

Reviews: