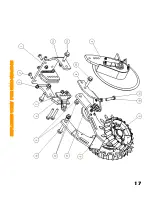
STEP 4 : ATTACH 1345 FRAME ASSEMBLY TO THE MOUNT
IMPORTANT:
Stop arm installation, as shown in the picture, is for the right UMO configuration . For a left
UMO configuration, install the right stop arm (STARM1360
-
5
-
8R) on the opposite side.
1.
Align the holes in the mount and the frame assembly. Insert the
5/8”
x 2
1/2”
and the
5/8”
x
2”
bolts
from the outside. Add the Stop Arm and other
5/8”
x
2”
bolt as it is shown in the picture. Place the
bushings (BU7858) and nuts on the
5/8”
x
2”
bolt and on the
5/8”
x 2
1/2”
bolt from inside.
2.
Tighten the three bolts to 112 ft
-
lbs. Check after first day of use.
3.
Check to ensure the frame is not binding on the mounting bracket and is free to float up and down.
4.
Install the
5/8”
X
3”
bolt on the Stop Arm as threaded adjustment assembly and tighten the
5/8”
Thin
Nut to lock it after the adjustment.
6
5/8”
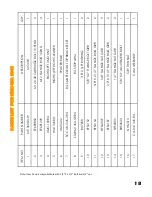
FLANGE LOCKNUT
(NFSL007)
5/8”
X
2”
FLANGE BOLT
(BFS0152)
5/8”
X 2
1/2”
FLANGE
BOLT (BFS0154)
STOP ARM
(STARM1360
-
5
-
8L)
5/8”
THIN NUT (NHSJ013)
5/8”
X
3”
BOLT (BHS0543)
BUSHINGS
(BU7858)
5/8”
X
2”
FLANGE
BOLT (BFS0152)


