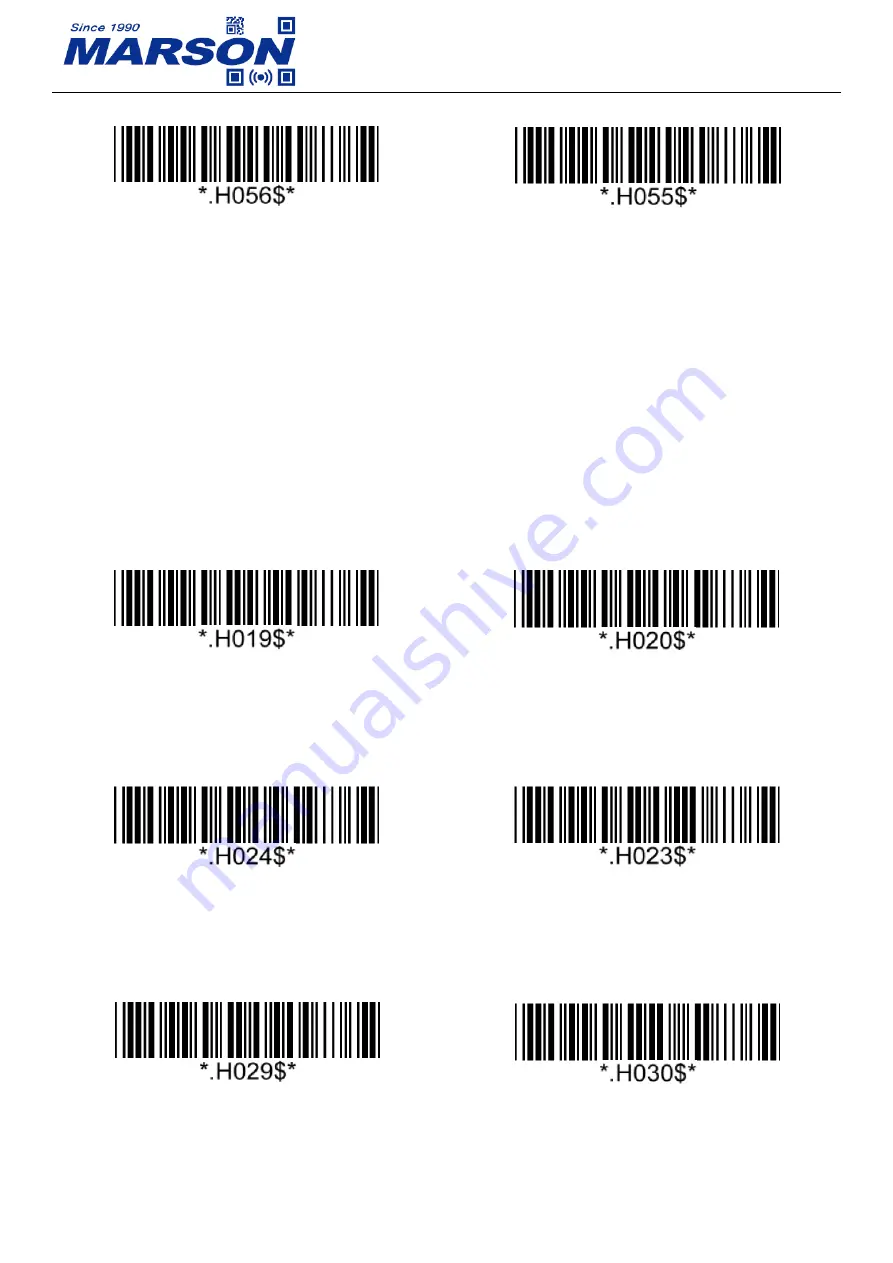
background image

MT584 User’s Manual V1.0


49


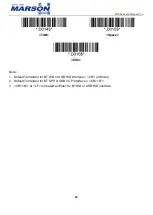
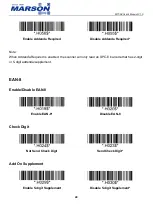
Enable Addenda Required 


Disable Addenda Required* 


Note: 
When Addenda Required is enabled, the scanner will only read an UPC-E barcode that has 2-digit 
or 5-digit addenda/supplement. 


EAN-8 

Enable/Disable EAN-8 


Enable EAN-8* 


Disable EAN-8 


Check Digit 


Not Send Check Digit 


Send Check Digit* 


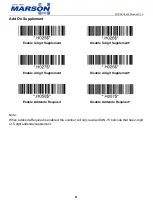
Add On Supplement 


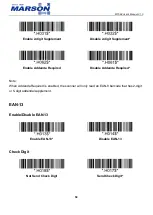
Enable 5-digit Supplement 


Disable 5-digit Supplement* 


Summary of Contents for MT584

Page 1: ...MT584 User s Manual V1 0 MT584 2D Wireless Ring Scanner User s Manual Version 1 0 DATE 2022 07 13 ...

Page 2: ...Converts to TAB ENTER ESCAPE 14 Function Code Conversion 14 Control Code Output Method 15 Numeric Key 17 Capslock Mode 17 Keyboard Layout 18 Intercharacter Delay 20 Interblock Delay 20 BCC Binary Check Character 21 GS Character Replacement 21 IMAGING SETTINGS 22 Inverse Barcode 22 CHAPTER 3 INTERFACE 23 BT HID 23 Getting Connected 23 Pincode Setup 24 BT SPP 25 Getting Connected 25 Set SPP Pincode ...

Page 3: ... 35 USB VCP 35 CHAPTER 4 READING MODE 36 TRIGGER MODE 36 TOGGLE MODE 36 CONTINUOUS MODE 36 AUTO SENSING MODE 37 ADVANCED READING MODE SETTINGS 38 LED Auto Off Timeout 38 Scan Interval 38 Identical Read Interval 39 Trigger Control 39 CHAPTER 5 DATA FORMAT 40 CODE ID 40 SET ID 40 DATA LENGTH 43 PREAMBLE 43 POSTAMBLE 44 Clear Preamble Postamble 44 TERMINATOR 44 CHAPTER 6 SYMBOLOGIES 46 GENERAL SETTIN...

Page 4: ...ble Disable Code 32 54 Leading Tailing 54 CODABAR NW 7 55 Enable Disable Codabar 55 Verification 55 Start Stop 55 Codabar Min Max Length 56 INTERLEAVED 2 OF 5 57 Enable Disable Interleaved 2 of 5 57 Verification 57 Interleaved 2 of 5 Min Max Length 58 STANDARD 2 OF 5 IATA 59 Enable Disable Standard 2 of 5 59 Verification 59 Standard 2 of 5 Min Max Length 60 MATRIX 2 OF 5 61 Enable Disable Matrix 2...

Page 5: ... 71 CODE 128 GS1 128 72 Enable Disable Code 128 GS1 128 72 Code 128 GS1 128 Min Max Length 72 GS1 DATABAR RSS 14 73 Enable Disable GS1 DataBar 73 GS1 DATABAR LIMITED RSS LIMITED 73 Enable Disable GS1 DataBar Limited 73 GS1 DATABAR EXPANDED RSS EXPANDED 73 Enable Disable GS1 DataBar Expanded 73 GS1 DataBar Expanded Min Max Length 74 Surround GS1 Application Identifiers AI s with Parentheses 74 QR C...

Page 6: ...APTER 7 APPENDIX 78 APPENDIX NUMBERS 78 APPENDIX UPPER CASE ALPHABETS 79 APPENDIX LOWER CASE ALPHABETS 81 APPENDIX CONTROL CODES 83 APPENDIX SYMBOLS 85 APPENDIX FUNCTION KEYS 88 APPENDIX NAVIGATION KEYS 89 APPENDIX MODIFIER KEYS 90 APPENDIX ABORT 92 APPENDIX DEFAULT TABLE 93 APPENDIX FACTORY ID 98 APPENDIX ASCII TABLE 100 VERSION HISTORY 104 ...

Page 7: ...icrobe free scanning experience Specifications Optic Performance Light Source White LED Visible red LED Sensor 640 x 480 Scan Rate 30 Frames Sec Resolution 5mil 0 125mm 1D 10mil 0 25mm 2D Scan Angle Horizontal 37 Vertical 27 5 Pitch Angle 60 Skew Angle 60 Roll Angle 360 Print Contrast Ratio 25 Width of Field 141mm 13Mil Code39 Memory 2MB 20 000 barcodes Typical D O F 5 Mil Code 39 45 120mm LED Ind...

Page 8: ...tandby Current 25mA Battery 3 7V 240mAh Li Polymer Battery Number of Scan per full charge 4000 scans 1 scan 5 secs Bluetooth connected Connectivity Radio Bluetooth 5 0 dual mode Class 2 Range 66 ft 20m line of sight Interface Profile BT HID BT SPP USB HID USB VCP Memory User Environment Operating Temperature 10 50 C Storage Temperature 20 60 C Humidity 0 95 RH Non condensing Drop Durability 1 5M S...

Page 9: ...White version only JIS Z 2801 Beeper Indication Beeper Status Single beep Good read Single short beep The scanner reads a Code39 ASCII during multi step configuration Two beeps Wireless connection The scanner successfully reads a configuration barcode Three beeps Wireless disconnection Three short beeps The scanner reads a barcode while disconnected The scanner reads an unexpected barcode during m...

Page 10: ...MT584 User s Manual V1 0 10 LED Indication LED Status Off Power off Standby Connected Flashing blue Disconnected Discoverable One green flash Good read Flashing red Low power Solid red Charging ...

Page 11: ...gs by scanning configuration barcodes in this manual Enable Barcode Configurability Disable Barcode Configurability Factory Default Scanning below configuration barcode will reset all parameters to factory default settings the ones with asterisk mark Factory Default Check Version To check firmware version please scan below configuration barcode Check Version ...

Page 12: ...low barcodes to determine which touch sensing button to enable according to your habit Right Button Only Left Button Only For Left handed User For Right handed User Both Button Good Read Indicator Beep Tone Off Beep Low 2 0KHz Beep Medium 2 7KHz Beep High 4 0KHz ...

Page 13: ...ng Beep Only Mute Data Format UTF 8 to Unicode Conversion Off On Note To output double byte character i g Chinese using UTF 8 to Unicode Conversion please make sure that the application accepting barcode data supports Unicode display i g Word TeraTerm ...

Page 14: ... is transmitted as 0x09 0x0D and 0x1B respectively 2 When enabled HT I CR M and ESC A is transmitted as TAB ENTER and ESCAPE on keyboard respectively Function Code Conversion Off On Note Once disabled the scanner will output the original encoded data of the barcodes in Appendix Function Navigation Modifier Keys ...

Page 15: ...ess I key and release Ctrl key and I key c Enter F Press F key Since Ctrl I is shortcut for italicizing text in some software applications the result of above output sequence can be a regular A plus an italic F 2 Alt Mode For HT the output sequence of virtual keyboard is Enter Alt 0 9 Virtual keyboard will press and hold Alt key press 0 and 9 on numeric keypad respectively and release Alt key Cont...

Page 16: ...m Alt 1 3 SO 0E 14 Ctrl n Alt 1 4 SI 0F 15 Ctrl o Alt 1 5 DLE 10 16 Ctrl p Alt 1 6 DC1 11 17 Ctrl q Alt 1 7 DC2 12 18 Ctrl r Alt 1 8 DC3 13 19 Ctrl s Alt 1 9 DC4 14 20 Ctrl t Alt 2 0 NAK 15 21 Ctrl u Alt 2 1 SYN 16 22 Ctrl v Alt 2 2 ETB 17 23 Ctrl w Alt 2 3 CAN 18 24 Ctrl x Alt 2 4 EM 19 25 Ctrl y Alt 2 5 SUB 1A 26 Ctrl z Alt 2 6 ESC 1B 27 Alt 2 7 Alt 2 7 FS 1C 28 Alt 2 8 Alt 2 8 GS 1D 29 Alt 2 9 ...

Page 17: ...e keys on the numeric keypad 2 If you select NUMERIC KEY the Num Lock status of the physical keyboard should be ON Capslock Mode Capslock Off Capslock On Capslock Free Note When barcode scanner is set to Capslock Free mode no matter keyboard Capslock LED indicator is ON or OFF output will be always the same as the Original barcode In other words what you see is what output is ...

Page 18: ...MT584 User s Manual V1 0 18 Keyboard Layout English US English UK Danish Spanish Hungarian QWERTZ Hungarian QWERTY Canadian French Dutch Italian French German Swiss German ...

Page 19: ...MT584 User s Manual V1 0 19 Swiss French Swedish Czech QWERTZ Czech QWERTY Norwegian Belgian Portuguese Slovak Brazilian QWERTY Canadian Traditional Japanese Alt Code ...

Page 20: ...r Delay to 8ms Step1 Scan Set Intercharacter Delay Step2 Scan 0 0 8 in Appendix Numbers Step3 Scan Set Intercharacter Delay Interblock Delay The configurable range is from 0 to 2550ms The larger the number the longer the delay Set Interblock Delay Default 0ms Example Set Interblock Delay to 20ms Step1 Scan Set Interblock Delay Step2 Scan 0 0 2 in Appendix Numbers Step3 Scan Set Interblock Delay ...

Page 21: ...ata is TEST with terminator CR LF 1 BT SPP USB VCP Data Format T E S T CR LF BCC BCC 54h 45h 53h 54h 0Dh 0Ah 11h 2 BT HID USB HID Data Format T E S T Enter BCC BCC 54h 45h 53h 54h E7h F1h However since control character cannot be displayed in Bluetooth HID BCC will be converted into 2 bytes of characters As a result the data will be TEST Enter F 1 GS Character Replacement Enable GS Character Repla...

Page 22: ...ed by the user 2 To define replacement character please refer to below Example Set Replacement Character as X Step1 Scan Define Replacement Character Step2 Scan X in Appendix Upper Case Alphabets Step3 Scan Define Replacement Character Imaging Settings Inverse Barcode Disable Inverse Barcode Enable Inverse Barcode ...

Page 23: ... you to enter a pincode please follow the steps in Pincode Setup section 6 The scanner will emit two beeps as indication that the Bluetooth connection has established successfully 7 While conneted with the scanner as physical keyboard the touch keyboard on iOS Android device might disappear To resolve this issue please do the following 1 For iOS device simply press the function button on the top o...

Page 24: ... Bluetooth application prompts you to enter a pincode please follow the steps 1 Scan Pincode Start Pincode Start 2 Scan numeric barcodes below according to the pincode generated by the Bluetooth application 0 1 2 3 4 5 6 7 8 9 3 Scan Enter Enter ...

Page 25: ... can t auto reconnect use BT SPP Master If host can auto reconnect use BT SPP Slave to avoid conflict BT SPP Master Auto reconnect BT SPP Slave No Auto reconnect 4 Select Wireless Scanner from discovered device list 5 If Bluetooth application prompts you to enter a pincode enter 1234 from the host 6 Enter serial communication software on your host and open the port occupied by the scanner 7 The sc...

Page 26: ... By default the pincode under BT SPP profile for the scanner is 1234 It is configurable up to 8 numbers Set SPP Pincode Example Set SPP Pincode to 0000 Step1 Scan Set SPP Pincode Step2 Scan 0 0 0 0 in Appendix Numbers Step3 Scan Set SPP Pincode ...

Page 27: ...inute Default 03 Set Second Default 00 Example Set Power Off Timeout to 5 minnutes and 30 seconds Step1 Scan Set Minute Step2 Scan 0 5 in Appendix Numbers Step3 Scan Set Minute Step4 Scan Set Second Step5 Scan 3 0 in Appendix Numbers Step6 Scan Set Second To disable Power Off Timeout make scanner always on scan below barcode Disable Timeout Shut Down To shut down the scanner immediately pelase sca...

Page 28: ...the function button Secure Simple Pairing SSP Secure Simple Pairing SSP enabled by default allows the scanner to establish connection with host device without entering pincode When SSP is disabled a pincode will be requested by the host device which by default is 1234 for BT SPP profile and a random number generated by the host device for BT HID profile Enable SSP Disable SSP ...

Page 29: ...ets Numbers Step 3 Scan Set Bluetooth Device ID To reset Bluetooth Device ID to Wireless Scanner scan below barcode Reset Bluetooth Device ID To add the last 6 digits of MAC address to Bluetooth Device ID Wireless xxxxxx scan below barcode Add MAC Address to Bluetooth Device ID Check Bluetooth Firmware Version To check scanner s Bluetooth firmware version please connect to a host device via BT HID...

Page 30: ...scan below configuration barcode Check Device MAC Address Check Host MAC Address To check scanner s MAC address please connect to a host device and scan below configuration barcode Check Host MAC Address Check Battery Life To check scanner s battery life please connect to a host device and scan below configuration barcode Check Battery Life ...

Page 31: ...ugh numerous setup procedures on the host device to establish connection Simply generate ScanLink barcode for the target slave device in below rule For BT HID profile please encode HID MAC Address in Code39 without checksum or QR Code For BT SPP profile please encode SPP MAC Address in Code39 without checksum or QR Code Example Target Slave Device MAC Address 00 15 83 52 2C 3B Profile BT HID Encod...

Page 32: ... file BARCODE txt to your computer To exit Memory Mode simply scan any interface barcode e g BT HID BT SPP Master Slave USB HID USB VCP other than memory mode Delete Last Record To delete last memory data please scan below barcode or press function button once when the scanner is in memory mode Delete Last Record Clear All Record To delete all memory data please connect the scanner to the host wit...

Page 33: ...Example Set Data Format as Barcode Data Date Time Step1 Scan Data Format Step2 Scan 4 3 2 respectively in Appendix Numbers Step3 Scan Data Format Field Separator The field separator in memory mode is comma by default It can be replaced by any alphanumeric characters Field Separator Example Set Field Separator as Semicolon Step1 Scan Field Separator Step2 Scan in Appendix Symbols Step3 Scan Field S...

Page 34: ...ode Date Format 01 DD MM YYYY 09 DD MM YYYY 02 MM DD YYYY 10 MM DD YYYY 03 DD MM YY 11 DD MM YY 04 MM DD YY 12 MM DD YY 05 YYYY MM DD 13 YYYY MM DD 06 YY MM DD 14 YY MM DD 07 DD MM 15 DD MM 08 MM DD 16 MM DD Example Set Date Format as MM DD YY Code 12 Step1 Scan Date Format Step2 Scan 1 2 respectively in Appendix Numbers Step3 Scan Date Format Time Format HH MM SS HH MM ...

Page 35: ...6 Scan Set Time USB HID Scanning below configuration barcode will configure the scanner to USB HID interface in which the scanner becomes an HID keyboard device USB HID USB VCP Scanning below configuration barcode will configure the scanner to USB VCP interface The scanner will be able communicate with the host via USB Virtual COM Normally virtual COM port can be recognized by the host If it is no...

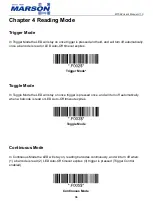
Page 36: ...xpires Trigger Mode Toggle Mode In Toggle Mode the LED will stay on once trigger is pressed once and will turn off automatically when a barcode is read or LED Auto Off timeout expires Toggle Mode Continuous Mode In Continuous Mode the LED will stay on reading barcodes continuously and will turn off when 1 a barcode is read 2 LED Auto Off timeout expires 3 trigger is pressed Trigger Control enabled...

Page 37: ...ode In Auto sensing Mode the LED will turn on when image change is detected within scanner s field of view and will turn off when 1 a barcode is read 2 LED Auto Off timeout expires 3 trigger is pressed Trigger Control enabled Auto sensing Mode ...

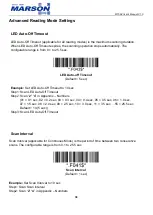
Page 38: ...f Timeout to 10 sec Step1 Scan LED Auto Off Timeout Step2 Scan 2 4 in Appendix Numbers 01 0 1 sec 02 0 2 sec 03 0 3 sec 04 0 4 sec 05 0 5 sec 06 1 0 sec 07 1 5 sec 08 2 0 sec 09 2 5 sec 10 3 0 sec 11 3 5 sec 55 25 5 sec Default 14 5 sec Step3 Scan LED Auto Off Timeout Scan Interval Scan Interval applicable for Continuous Mode is the period of time between two consecutive scans The configurable ran...

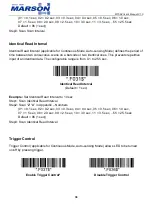
Page 39: ...ts repetitive input of an identical data The configurable range is from 0 1 to 25 5 sec Identical Read Interval Default 1 sec Example Set Identical Read Interval to 10 sec Step1 Scan Identical Read Interval Step2 Scan 2 4 in Appendix Numbers 01 0 1 sec 02 0 2 sec 03 0 3 sec 04 0 4 sec 05 0 5 sec 06 1 0 sec 07 1 5 sec 08 2 0 sec 09 2 5 sec 10 3 0 sec 11 3 5 sec 55 25 5 sec Default 06 1 sec Step3 Sc...

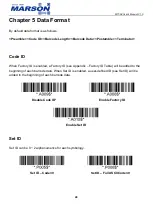
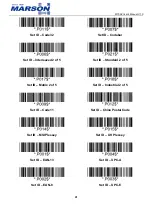
Page 40: ... Factory ID is enabled a Factory ID see Appendix Factory ID Table will be added to the beginning of each barcode data When Set ID is enabled a user defined ID see Set ID will be added to the beginning of each barcode data Disable Code ID Enable Factory ID Enable Set ID Set ID Set ID can be 0 2 alphanumerics for each symbology Set ID Code39 Set ID Full ASCII Code39 ...

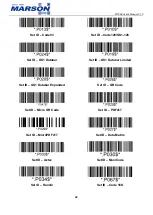
Page 41: ...32 Set ID Codabar Set ID Interleaved 2 of 5 Set ID Standard 2 of 5 Set ID Matrix 2 of 5 Set ID Industrial 2 of 5 Set ID Code11 Set ID China Postal Code Set ID MSI Plessey Set ID UK Plessey Set ID EAN 13 Set ID UPC A Set ID EAN 8 Set ID UPC E ...

Page 42: ...Set ID Code128 GS1 128 Set ID GS1 Databar Set ID GS1 Databar Limited Set ID GS1 Databar Expanded Set ID QR Code Set ID Micro QR Code Set ID PDF417 Set ID MicroPDF417 Set ID Data Matrix Set ID Aztec Set ID MaxiCode Set ID Hanxin Set ID Code 16K ...

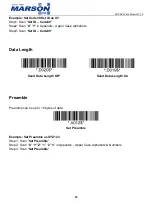
Page 43: ...dix Upper Case Alphabets Step3 Scan Set ID Code39 Data Length Send Data Length Off Send Data Length On Preamble Preamble can be up to 16 bytes of data Set Preamble Example Set Preamble as XYZ123 Step 1 Scan Set Preamble Step 2 Scan X Y Z 1 2 3 in Appendix Upper Case Alphabets Numbers Step 3 Scan Set Preamble ...

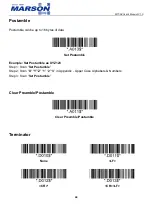
Page 44: ...to 16 bytes of data Set Postamble Example Set Postamble as XYZ123 Step 1 Scan Set Postamble Step 2 Scan X Y Z 1 2 3 in Appendix Upper Case Alphabets Numbers Step 3 Scan Set Postamble Clear Preamble Postamble Clear Preamble Postamble Terminator None LF CR CR LF ...

Page 45: ...al V1 0 45 TAB Space ESC Note 1 Default Terminator for BT HID or USB HID interface CR or Enter 2 Default Terminator for BT SPP or USB VCP interface CR LF 3 CR LF or LF is treated as Enter for BT HID or USB HID interface ...

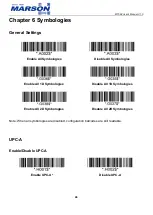
Page 46: ...l Symbologies Disable All Symbologies Enable All 1D Symbologies Disable All 1D Symbologies Enable All 2D Symbologies Disable All 2D Symbologies Note When all symbologies are disabled configuration barcodes are still readable UPC A Enable Disable UPC A Enable UPC A Disable UPC A ...

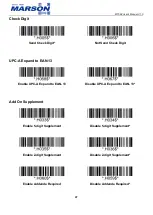
Page 47: ...Check Digit UPC A Expand to EAN 13 Enable UPC A Expand to EAN 13 Disable UPC A Expand to EAN 13 Add On Supplement Enable 5 digit Supplement Disable 5 digit Supplement Enable 2 digit Supplement Disable 2 digit Supplement Enable Addenda Required Disable Addenda Required ...

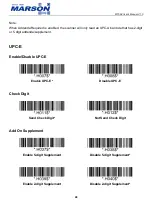
Page 48: ...d an UPC A barcode that has 2 digit or 5 digit addenda supplement UPC E Enable Disable UPC E Enable UPC E Disable UPC E Check Digit Send Check Digit Not Send Check Digit Add On Supplement Enable 5 digit Supplement Disable 5 digit Supplement Enable 2 digit Supplement Disable 2 digit Supplement ...

Page 49: ...denda Required is enabled the scanner will only read an UPC E barcode that has 2 digit or 5 digit addenda supplement EAN 8 Enable Disable EAN 8 Enable EAN 8 Disable EAN 8 Check Digit Not Send Check Digit Send Check Digit Add On Supplement Enable 5 digit Supplement Disable 5 digit Supplement ...

Page 50: ...nable Addenda Required Disable Addenda Required Note When Addenda Required is enabled the scanner will only read an EAN 8 barcode that has 2 digit or 5 digit addenda supplement EAN 13 Enable Disable EAN 13 Enable EAN 13 Disable EAN 13 Check Digit Not Send Check Digit Send Check Digit ...

Page 51: ...plement Disable 5 digit Supplement Enable 2 digit Supplement Disable 2 digit Supplement Enable Addenda Required Disable Addenda Required Note When Addenda Required is enabled the scanner will only read an EAN 13 barcode that has 2 digit or 5 digit addenda supplement ...

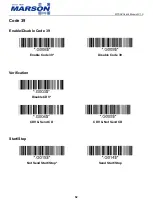
Page 52: ...MT584 User s Manual V1 0 52 Code 39 Enable Disable Code 39 Enable Code 39 Disable Code 39 Verification Disable CDV CDV Send CD CDV Not Send CD Start Stop Not Send Start Stop Send Start Stop ...

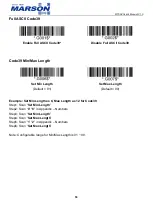
Page 53: ...n Length Default 01 Set Max Length Default 99 Example Set Min Length as 8 Max Length as 12 for Code39 Step1 Scan Set Min Length Step2 Scan 0 8 in Appendix Numbers Step3 Scan Set Min Length Step4 Scan Set Max Length Step5 Scan 1 2 in Appendix Numbers Step6 Scan Set Max Length Note Configurable range for Min Max Length is 01 99 ...

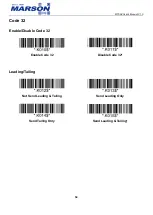
Page 54: ...MT584 User s Manual V1 0 54 Code 32 Enable Disable Code 32 Enable Code 32 Disable Code 32 Leading Tailing Not Send Leading Tailing Send Leading Only Send Tailing Only Send Leading Tailing ...

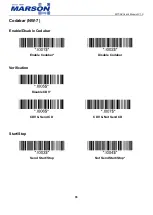
Page 55: ...MT584 User s Manual V1 0 55 Codabar NW 7 Enable Disable Codabar Enable Codabar Disable Codabar Verification Disable CDV CDV Send CD CDV Not Send CD Start Stop Send Start Stop Not Send Start Stop ...

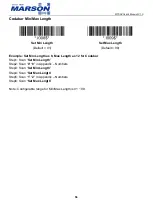
Page 56: ...Default 99 Example Set Min Length as 8 Max Length as 12 for Codabar Step1 Scan Set Min Length Step2 Scan 0 8 in Appendix Numbers Step3 Scan Set Min Length Step4 Scan Set Max Length Step5 Scan 1 2 in Appendix Numbers Step6 Scan Set Max Length Note Configurable range for Min Max Length is 01 99 ...

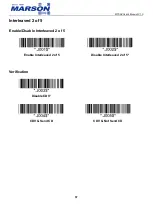
Page 57: ...MT584 User s Manual V1 0 57 Interleaved 2 of 5 Enable Disable Interleaved 2 of 5 Enable Interleaved 2 of 5 Disable Interleaved 2 of 5 Verification Disable CDV CDV Send CD CDV Not Send CD ...

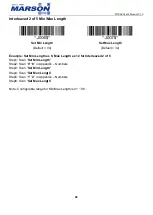
Page 58: ...Default 32 Example Set Min Length as 8 Max Length as 12 for Interleaved 2 of 5 Step1 Scan Set Min Length Step2 Scan 0 8 in Appendix Numbers Step3 Scan Set Min Length Step4 Scan Set Max Length Step5 Scan 1 2 in Appendix Numbers Step6 Scan Set Max Length Note Configurable range for Min Max Length is 01 99 ...

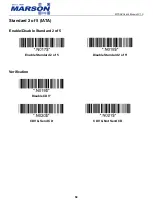
Page 59: ...MT584 User s Manual V1 0 59 Standard 2 of 5 IATA Enable Disable Standard 2 of 5 Enable Standard 2 of 5 Disable Standard 2 of 5 Verification Disable CDV CDV Send CD CDV Not Send CD ...

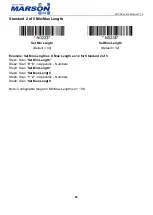
Page 60: ...Default 32 Example Set Min Length as 8 Max Length as 12 for Standard 2 of 5 Step1 Scan Set Min Length Step2 Scan 0 8 in Appendix Numbers Step3 Scan Set Min Length Step4 Scan Set Max Length Step5 Scan 1 2 in Appendix Numbers Step6 Scan Set Max Length Note Configurable range for Min Max Length is 01 99 ...

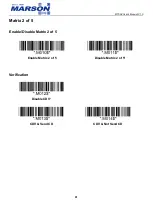
Page 61: ...MT584 User s Manual V1 0 61 Matrix 2 of 5 Enable Disable Matrix 2 of 5 Enable Matrix 2 of 5 Disable Matrix 2 of 5 Verification Disable CDV CDV Send CD CDV Not Send CD ...

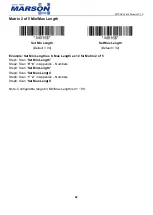
Page 62: ...Default 32 Example Set Min Length as 8 Max Length as 12 for Matrix 2 of 5 Step1 Scan Set Min Length Step2 Scan 0 8 in Appendix Numbers Step3 Scan Set Min Length Step4 Scan Set Max Length Step5 Scan 1 2 in Appendix Numbers Step6 Scan Set Max Length Note Configurable range for Min Max Length is 01 99 ...

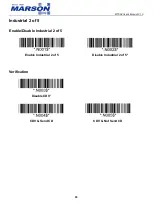
Page 63: ...MT584 User s Manual V1 0 63 Industrial 2 of 5 Enable Disable Industrial 2 of 5 Enable Industrial 2 of 5 Disable Industrial 2 of 5 Verification Disable CDV CDV Send CD CDV Not Send CD ...

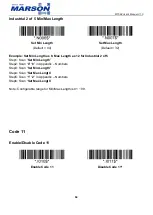
Page 64: ...th as 8 Max Length as 12 for Industrial 2 of 5 Step1 Scan Set Min Length Step2 Scan 0 8 in Appendix Numbers Step3 Scan Set Min Length Step4 Scan Set Max Length Step5 Scan 1 2 in Appendix Numbers Step6 Scan Set Max Length Note Configurable range for Min Max Length is 01 99 Code 11 Enable Disable Code 11 Enable Code 11 Disable Code 11 ...

Page 65: ...ngth Set Min Length Default 04 Set Max Length Default 32 Example Set Min Length as 8 Max Length as 12 for Code11 Step1 Scan Set Min Length Step2 Scan 0 8 in Appendix Numbers Step3 Scan Set Min Length Step4 Scan Set Max Length Step5 Scan 1 2 in Appendix Numbers Step6 Scan Set Max Length Note Configurable range for Min Max Length is 01 99 ...

Page 66: ...MT584 User s Manual V1 0 66 China Postal Code Enable Disable China Postal Code Enable China Postal Code Disable China Postal Code Verification Disable CDV CDV Send CD CDV Not Send CD ...

Page 67: ...Default 32 Example Set Min Length as 8 Max Length as 12 for China Postal Code Step1 Scan Set Min Length Step2 Scan 0 8 in Appendix Numbers Step3 Scan Set Min Length Step4 Scan Set Max Length Step5 Scan 1 2 in Appendix Numbers Step6 Scan Set Max Length Note Configurable range for Min Max Length is 01 99 ...

Page 68: ...84 User s Manual V1 0 68 MSI Plessey Enable Disable MSI Plessey Enable MSI Plessey Disable MSI Plessey Verification Send Check Digit Not Send Check Digit Single Check Digit MOD10 Double Check Digits MOD10 ...

Page 69: ...Default 32 Example Set Min Length as 8 Max Length as 12 for MSI Plessey Step1 Scan Set Min Length Step2 Scan 0 8 in Appendix Numbers Step3 Scan Set Min Length Step4 Scan Set Max Length Step5 Scan 1 2 in Appendix Numbers Step6 Scan Set Max Length Note Configurable range for Min Max Length is 01 99 ...

Page 70: ...MT584 User s Manual V1 0 70 UK Plessey Enable Disable UK Plessey Enable UK Plessey Disable UK Plessey Check Digit Send Check Digit Not Send Check Digit ...

Page 71: ...ength Default 01 Set Max Length Default 99 Example Set Min Length as 8 Max Length as 12 for Code93 Step1 Scan Set Min Length Step2 Scan 0 8 in Appendix Numbers Step3 Scan Set Min Length Step4 Scan Set Max Length Step5 Scan 1 2 in Appendix Numbers Step6 Scan Set Max Length Note Configurable range for Min Max Length is 01 99 ...

Page 72: ...x Length Set Min Length Default 01 Set Max Length Default 99 Example Set Min Length as 8 Max Length as 12 for Code128 GS1 128 Step1 Scan Set Min Length Step2 Scan 0 8 in Appendix Numbers Step3 Scan Set Min Length Step4 Scan Set Max Length Step5 Scan 1 2 in Appendix Numbers Step6 Scan Set Max Length Note Configurable range for Min Max Length is 01 99 ...

Page 73: ... GS1 DataBar Disable GS1 DataBar GS1 DataBar Limited RSS Limited Enable Disable GS1 DataBar Limited Enable GS1 DataBar Limited Disable GS1 DataBar Limited GS1 DataBar Expanded RSS Expanded Enable Disable GS1 DataBar Expanded Enable GS1 DataBar Expanded Disable GS1 DataBar Expanded ...

Page 74: ...n 0 8 in Appendix Numbers Step3 Scan Set Min Length Step4 Scan Set Max Length Step5 Scan 1 2 in Appendix Numbers Step6 Scan Set Max Length Note Configurable range for Min Max Length is 01 99 Surround GS1 Application Identifiers AI s with Parentheses Surround AI s with Parenthese Not Surround AI s with Parenthese Note When enabled each application identifier AI in GS1 DataBar will be enclosed in pa...

Page 75: ...5 QR Code Enable Disable QR Code Enable QR Code Disable QR Code Micro QR Code Enable Disable Micro QR Code Enable Micro QR Code Disable Micro QR Code Data Matrix Enable Disable Data Matrix Enable Data Matrix Disable Data Matrix ...

Page 76: ...er s Manual V1 0 76 PDF417 Enable Disable PDF417 Enable PDF417 Disable PDF417 MicroPDF417 Enable Disable MicroPDF417 Enable MicroPDF417 Disable MicroPDF417 Aztec Enable Disable Aztec Enable Aztec Disable Aztec ...

Page 77: ...er s Manual V1 0 77 MaxiCode Enable Disable MaxiCode Enable MaxiCode Disable MaxiCode Hanxin Enable Disable Hanxin Enable Hanxin Disable Hanxin Code 16K Enable Disable Code 16K Enable Code 16K Disable Code 16K ...

Page 78: ...MT584 User s Manual V1 0 78 Chapter 7 Appendix Appendix Numbers 0 1 2 3 4 5 6 7 8 9 ...

Page 79: ...MT584 User s Manual V1 0 79 Appendix Upper Case Alphabets A B C D E F G H I J K L ...

Page 80: ...MT584 User s Manual V1 0 80 M N O P Q R S T U V W X Y Z ...

Page 81: ...MT584 User s Manual V1 0 81 Appendix Lower Case Alphabets a b c d e f g h i j k l ...

Page 82: ...MT584 User s Manual V1 0 82 m n o p q r s t u v w x y z ...

Page 83: ...MT584 User s Manual V1 0 83 Appendix Control Codes NUL SOH STX ETX EOT ENQ ACK BEL BS HT LF VT ...

Page 84: ...MT584 User s Manual V1 0 84 FF CR SO SI DLE DC1 DC2 DC3 DC4 NAK SYN ETB CAN EM SUB ESC ...

Page 85: ...MT584 User s Manual V1 0 85 FS GS RS US Appendix Symbols ...

Page 86: ...MT584 User s Manual V1 0 86 _ ...

Page 87: ...MT584 User s Manual V1 0 87 SP DEL ...

Page 88: ...MT584 User s Manual V1 0 88 Appendix Function Keys F1 F2 F3 F4 F5 F6 F7 F8 F9 F10 ...

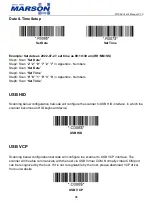
Page 89: ...MT584 User s Manual V1 0 89 F11 F12 Home End Enter Numeric Key App Appendix Navigation Keys Cursor Left Cursor Right Cursor Up Cursor Down Page Up Page Down Tab Back Tab ...

Page 90: ...MT584 User s Manual V1 0 90 Esc Enter BS Ins Del Appendix Modifier Keys Alt Left make 1 Alt Left break Alt Right make Alt Right break Shift Left make 2 Shift Left break ...

Page 91: ...t make 3 Ctrl Left break Ctrl Right make Ctrl Right break Note 1 When Alt Left make is programmed please scan Alt Left break to resume barcode setting 2 When Shift Left make is programmed please scan Shift Left break to resume barcode setting 3 When Ctrl Left make is programmed please scan Ctrl Left break to resume barcode setting ...

Page 92: ...MT584 User s Manual V1 0 92 Appendix Abort If there is an error reading data barcode during multi step configuration you may cancel configuration by scanning below configuration barcode Abort ...

Page 93: ...FF Capslock Mode OFF Keyboard Layout English US Intercharacter Delay 4ms Interblock Delay 0ms BCC Binary Check Character OFF GS Character Replacement OFF Define Replacement Character N A Image Settings Inverse Barcode OFF Interface Set SPP Pincode 1234 General Bluetooth Settings Power Off Timeout 03 00 Secure Simple Pairing SSP ON Set Bluetooth Device ID Wireless Scanner Memory Mode Data Format Da...

Page 94: ...LF BT SPP USB VCP Symbologies General Settings N A UPC A Enable Disable ON Check Digit Send UPC A Expand to EAN 13 OFF 5 digit Supplement OFF 2 digit Supplement OFF Addenda Required OFF UPC E Enable Disable ON Check Digit Send 5 digit Supplement OFF 2 digit Supplement OFF Addenda Required OFF EAN 8 Enable Disable ON Check Digit Send 5 digit Supplement OFF 2 digit Supplement OFF Addenda Required OF...

Page 95: ... Disable CDV Start Stop Not Send Min Length 01 Max Length 99 Interleaved 2 of 5 Enable Disable OFF Verification Disable CDV Min Length 04 Max Length 32 Standard 2 of 5 IATA Enable Disable OFF Verification Disable CDV Min Length 04 Max Length 32 Matrix 2 of 5 Enable Disable OFF Verification Disable CDV Min Length 04 Max Length 32 Industrial 2 of 5 Enable Disable OFF Verification Disable CDV Min Len...

Page 96: ...th 04 Max Length 32 UK Plessey Enable Disable OFF Check Digit Not Send Code 93 Enable Disable ON Min Length 01 Max Length 99 Code 128 GS1 128 Enable Disable ON Min Length 01 Max Length 99 GS1 DataBar RSS 14 Enable Disable OFF GS1 DataBar Limited RSS Limited Enable Disable OFF GS1 DataBar Expanded RSS Expanded Enable Disable OFF Min Length 04 Max Length 32 Surround AI s with Parentheses OFF QR Code...

Page 97: ...4 User s Manual V1 0 97 Enable Disable ON PDF 417 Enable Disable ON Micro PDF 417 Enable Disable ON Aztec Enable Disable OFF MaxiCode Enable Disable OFF Hanxin Enable Disable OFF Code 16K Enable Disable OFF ...

Page 98: ...44 6 Code32 B 42 7 Codabar N 4E 8 Interleaved 2 of 5 I 49 9 Standard 2 of 5 IATA R 52 10 Matrix 2 of 5 Y 59 11 Industrial 2 of 5 V 56 12 Code 11 J 4A 13 China Postal Code Toshiba Code H 48 14 MSI Plessey O 4F 15 UK Plessey P 50 16 Code 93 L 4C 17 Code 128 GS1 128 K 4B 18 GS1 DataBar G 47 19 QR Code W 57 20 Micro QR Code w 77 21 Data Matrix X 58 22 PDF417 Z 5A ...

Page 99: ...MT584 User s Manual V1 0 99 23 MicroPDF417 Z 5A 24 Aztec z 7A 25 MaxiCode Z 5A 26 Hanxin X 58 27 Code 16K 16 31 36 ...

Page 100: ... Line Feed 0B 11 VT Vertical Tab 0C 12 FF Form Feed 0D 13 CR Carriage Return 0E 14 SO Shift Out 0F 15 SI Shift In 10 16 DLE Data Link Escape 11 17 DC1 XON Device Control 1 12 18 DC2 Device Control 2 13 19 DC3 XOFF Device Control 3 14 20 DC4 Device Control 4 15 21 NAK Negative Acknowledgment 16 22 SYN Synchronous Idle 17 23 ETB End of Trans Block 18 24 CAN Cancel 19 25 EM End of Medium 1A 26 SUB Su...

Page 101: ...enthesis 2A 42 Asterisk 2B 43 Plus 2C 44 Comma 2D 45 Minus Dash 2E 46 Dot 2F 47 Forward Slash 30 48 0 31 49 1 32 50 2 33 51 3 34 52 4 35 53 5 36 54 6 37 55 7 38 56 8 39 57 9 3A 58 Colon 3B 59 Semi colon 3C 60 Less Than 3D 61 Equal Sign 3E 62 Greater Than 3F 63 Question Mark 40 64 AT Symbol 41 65 A 42 66 B 43 67 C 44 68 D 45 69 E 46 70 F 47 71 G 48 72 H 49 73 I 4A 74 J ...

Page 102: ...V 57 87 W 58 88 X 59 89 Y 5A 90 Z 5B 91 Left Opening Bracket 5C 92 Back Slash 5D 93 Right Closing Bracket 5E 94 Caret Circumflex 5F 95 _ Underscore 60 96 Grave Accent 61 97 a 62 98 b 63 99 c 64 100 d 65 101 e 66 102 f 67 103 g 68 104 h 69 105 i 6A 106 j 6B 107 k 6C 108 l 6D 109 m 6E 110 n 6F 111 o 70 112 p 71 113 q 72 114 r ...

Page 103: ...T584 User s Manual V1 0 103 73 115 s 74 116 t 75 117 u 76 118 v 77 119 w 78 120 x 79 121 y 7A 122 z 7B 123 Left Opening Brace 7C 124 Vertical Bar 7D 125 Right Closing Brace 7E 126 Tilde 7F 127 DEL Delete ...

Page 104: ...MT584 User s Manual V1 0 104 Version History Rev Date Description Issued 1 0 2022 07 13 Initial Release Shaw ...

Reviews: