background image


10   

On-Screen Menu (continued)


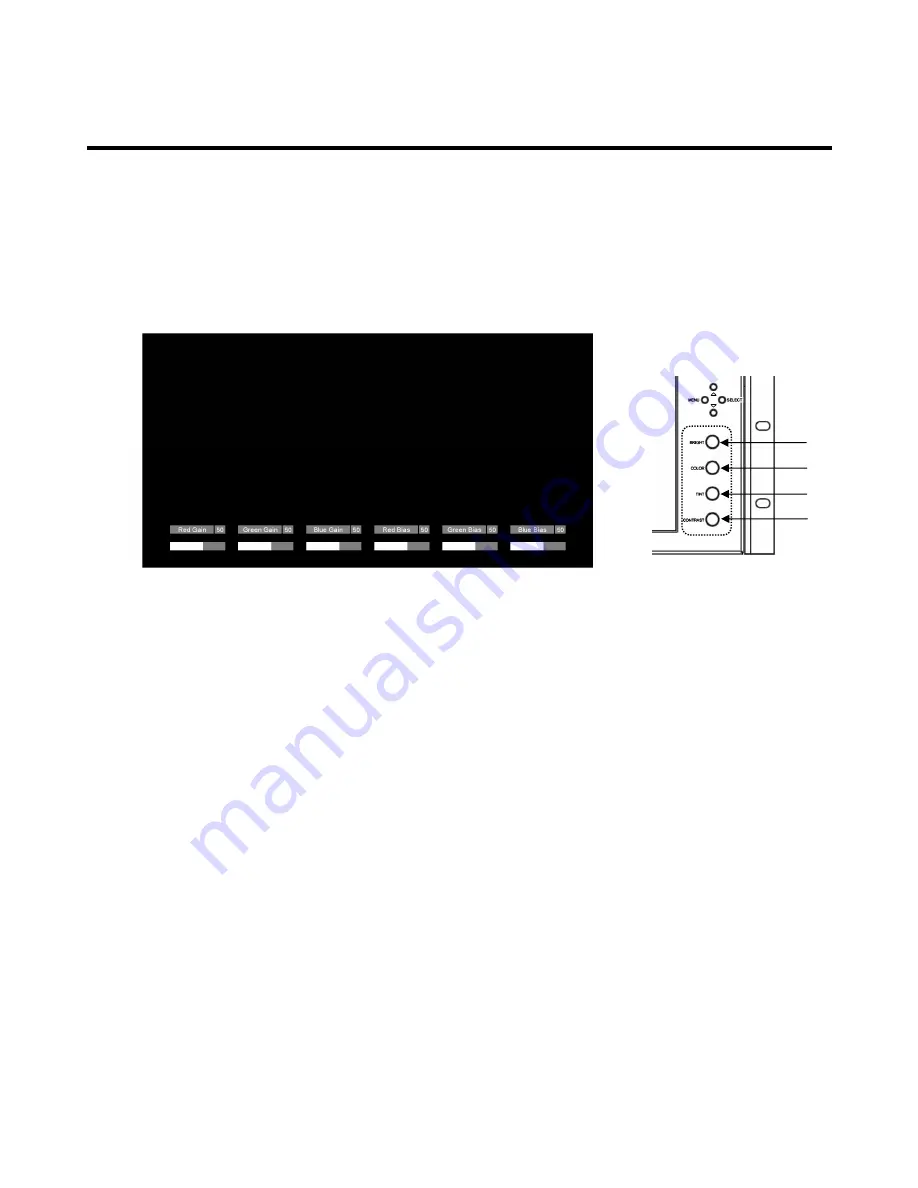
  RGB Bias and Gain 


Select this submenu to fine-tune the monitor’s color balance (R, G, B). This should only be done by someone 
experienced with video engineering, as this will alter the overall color shading of the screen. The purpose is to allow 
color matching to other types of monitors and/or displays. Note: The Color Temperature preset will automatically 
switch to USER when Color Bias settings are adjusted. It is normal for color bias adjustments to be very subtle. 


When selecting the RGB Bias and Gain submenu, gain adjustment indicators will appear at the top of the screen, and 
bias adjustment indicators will appear at the bottom of the screen: 


Use the 

 and 

 buttons to select each individual bias or gain control. Press SELECT to begin adjusting the control. Use 

the 

 and 

 buttons to increase or decrease the value. 

 
Alternately, the image adjustment knobs (Brightness, Color, Tint, Contrast) can be used to easily adjust the bias and gain 
settings as shown below. The knobs affect whichever row of controls (gain or bias) is currently selected. 
 
Note: RGB Gain and Bias is disabled when Color Temperature is set to Linear. 
 

  Check Field 


Use the check field modes for monitor calibration or to analyze individual color components of an image. In 
Monochrome mode, all color is disabled and only a grayscale image is shown. In Blue, Green, and Red check field 
modes, only the selected color will be shown. 


  Ratio (Aspect Ratio Settings) 


Use to switch between Full Screen, 4:3 and 16:9 aspect ratios. 


As the V-MD171X monitor has a native resolution of 1920 x 1200 RGB pixels, incoming images are automatically 
scaled to fit the screen: 
 
• 

In Full Screen, images are scaled to fill the entire screen. 


• 

In 4:3 mode, images are scaled to fill the maximum 4:3 portion of the screen, with black bars filling the remainder 
of the screen edges. 


• 

In 16:9 mode, images are scaled to fill the maximum 16:9 portion of the screen (1920 x1080), with black bars 
filling the remainder of the screen. 

RED 

GREEN 

BLUE 

ALL 

RGB Bias and Gain Submenu 
 

Summary of Contents for V-MD171X

Page 1: ...Marshall Electronics V MD171X 17 High Resolution Rack Mountable Monitor Operating Instructions ...

Page 2: ...tion 6 Compatible Input Formats 7 On Screen Menu 8 STRUCTURE OVERVIEW 8 MAIN MENU AND NAVIGATION 9 VIDEO CONFIGURATION SUBMENU 9 MARKER CONFIGURATION SUBMENU 12 FILTER CONFIGURATION SUBMENU 16 SYSTEM CONFIGURATION SUBMENU 17 FUNCTION PRESETS SUBMENU 19 Specifications 20 Dimensions 21 Maintenance 22 Warranty 22 ...

Page 3: ... possible damage to the monitor s internal components A VESA standard 75mm hole pattern also allows custom mounting installations Alternately the V MD171X can be used in a desktop configuration with optional stand Marshall part number V ST15 Input Slots Install any optional input modules BEFORE applying power to unit Please see detailed instructions on Page 9 Connections and Power On Plug the V PS...

Page 4: ...function buttons can be used for direct access to various settings Functions are assigned using the on screen menu Function Presets Page 21 Menu Navigation Buttons Use the Menu and Select buttons to display and navigate the on screen menu See Main Menu and Navigation Page 12 Image Adjustment Knobs Use the image adjustment knobs to adjust color brightness color saturation tint and contrast of the i...

Page 5: ... can be activated via the HD 15 connector by connecting the corresponding pin to ground A variety of external devices can be used to perform the contact closure No additional power should be supplied to the HD 15 port See pin out details on page 22 Programming Connector CN1 For Factory Use ONLY NOTE although this appears to be a standard USB connector It is NOT Do not connect to any computer direc...

Page 6: ...h slot you intend to install module Slot 1 or Slot 2 Carefully align the module with the chosen slot The raised rails will fit inside the module Align the Module so that the three 3 mounting holes all line up with the threaded holes of the slot The connectors on both the module and the main board slot should now be in alignment Carefully PRESS the module into the slot Module will seat flush with t...

Page 7: ...98 23 98sF MD HDSDIx2 A Two channel HDSDI Input Module with Switched Output SD SDI 480i 59 94 576i 50 HD SDI 720p 60 59 94 50 30 29 97 25 1080i 60 59 94 50 1080p 30 29 97 25 24 24sF 23 98 23 98sF MD DVII A DVI I Input Module DVI D Video YCbCr or RGB 480p 59 94 576p50 720 59 94 60 50 25 29 97 30 1080i 50 59 94 60 1080p 23 97 24 29 97 30 24 24sF 23 98 23 98sF PC Formats DVI D and DVI A 640 x 480 60 ...

Page 8: ...reen Menu STRUCTURE OVERVIEW 1 Disabled when Color Temperature is set to Linear 2 Disabled when Pixel to Pixel is ON 3 Available only with Composite NTSC or PAL Input 4 Available only with Composite NTSC Input ...

Page 9: ... MENU Exit the main menu by pressing MENU The menu will automatically time out after approximately 15 seconds VIDEO CONFIGURATION SUBMENU Color Temperature Use this setting to choose one of five color temperature presets D65 5500K D55 6500K D93 9300K USER Adjustable Color Bias and Gain Linear Gamma Use this setting to choose one of four selectable Gamma tables 2 2 2 4 1 8 2 0 Note Gamma is disable...

Page 10: ...rast can be used to easily adjust the bias and gain settings as shown below The knobs affect whichever row of controls gain or bias is currently selected Note RGB Gain and Bias is disabled when Color Temperature is set to Linear Check Field Use the check field modes for monitor calibration or to analyze individual color components of an image In Monochrome mode all color is disabled and only a gra...

Page 11: ...ee delay modes H V Delay V Delay H Delay In H V Delay mode both horizontal sync and vertical sync are delayed resulting in both horizontal and vertical blanking periods being shown on the screen In V Delay mode vertical sync is delayed so that the vertical blanking period is displayed on screen In H Delay mode horizontal sync is delayed so that the horizontal blanking period is displayed on the sc...

Page 12: ...mposite input and all component 3G SDI formats MARKER CONFIGURATION SUBMENU Markers Use this setting to enable or disable all on screen markers This setting affects the center marker full screen markers 16 9 markers and 4 3 markers Center Marker Use this setting to display a center marker on the screen 16 9 Markers Use these settings to superimpose one of the selectable markers on the screen when ...

Page 13: ... no marker 95 Safe Area 93 Safe Area 90 Safe Area 88 Safe Area 85 Safe Area 80 Safe Area User 4 3 Marker Examples 4 3 Markers Use this setting to superimpose one of the selectable markers on the screen when in 4 3 ratio mode This setting is disabled when the aspect ratio is set to 16 9 or when Pixel to Pixel Underscan or H V Delay is enabled Off no marker 95 Safe Area 93 Safe Area 90 Safe Area 88 ...

Page 14: ...cted aspect ratio Full Screen 4 3 or 16 9 in the Marker Configuration submenu and press the SELECT button You may also begin with an already predefined safe area 95 93 90 etc and make your adjustments from there by highlighting a particular safe area and pressing the SELECT button 2 Use the BRIGHT COLOR TINT and CONTRAST knobs to move the LEFT RIGHT TOP and BOTTOM borders of the safe area to your ...

Page 15: ...15 ...

Page 16: ...like people it is common practice to set exposure of faces to the equivalent of approximately 56 IRE The false color filter will show this area as the color PINK on the monitor Therefore as you increase exposure open the IRIS your subject will change color as indicated on the chart PINK then GREY then a few shades of YELLOW Over exposed subjects above 101 IRE on the monitor will be shown as RED In...

Page 17: ...this option to enable on screen display of input format status in the upper left corner of the screen Options are Off On or 5 Sec When 5 Sec selected On Screen display whenever a new input is received then after approximately 5 seconds the text wit disappear Curtain Color Selects the color of the screen whenever there is no input or if input is lost Choices are Blue Black or Green Splash Screen Th...

Page 18: ... recall of any of the 6 saved configurations User 1 6 Also available is the ability to load factory default settings MFG Default Save Setup Up to 6 User Setups can be stored on this monitor Save Setup allows the current configuration to be saved in one of 6 named locations in memory User 1 6 Settings are saved even if power is lost from the unit Power on Preset Selects what preset configuration is...

Page 19: ...s Allows user to assign menu items to the front panel function buttons F1 F2 F3 and F4 The following options are available for each button Ratio Check Field Mosquito Filter False Colors Freeze Input Aspect Markers Center Marker Markers Underscan H V Delay Pixel to Pixel ...

Page 20: ...Module Slots For Marshall I O Modules Only Cold Swap remove power from unit before Inserting or removing Modules Power Input 4 Pin XLR Connector Tally Hardware Interface HD 15 Female CN 1 Programming Port NOT USB Factory Use Only TALLY HARDWARE INTERFACE HD 15 Activation requires contact closure of pin to ground on the HD 15 connector ELECTRICAL Power Consumption ON 3 5 Amp 12VDC 42 W Max Voltage ...

Page 21: ...21 Dimensions ...

Page 22: ...a warranty claim Marshall Electronics reserves the right not to honor the warranty set forth above Therefore labor and parts may be charged to the consumer This warranty does not apply to the product exterior or cosmetics Misuse abnormal handling alterations or modifications in design or construction void this warranty It is considered normal for a minimal amount of pixels not to exceed three to f...

Reviews: