CV605-BK/WH Manual
www.marshall-usa.com
10
11
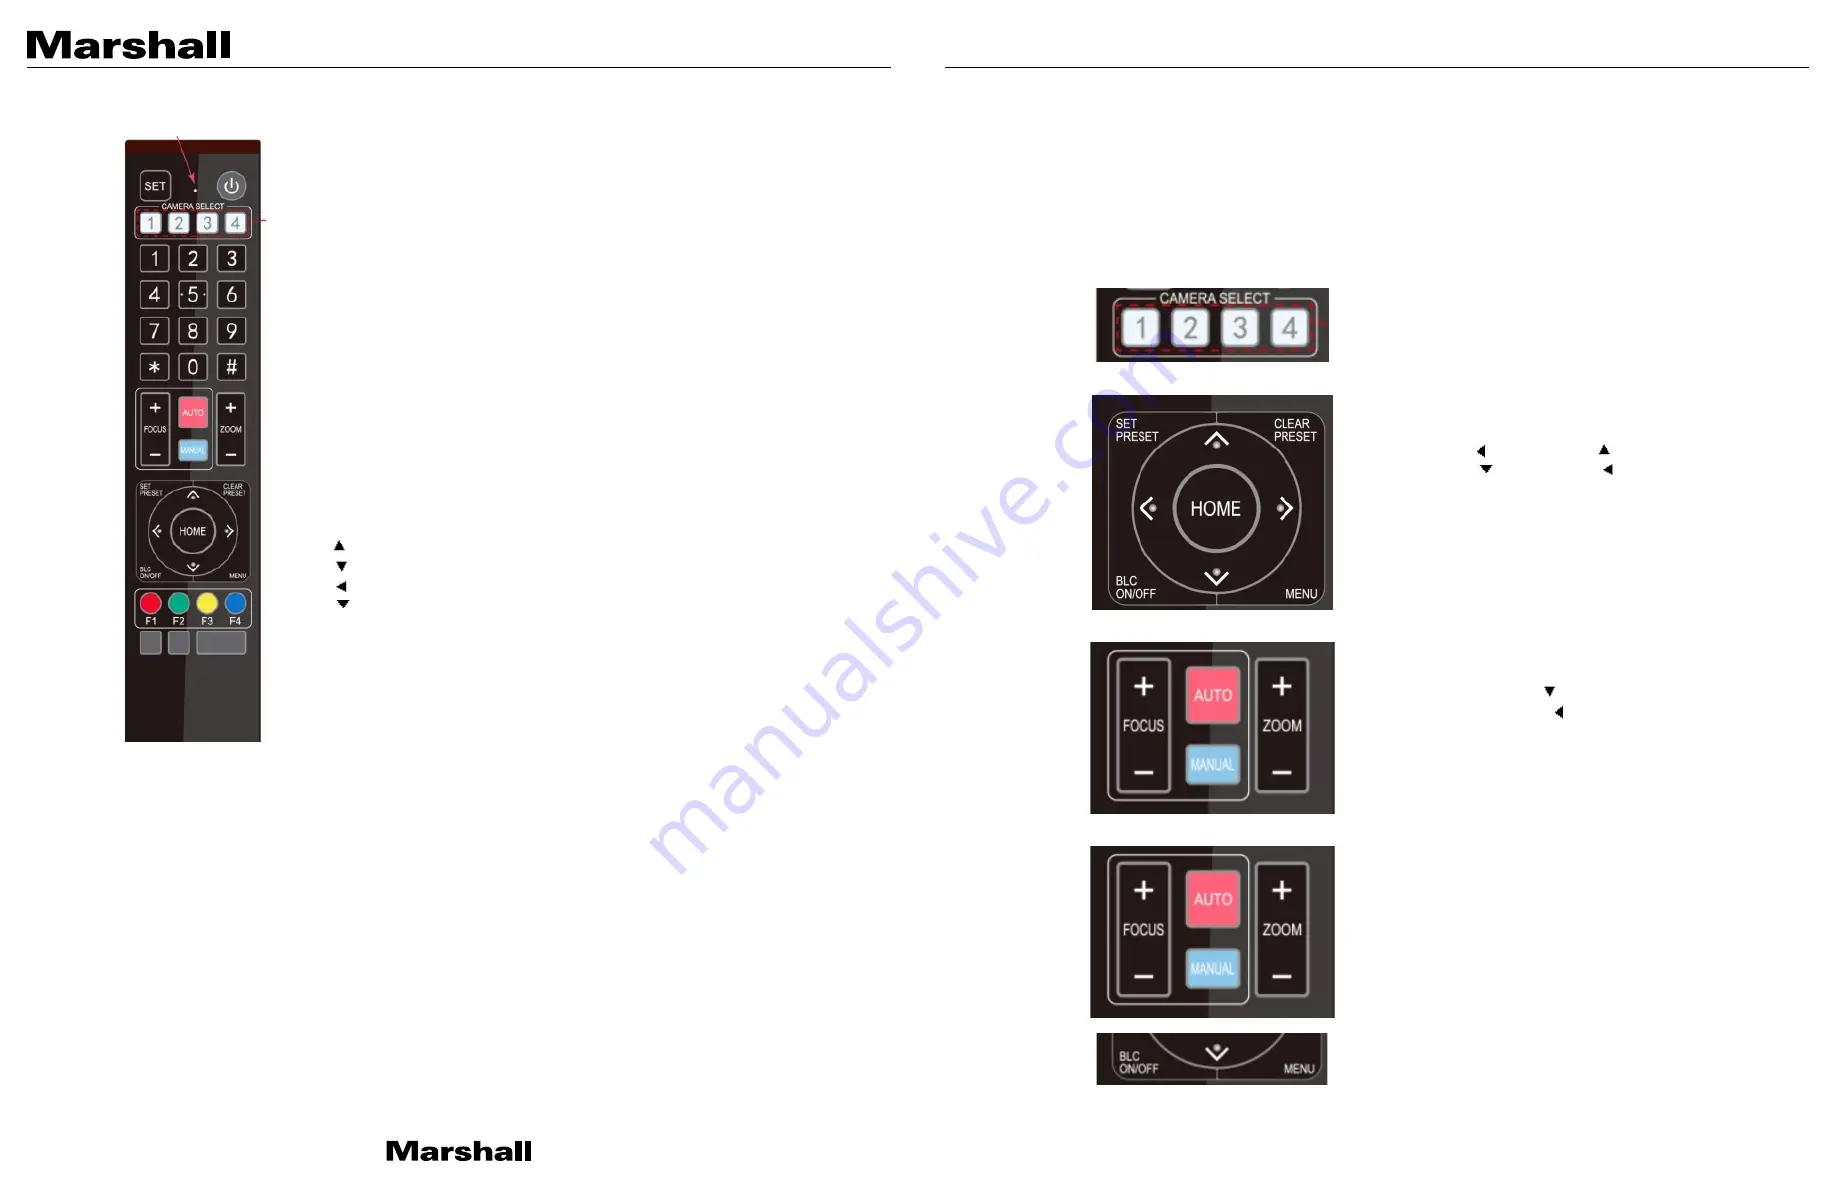
3.1 Remote Controller
3.1.1
Setting Explanation
1. Standby Key
After a 3 second press, the camera will go into standby mode. Long press 3 second press again,
camera will self-test again and move to HOME position. (Note: If power-on mode is turned on and
Preset 0 is set, and there is no operation within 12s, camera will automatically point to the
specified preset position.
2. Camera Address Selection
Select the camera
address
of which to control
3. Number Key
Set or run 0-9 presets
4, *, # Key
Key combination use
5. Focus Control Key
Auto Focus: Enter Auto focus mode.
Manual Focus: The camera focus mode is manual
Switch the camera focus mode to manual by pressing [focus +] or [focus -] to adjust manually.
6. Zoom Control Key
Zoom
+
: Lens near or zoom in
Zoom
-
: Lens far or zoom out
7. Set or Clear Preset key:
Set Preset: Set preset key + 0-9 number key:
Clear Preset key: Clear preset key + 0-9 number key
8. Pan/Tilt Control Key
Press Key: Up
Press Key: Down
Press Key: Left
Press Key: Right
“HOME” Key: Return to the middle position or enter next level menu
9. BLC Control Key
Back Light ON / OFF: Turn back light on or off
10. Menu Setting
Open or close the OSD menu
Enter / Exit the OSD menu or return to the previous menu.
11. Camera IR Remote Control Address Setting
【
*
】
+
【#】
+
【
F1
】
:Camera Address No.1
【
*
】
+
【#】
+
【
F2
】
:Camera Address No. 2
【
*
】
+
【#】
+
【
F3
】
:Camera Address No. 3
【
*
】
+
【#】
+
【
F4
】
:Camera Address No. 4
12. Key Combination Functions
1)
【
#
】
+
【
#
】
+
【
#
】
:Clear all presets
2)
【
*
】
+
【
#
】
+
【
6
】
:Restore factory defaults
3)
【
*
】
+
【
#
】
+
【
9
】
:Flip switch
4)
【
*
】
+
【
#
】
+Auto: Enter into the aging mode
5)
【
*
】
+
【
#
】
+
【
3
】
:Menu set to Chinese
6)
【
*
】
+
【
#
】
+
【
4
】
:Menu set to English
7)
【
*
】
+
【
#
】
+Manual: Restore the default user name,
password, and IP address
8)
【
#
】
+
【
#
】
+
【
0
】
:Switch the video format to 1080P60
9)
【
#
】
+
【
#
】
+
【
1
】
: Switch the video format to 1080P50
10)
【
#
】
+
【
#
】
+
【
2
】
:Switch the video format to 1080I60
11)
【
#
】
+
【
#
】
+
【
3
】
:Switch the video format to 1080I50
12)
【
#
】
+
【
#
】
+
【
4
】
:Switch the video format to 720P60
13)
【
#
】
+
【
#
】
+
【
5
】
:Switch the video format to 720P50
14)
【
#
】
+
【
#
】
+
【
6
】
:Switch the video format to 1080P30
15)
【
#
】
+
【
#
】
+
【
7
】
:Switch the video format to 1080P25
16)
【
#
】
+
【
#
】
+
【
8
】
:Switch the video format to 720P30
17)
【
#
】
+
【
#
】
+
【
9
】
:Switch the video format to 720P25
3.1.2 Applications
After camera boot-up (initialize), camera can receive and execute IR commands. Press the remote controller button, the
indicator light will start flashing; release the button, the indicator light will stop flashing. Users can control the
pan/tilt/zoom, setting and operate preset positions via the IR remote controller.
Key Instruction:
1. In these instructions, “press the key” means a quick push rather than a long-press, and a special note will be provided
if a long-press is required (longer then one second).
2. When a key-combination is required, perform it in sequence. For example,“
【
*
】
+
【
#
】
+
【
F1
】
” means press“
【
*
】
”
first and then press“
【
#
】
” and then lastly press“
【
F1
】
”.
1) Camera Selection
Select the camera address to control.
2) Pan/Tilt Control
Up: press
Down: press
Left: press Right: press
Back to middle position: press“
【
HOME
】
”
Press and hold the up/down/left/right key, the pan/tilt will keep
running, from slow to fast, until it runs to the maximum
endpoint; the pan/tilt movement will stop as soon as the key is
released.
3) Zoom Control
ZOOM IN: press “ZOOM “ key
ZOOM OUT: press “ZOOM ” key
Press and hold the key, the camera will keep zooming in or
zooming out and stops as soon as the key is released.
4) Focus Control
Focus (near):Press “
【
focus+
】
” key (Valid only in manual focus
mode)
Focus (far): Press “
【
focus-
】
”key (Valid only in manual focus
mode)
Auto Focus: Support
Manual Focus: Support
Press and hold the key, the action of focus will keep continue and
stops as soon as the key is released.
5) BLC Setting
BLC ON / OFF: support
6) Presets Setting, Running, Clearing


