


22201302
Page 4 of 6
Rev. A
9.
Slide the Bill Acceptor Assembly onto
the guide rail making sure that the lower
bracket is fitted into the groove on the
roller/spacer. Leave the acceptor
sticking out a little farther than it would
normally be and pull the roller/spacer
outward along with the Acceptor so that
it maintains contact. Carefully lower the
front door and gently latch it, allowing it
to push the bill acceptor and roller/
spacer rearward. Once the door is
latched, open it and using the open end
wrench to hold the roller/spacer, tighten
the Sems screw. Close the door once
again to verify that there is a snug fit
between the front of the acceptor and
the door. See Figure 5.
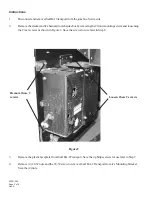
8.
Remove the roller/spacer from the OBA-2’s Bill Stacker as shown in Figure 4. Slide the Guide Plate (Item
2) over the screw present on the bill acceptor mounting panel and secure in place using one of the #8-32
machine screws removed in Step 2. Install the roller/spacer as shown in Figure 4 using the Sems Head
machine screw (Item 4) but do not tighten.
Figure 4
Roller/Spacer
OBA-2 Stacker
Tighten this
screw to secure
Slide the plate
ocer this screw
Sems Head Screw
(Item 4)
Guide
Rail
Figure 5
Move the roller/spacer forward
with the Bill Acceptor