EN
You bought a technical device, the handling is easy and simple, but
requires the observance of certain precautions. We therefore ask
you to read the following instructions carefully!
For the operation of the filter system, you need a skimmer (surface
skimmer). Either an integrated skimmer (built into the pool wall) or a
suspended skimmer (attachment to the poolwall).
Positioning
The installation area you set between the skimmer and the inlet noz-
zle so, that there is an adequate safety margin to the pelvic wall.
We recommend putting the filter system in addition on base plates
(for example: washed concrete slabs etc.). These have to be
installed with the spirit level.
Under no circumstances you may put your filter system in a trough
or directly into the grass (flood danger or risk of overheating of the
filter pump).
If you have sunk your pool
partially or completely
, so it makes sense
to place the filter pump in a filter slot, which
should connect directly
to the pelvis
.
Is your filter pump housed in a filter slot, so it has to be insured, that
the filter slot can’t be slooded. For this purpose you should bring in a
roller-burnishing (crushed rock) in the range of the filter slot,
so that the surrounding- and rainwater can seep away.
It would be
ideal if there is a direct connection to the drain in the sump of the
filter shaft (
or
sludge pump, with automatic floating switch).
It is important to ensure that the filter slot should never be airtight,
because this may cause damage, due to condensation water, on the
filter pump. The size of the filter shaft should be selected so that
work can be performed on the filter system.
The necessary accessories such as hoses, hose clamps and filter
sand (not included) are offered gladly from your pool dealer.
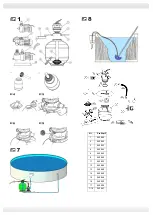
Assembly of the filter system (Illustration 1)
Assemble the filter system at the location where the pump finally will
be (the subsequent transport there would be too burdensome!).
The filter pump
consists of the following parts
:
1. Pump
2. valve
3. Seal (O-Ring)
4. clamping ring
5. vessel
6. Central pipe
7. Filter screen
8. Drain plug
9. Centralizer (cover for standpipe)
10. Base plate
11. Pressure hose
Filter vessel
1. Insert stand pipe including filter screen into boiler (Figure 2)
2. Place the stand pipe with the filter screen on the floor of the boiler,
make sure that the stand pipe is located in the middle of the boiler
and that the drain plug is screwed in.
3. Now put the centralizer on the tank opening, while centering the
standpipe. (Illustration 4)
4. Fill in the filter quarz sand up to a high of about
¾
of the
bowlhight.(right grit 0,
6
mm -
1,2
mm, Quantity: depending on filter
size) (Illus-tration 4)
5. Then mount the top oft he boiler or the valve head and the boiler
seal on the tank top of the filter vessel. Before you do this, it is
neccassary to clean again and wash off any sand or accumulated
debris. The connection of the top of the boiler or the head valve
with the filter vessel is carried out by the clamping ring. The clamp-
ing ring is screwed with the clamping ring screw and the collet nut
.
(Illustration 5 & 6)
6. Finally, mount the pump fittings on the valve head. Seal the pump
fittings sufficiently by using teflon tape.
7. The pressure gauge (if included) is screwed to the side of the 7-
way valve and sealed. The existing vent plug should be removed
first
. Illustration 9
Pump hose connections (Illustration 7)
1.
Skimmers:
Connection from skimmer to the front connector of the
filter pump.
2.
Pressure line
: Connection going from the upper area of the top of
the filter pump to the connector with the designation "PUMP" at the
7-way valve.
3.
Return line:
Connection from the 7-way valve with the designation
"RETURN" to the connection at the inlet nozzle (pool). Secure all
connections with hose clamps
.
4.
Backwash:
Connection
„WASTE“ (Empty) in the channel. Con-
nections are made with special pool hoses and hose clamps!
Commissioning of the filter system
1. Before you go in operation with the filter system, it must be insured
that the filter system stands outside the basin and in the level low-
er than the water level of the pool is, and the hose connections are
properly connected and secured.
2. The swimming pool must be filled with water, according to the in-
structions of your pool dealer. The water must flow towards the fil-
ter pump. Now the filter pump is vented. If available, open slightly
the preliminary filter of the filter pump until water flows from the
prefilter top. (transparent cover with screw connection on the top of
the filter pump) For non self-priming pumps, it is neccassary that
the water level is above the filter pump.
3. Place the handle on the 7- way valve to the Backwash position.
Only now the filter pump is taken in operation. Backwashing about
2 - 3 minutes to perform. Then turn the filter pump off again and
put the handle on the valve head in the RINSE position. Rinsing
for 30 seconds. Thereafter, the filter pump is switched off again
and the handle set to the position FILTER. The backwashing and
rinse water you best pipe in the channel.
4. Turn the filter pump back on. The filter system is in normal filter
operation. We recommend a filter run time of 2 x 4 - 5 hours per
day. If you clean the bottom of your pool with a pool vacuum
cleaner, this is also done in the position filter. After each floor-
cleaning or when the pressure on the pressure gauge if available
(by 2 - 3 ticks) rises, backwashing is required.
5. After BACKWASHING always a REFLUSHING with a duration of
approximately 30 seconds is required. This causes the reduction
of the sand in the filter vessel.
6. If you clean your pool with a pool vacuum cleaner, this can also be
done with the 7-way valve in the position DRAINING to remove
impurities from the pool (eg: algae), which otherwise go back
through the filter sand. In doing so, the water which is extracted
from the ground, will be directly pumped through the backwash
line into the open air. After this process, the water level of the pool
is supplemented accordingly.

