©2021 Marco Group Inc.
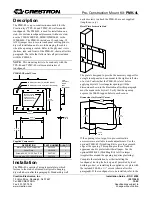
ATTACH BRACES
On the backside of the stand, attach the
(2) braces as shown here with (4) bolts “A”.
Note: The end with the round hole on each
Brace goes on the top. The rectangle hole
attaches at the bottom of stand
.
Tighten with Allen Wrench.
FINAL ASSEMBLY
Insert Top Wood Shelf “G” into Top Metal
Shelf Support with the (4) pre-drilled holes
facing down. Screw (4) bolts “B” from the
underside of the leg frames as shown here.
The bolts will secure the Wood Shelf to the
stand. Tighten with Allen Wrench.
Finally, insert Middle Wood Shelf “I” into the
Middle Shelf Support and the Bottom Wood
Shelf “K” into the Bottom Shelf Support.
ASSEMBLY OF
YOUR NEW STAND
IS NOW COMPLETE!
CARE & MAINTENANCE
• Clean furniture with a soft cotton cloth moistened with water.
• DO NOT use abrasives.
• DO NOT leave water on any of the stand’s surfaces. Always
wipe spilled water from the stand. Water, for prolonged
periods, could damage the stand’s surface.
IMPORTANT SAFETY INFORMATION
Please read all the following information before assembling and using your aquarium stand.
THIS PRODUCT IS NOT A TOY
–
NEVER allow small children to touch, climb on or play with aquarium or aquarium stand. Serious injury or death could result.
WHERE TO PLACE YOUR AQUARIUM
Use only an aquarium stand designed to support the weight and size of your aquarium. The filled weight of an aquarium is approximately 10 to 12 pounds per
gallon. This stand is designed only for use on level surfaces. Failure to place your stand on a level surface could cause the aquarium to leak, crack or even tip or
fall. Never tip the stand from the upright position.
MOVING YOUR AQUARIUM STAND
Always position the stand in the desired location before putting the aquarium tank in place. Never attempt to move the stand with the aquarium in place.
Never remove an aquarium tank from the stand unless the aquarium tank is completely empty. Never carry the stand by the top.
A
L
L
A
A
A
B
G
B