background image

12

General Information

ENGLISH

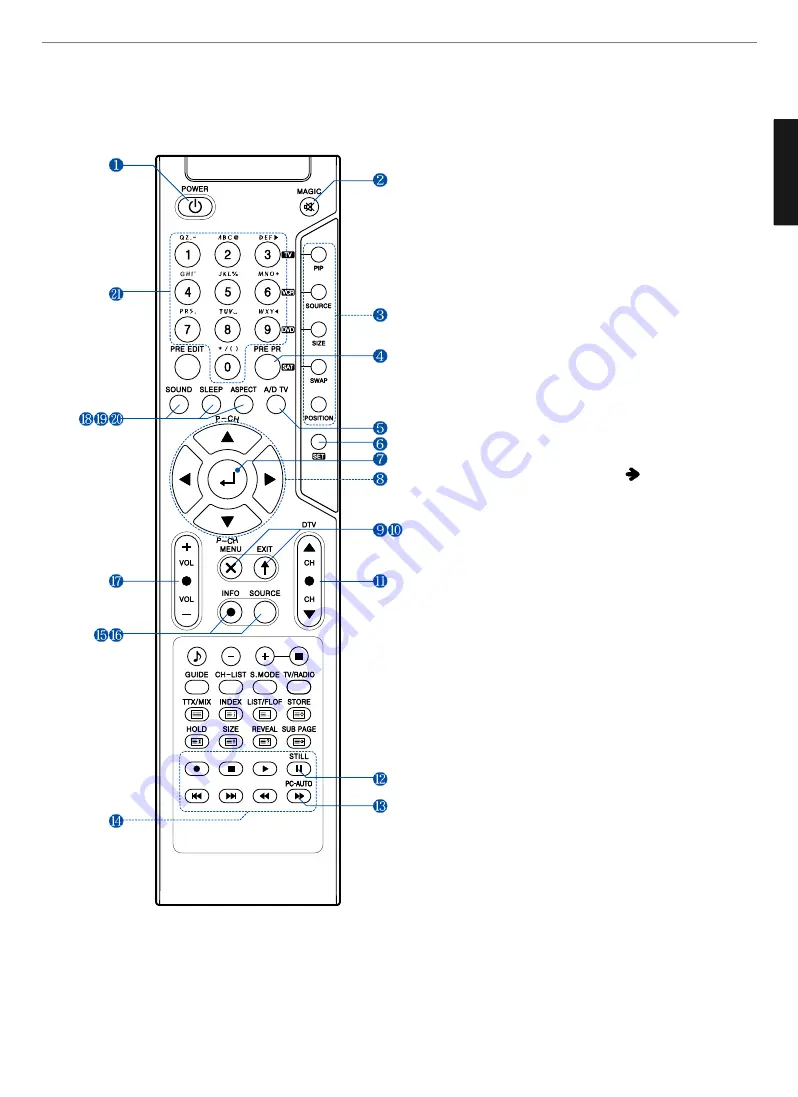
1. POWER/STANDBY

2. MUTE

This button is also used when setting up to use other 

external

devices

.

3. PIP FUNCTIONS

- PIP

: Use this button for PIP On/Off.

- SOURCE

: Use this button to select the input source of sub-picture.

- SIZE 

: Use this button to select the size of sub-picture.

- SWAP 

: Use this button to swap main and sub-picture.

- POSITION 

: Use this button to select the position of sub-picture.

4. PREVIOUS PROGRAM

5. A/D TV

Use this button to switch the input source from analog to

digital

6. Other external device selection (

44P)

7. MENU SELECTION

Use this button to select menu items.

8. LEFT/RIGHT MOVE/ADJUST

- Use these buttons to move between menu items or adjust

each item.

- Use UP/DOWN buttons to select Analog TV channels.

9. MENU

Use this button to call the OSD on the screen.

10. EXIT

Use this button to end the OSD.

11. DTV CHANNEL SELECTION

You can also use these buttons when changing pages in TTX

mode.

12. STILL 

13. PC-AUTO

14. Use this buttons to use other manufacturer’s DVD or

VCR.

15. INFOMATION

Use this button to display resolution or various program.

16. SOURCE

Use this button to select External Input.

17. VOLUME

18. SOUND MODE

19. SLEEP

20. ASPECT RATIO

Use this button to change the picture size.

21. NUMERIC KEYS

Remote Control

Summary of Contents for PD4201e

Page 1: ...dio Mode 23 How to Adjust the Desired Audio Mode 23 How to Select AVL 24 How to Select S Mode 24 How to Select TruSurround XT 25 How to Set the Output of Subwoofer 25 How to Select Earphone 26 Channel...

Page 2: ...te pattern after 10 hours The permanent image sticking couldn t take off under the latest technology even though being in its manufacturer 4 Notice It is very important to notify every buyer customer...

Page 3: ...ge unit size of grounding conductors location of antenna discharge unit connection to grounding electrodes and requirements for the grounding electrode Example of Grounding According to National Elect...

Page 4: ...ng on the TV It may cause electric shock or fire and also heavy things may cause injury when they fall Do not install in a place where there is oil smoke excessive humidity or where water may be sprin...

Page 5: ...a long time If dust is stacked on the TV electric shock or fire may be caused from heat fire or deterioration of insulation When moving the TV two or more people are advised to carry it This may cause...

Page 6: ...due to leakage or contamination In the event of damaging or dropping the product switch off the power and remove the plug Using a damaged product may cause an electric shock or a fire Contact your lo...

Page 7: ...t to purchase the following accessories consult a service center electronics shops or parts seller Antenna Cable coaxial cable Power Cord Remote Control 2 batteries 1 5V AAA User s Guide Desk type sta...

Page 8: ...t scratch on the product 2 Align the stand with TV body below and fasten the stand bars using 4 fixing screws 3 After the assembly is over stand the assembled product at a desired place Desk type stan...

Page 9: ...ween terminals on the rear of speakers with speaker connection terminals on the rear of TV Connect cables and terminals in the same color 2 Speakers left and right 4 brackets 16 fixing screws 2 sets o...

Page 10: ...er cables left and right Insert speaker stands in the groove on the bottom of speakers and fasten them using fixing screws Left and right side each Upright and place them on the desired place left and...

Page 11: ...ons also serve as the cursors of Down and Up buttons in Menu mode Select button Use this button to select each item from the menu mode Menu button Use this button to display or exit from the menu mode...

Page 12: ...udio output terminal for coaxial cable Subwoofer output terminal Half Scart input terminal SPDIF Optical audio output terminal Extend an RS 232 input for DTV communication Power AC input terminal Exte...

Page 13: ...device selection 44P 7 MENU SELECTION Use this button to select menu items 8 LEFT RIGHT MOVE ADJUST Use these buttons to move between menu items or adjust each item Use UP DOWN buttons to select Anal...

Page 14: ...orite channel lists in the channel list menu ATV To sort channels in the Program Edit menu 6 YELLOW rubber DTV To move favorite channel lists in the channel list menu ATV To edit channel names in the...

Page 15: ...e Connecting Indoor Outdoor TV Antenna UHF VHF Antenna or Cable service without cable box connections For on optimum picture quality adjust the direction of antenna if needed VCR Cable Receiver Connec...

Page 16: ...or Set Top Box supports DVI D SUB see How to connect to a PC page 16 You can enjoy more clear picture quality DTV receiver DVD Player Audio cable Video Y Pb Pr cable How to Connect a DTV Receiver or...

Page 17: ...lity If you input an unsupported resolution in PC or DVI mode the screen won t be displayed properly How to Connect a VCR Cable Receiver Camcoder Game Player 1 Connect the Video cable or S Video cable...

Page 18: ...et VCR to H Scart so that you can redirect the signal from F Scart to H Scart F Scart sends the TV broadcast signal received through an antenna to a set top box and receives the descrambled signal bac...

Page 19: ...al S VIDEO For supporting better resolution than composite video which carries the signals together VIDEO For supporting the color shade chrominance and brightness luminance information into one video...

Page 20: ...harpness hue saturation How to Select the Picture Mode Users can automatically adjust the picture mode according to the input mode How to Set the Desired Picture Users can manually adjust their desire...

Page 21: ...with bluish tone USER When the user wants to set the degree of RGB directly Press MENU button Menu items appear on the screen Press button to select Picture Icon PICTURE MODE is highlighted Press butt...

Page 22: ...ress buttons to move to SCALE Press buttons then the mode change in the following order WIDE ZOOM1 ZOOM2 4 3 14 9 Press EXIT button to TV viewing or press MENU button to return to the previous menu 1...

Page 23: ...ENU button Menu items appear on the screen Press button to select PC Icon H POSITION is highlighted Select required option by pressing the button then Press button to adjust Press EXIT button to TV vi...

Page 24: ...speakers EQUALIZER Adjusts the audio ouput signal in the desired band 3 4 2 1 5 6 7 8 Press MENU button Menu items appear on the screen Press buttons to move to SOUND icon Press button to select SOUND...

Page 25: ...or if you are having difficultly receiving a STEREO signal If the signal reception conditions deteriorate setting to Mono will make sound conditions better 1 2 How to Select S Mode Depending on the p...

Page 26: ...se a subwoofer speaker system with built in amplifier 1 3 4 5 6 7 8 2 How to Select TruSurround XT This function processes multi channel surround sound through two speakers Press MENU button Menu item...

Page 27: ...ss buttons to move to SOUND icon Press button to select SOUND icon SOUND MODE is highlighted Press buttons to move to EARPHONE Press buttons to adjust volume Press EXIT button to TV viewing or press M...

Page 28: ...ton Menu items appear on the screen Press Buttons to move to CHANNEL icon Press button to select CHANNEL Icon AUTO PROGRAM is highlighted Press buttons to select AUTO PROGRAM Auto program menu appears...

Page 29: ...ess the Yellow button Select a letter A Z a number 0 9 or blank space If you need to erase press button which is the same feature as back space b To store the setting press the Yellow button once agai...

Page 30: ...FF How to Directly Turn PIP FUNCTION ON OFF Press PIP button TWIN To watch two screens in half and half PIP To watch the Sub screen in the main screen at once After setting this go to step 6 to set th...

Page 31: ...ng order LEFT TOP RIGHT TOP RIGHT BOTTOM LEFT BOTTOM How To Directly Set the POSITION Press POSITION button In case the Input source in Sub picture is TV go to step 15 when you wish to change the chan...

Page 32: ...T 1 2 How to Set Key Lock User can lock the control buttons on the front bottom of the TV 3 4 5 Press MENU button Menu items appear on the screen Press button to select Function Icon PIP TWIN is highl...
Page 33: ...owing order ENGLISH DEUTSCH FRAN AIS NEDERLAND ITALIANO ESPA OL SUOMI Press EXIT button to TV viewing or press MENU button to return to the previous menu 1 3 4 2 How to Set Teletext in ATV You can use...

Page 34: ...CTION Hidden Text Answers to Quiz Games for Example The Normal Screen A Second Page Normal screen Double Size Letters in the Upper half of the screen Lower half of the screen Normal Screen Stops the a...

Page 35: ...0 How To Directly Start Sleep Press SLEEP button One minute before the preset Sleep Time TURN OFF AFTER 1 MIN message will appear Go to step 8 if you need to set the ON OFF TIME Press buttons to move...

Page 36: ...vates While searching you can see the following menu on the screen When scanning is finished you can see the following information on the screen After the scanning process the first program of the las...

Page 37: ...tems appear on the screen Press Buttons to move to DTV CHANNEL icon Press button to select DTV CHANNEL Icon AUTO SCAN is highlighted Press Buttons to move to CHANNEL STATE icon Press buttons to select...

Page 38: ...uld be converted to the next or current program information respectively Press YELLOW button You can see the program schedule list of the selected channel If you want to see the program information of...

Page 39: ...n Press EXIT button to TV viewing or press MENU button to return to the previous menu 1 5 7 8 2 How to Set Favorite Channel Users can store frequently watched channels to quickly access a preferred ch...

Page 40: ...t Mode Users can see variant channel lists which may enable them to edit and select channels more conveniently 3 4 5 How to Lock Channel This menu enables users to prevent children from viewing progra...

Page 41: ...els will move automatically to the programmed position Press MENU EXIT or button to finish the process 1 2 How to Delete Channel Users can delete channels from the channel list Press CH LIST button Ch...

Page 42: ...O channels How to Factory Set The status of the Digital TV will return to factory default parameters by using this function Press MENU button Menu items appear on the screen Press Buttons to move to D...

Page 43: ...Image Sticking at the begining of the manual How to Subtitle Audio Users can adjust the subtitle and audio condition status of the current channel Press S MODE button Subtle and audio related window w...

Page 44: ...time settings are correct or infor mation is not sent by the channel provider 43 DTV Channel Setup How to Set Teletext in DTV You can use Teletext service in iDTV mode The icon on the screen means you...

Page 45: ...button and button at the same time for two seconds 4 Enter an appropriate 3 digit number of the manufacturer from the DVD Setting Number Table If the product brand you want to set has multiple settin...

Page 46: ...45 DVD Setting Number Table Satellite Receiver Setting Number Table Appendix ENGLISH...

Page 47: ...Check whether power is on Check whether the power is cut or whether the power cord is properly connected Try to plug another product s power cord to the same outlet to check the outlet itself This sy...

Page 48: ...cks Check other channels for sound Check the volume settings on the cable broadcasting receiver Try to press volume up volume down buttons of your remote control Select sound balance and make proper a...

Page 49: ...eo Composite PC DVI AC 100 240 V 50 60 Hz Typical 380W Typical 3 5W 1030 x 79 x 716 32 Kg Remote control Key control Full Scart Half Scart S Video Video RCA Component Y Cb Cr Antenna PC Connectionjack...

Page 50: ...49 Appendix ENGLISH...

Reviews: