background image

ENGLISH

Connecting Up

2

10

Befor

e Y
ou St

ar

t

C

onnec

ting Up

Co
ntr
ol & Displa

ys

Ge
tting St

ar

te

d

Pla
ying Discs

D

VD Se

tup Menu

A

dditional 

Informa

tion

Connecting audio/video cables

Be sure to insert each 
plug fully for the best 
con nec tion. The plugs 
and jacks are color-cod ed 
to make con nec tion 
easier.

Connecting system control cables 
(USA only)

By connecting this DVD player to another 
Marantz audio component using a supplied 
system control cable, you can remotely 
operate the components as a single system.

•    When con nect ing to a com po nent with a 

remote sensor, be sure to connect the 

REMOTE 

CON TROL IN

 jack of this DVD player to 

the 

REMOTE CON TROL OUT

 jack of the 

com po nent with the remote sensor.

•    When connecting to component which is 

not equipped with a remote sensor, be sure 
to connect the com po nent to the 

REMOTE 

CONTROL OUT

 jack of this DVD player. 

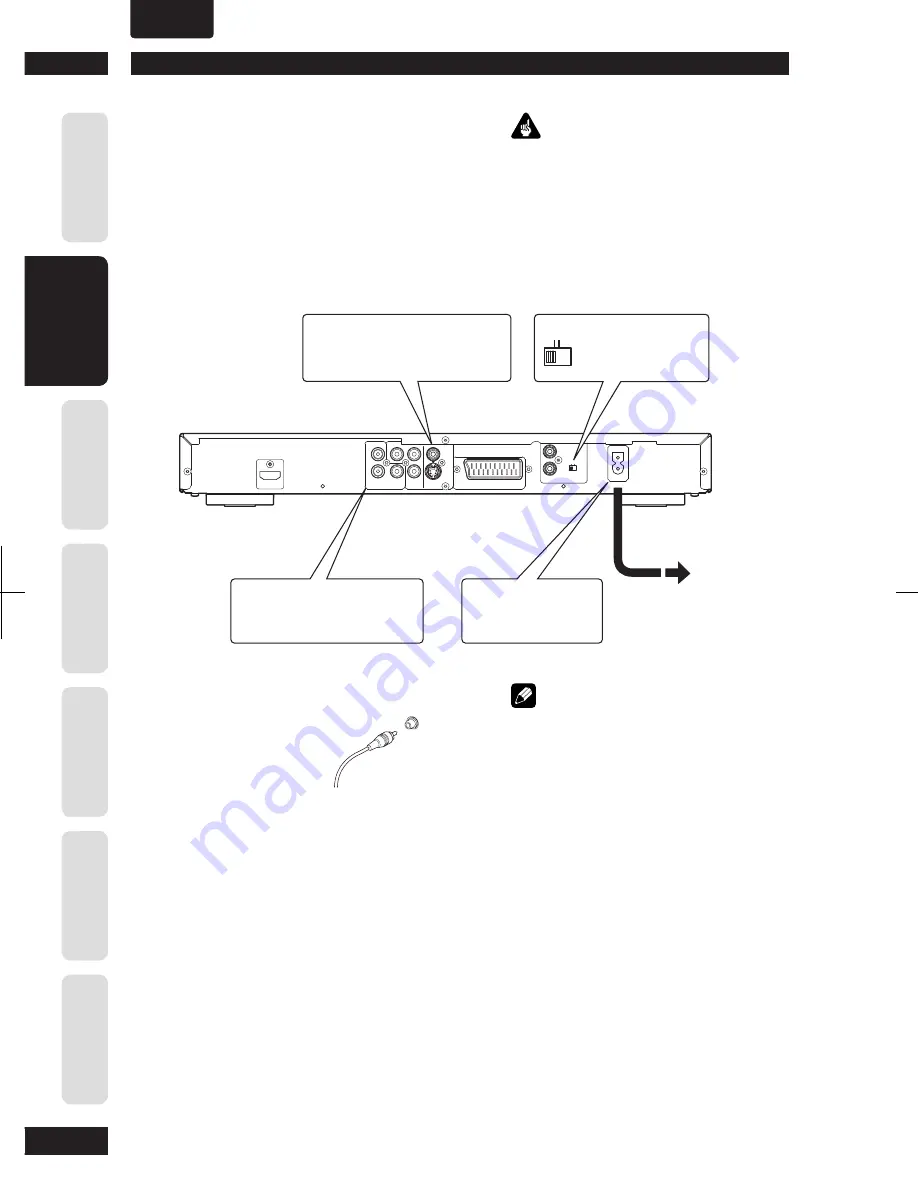
Easy setup

This easy setup is the minimum set of 
connections you need to start watching 
DVD-Video discs. Both sound and picture 
are fed directly to your TV using the 
sup plied audio/video cables. For other 
possible con nec tions, see 

pages 11

 and 

12

.


  Important

•    Before making or changing any rear panel 

connections, make sure that all components are 
switched off and unplugged from the wall outlet.

•    While a connected component is turned on, 

do not unplug the power cord of this DVD 
player from the wall outlet. The speaker may be 
damaged.


  Note

•    When connecting to a standard TV, select 

4:3 LETTER - BOX

 or 

4:3 PAN SCAN

 in the TV 

Aspect setting (see 

page 40

).

•    Connect the video output of the player directly 

to your TV. Because the player is de signed to 
support an Analog Protection System copy card, 
there are cases when proper playback will be 
not be possible if the player is connected to the 
TV through a VCR and images are recorded and 
played on the VCR.

•    The player’s video output and S1 output are not 

be progressive.

•      

Remote switch (USA only)

     When using this DVD player independently, set 

this switch to 

INT. (INTERNAL)

. When using this 

DVD player in a system with a Marantz receiver 
equipped with a remote sensor, set the switch to 

EXT. (EXTERNAL)

.

ANALOG

AUDIO

L

COMPONENT

Y

DIGITAL

COAX.

AC IN

S1

VIDEO

R

HDMI

R

/P

C

R

B

B

C /P

OUT

IN

EXT.

INT.

REMOTE 

CONTROL

A/V EUROCONNECTOR

1

3

2

INT. EXT.

Connect to a composite video 
input on your TV using the 
supplied Audio/Video cable.

Plug into a standard 
AC wall outlet.

Connect to a pair of stereo audio 
inputs on your TV using the 
sup plied Audio/Video cable.

See Note:
Remote Switch 
(for USA only)

Summary of Contents for 541110153029M

Page 1: ...DVD Player DV4003 ESPA OL FRAN AIS ENGLISH...

Page 2: ...instructions put them away in a safe place for future reference CAUTION VISIBLE AND INVISIBLE LASER RADIATION WHEN OPEN AVOID EXPOSURE TO BEAM WARNING LOCATION INSIDE ON LASER COVERSHIELD CAUTION TO R...

Page 3: ...h the cart stand tripod bracket or table specified by the manufacturer or sold with the apparatus When a cart is used use caution when moving the cart apparatus combination to avoid injury from tip ov...

Page 4: ...igital device pursuant to Part 15 of the FCC rules These limits are designed to provide reason able protection against harmful interference in a residential installation This equipment generates uses...

Page 5: ...oduction 18 Fast Forward Fast Reversed 18 Still Frame Slow Play Frame Advance Playback 19 Using the Repeat Play 20 Looping a section of a disc 21 Using the Random SHUFFLE Play 21 Switching Camera Angl...

Page 6: ...4x over sampling to let you enjoy beautiful video possible with DVD High quality 24 bit 192 kHz DAC The high specification 24 bit 192 kHz DAC delivers dynamic smooth and expansive analog sound from C...

Page 7: ...ent Remove batteries from equipment that isn t going to be used for a month or more When disposing of used batteries please comply with governmental regulations or environmental bylaws that apply in y...

Page 8: ...Please note the following points when using these discs Logo This unit can play DVD RW discs recorded as DVD Video format and DVD VR format DVD RW discs that were recorded with copy once only permiss...

Page 9: ...mages This player can display HD JPEG images Always be sure to specify a le extension of JPG or JPEG for JPEG les The le will not be able to be displayed if a le extension other than JPG or JPEG is sp...

Page 10: ...any rear panel connections make sure that all components are switched off and unplugged from the wall outlet While a connected component is turned on do not unplug the power cord of this DVD player fr...

Page 11: ...analog format it becomes possible to provide the very finest in image quality see pages 38 42 43 Note The HDMI output of this unit can be connected to a DVI jack on a TV or other device using a conver...

Page 12: ...xial type jacks Make sure that the plug is pushed fully home Home theater audio connections This player outputs multi channel audio in digital form Check the manual for your amplifier receiver to see...

Page 13: ...NDBY Press to turn the power on and press it again to enter STANDBY mode 8 Display Operation indications are displayed here 9 AUDIO EX indicator Lights when the AUDIO EX is activated using the AUDIO E...

Page 14: ...ea Non applicable models MARANTZ Ampli ers and receivers which had released before 2006 including PM 14 PM 17 and PM4001 except above models 8 4 PREV NEXT Skip pages 16 17 18 27 28 36 46 Allows you to...

Page 15: ...sure that it is set to the correct video input 2 Press STOP OPEN CLOSE on the front panel or 0 OPEN CLOSE on the remote control to open the disc tray 3 Load a disc Load a disc with the label side fac...

Page 16: ...apters Press and hold for Fast Reversed Skips to the next track or chapter Press and hold for Fast Forward Numbers Playback starts from the selected track chapter number ENTER Select the current menu...

Page 17: ...same as the top menu RETURN Returns to the previously displayed menu screen Cursor Moves the cursor around the screen 2 3 5 ENTER Selects the current menu option Numbers Selects a numbered menu optio...

Page 18: ...st Reverse the speed of play back can be adjusted from x2 speed to x32 speed in 5 steps using 4 PREV To return to normal play back press 3 PLAY to normal play back Note The sound is muted during fast...

Page 19: ...speed of playback can be adjusted from 1 2 normal playback speed to 1 normal playback speed in 5 steps using 5 up To return to normal playback When the picture is paused or during slow playback pressi...

Page 20: ...disc It s also possible to loop a section of a disc You can t use any repeat mode or looped play with a Video CD playing in PBC mode Press REPEAT during playback to select a repeat mode Each press swi...

Page 21: ...be in the same track 2 To resume normal playback press A B again Note There may be a slightly difference between point A and the location where playback actually resumes depending on the disc After Re...

Page 22: ...not work Switching the Subtitle Language DVD Video DivX Many DVD Video discs or DivX discs have subtitles in one or more languages The disc box will usually tell you which subtitle languages are avai...

Page 23: ...may take a few seconds till a selected Audio Language is audible Switching the Audio channel Depending on the disc this feature may not work Video CD On Video CDs you can switch between stereo just th...

Page 24: ...plays them on one screen TRACK INTERVAL View the content of a single track in six thumbnail pictures It divides a single track into six portions at regular intervals and displays them on one screen TI...

Page 25: ...e TV DVD MENU TITLE TITLE 01 07 CHAPTER 01 30 AUDIO 2CH ENG SUBTITLE OFF BITRATE 00 TITLE ELAPSED 0 00 23 Video CD SVCD MENU TRACK TRACK 01 01 DISC TIME 1 01 14 TRACK TIME 1 01 14 REPEAT OFF BITRATE 7...

Page 26: ...Disc Total Remain remaining playing time of current Disc Single Elapsed elapsed playing time of current Track Single Remain remaining playing time of current Track 2 Press 5 to select the desired tim...

Page 27: ...ENTER to open the folder 3 Use the 5 keys to select a track file and press ENTER to start playback Playback will start from the selected file and continue through to the end of the folder During play...

Page 28: ...ack press ZOOM repeatedly to select a different zoom factor 2 Use the 2 3 5 keys to pan through the zoomed image Tip This feature is not applicable for DivX discs Zoom play cannot be used on some disc...

Page 29: ...MA track in the menu and press PLAY 3 to start playback 3 During MP3 WMA music playback use the 2 3 5 keys to select a picture folder from the disc menu and press PLAY 3 The picture files will be play...

Page 30: ...the same as the le name of the movie The subtitle can only be displayed up to an average of 42 characters The time search feature is not available during DivX movie playback Advanced features of the D...

Page 31: ...or details 5 Press 7 STOP to stop playback 6 Press DISC SKIP on the remote control to exit from the menu and switch to disc mode You can remove the USB device now Note The supported le systems are FAT...

Page 32: ...creen display illustrations on the following pages may not correspond to those available in your country or region 1 Press the SETUP button on the remote control Select a tab using the cursor buttons...

Page 33: ...LL PCM LPCM OUT 48KHZ 96KHZ ON OFF ON OFF DELAY TIME 0 200 ms 0 ms TV SYSTEM TV ASPECT PROGRESSIVE PICTURE SETTING BLACK LEVEL CLOSED CAPTION USA model only COMPONENT Europe model only HDMI SETUP PAL...

Page 34: ...wn in the user manual Default setting ENGLISH The OSD On Screen Display language for this DVD system will remain as you have set it regardless of the changes made to the DVD disc language Selects the...

Page 35: ...r the playback while creating the audio tracks Fast Fast speed Note Analog and Digital are muted Bitrate Select a creating bitrate Default setting is 128 kbps 6 Move to the TRACK menu and use 5 keys t...

Page 36: ...ect NEXT on the screen and press ENTER or press on the remote control to access the next programming page 3 To remove the track chapter from the programming menu select the track chapter and press ENT...

Page 37: ...als directly into analogue stereo from L R jacks LT RT This option should be used only if your DVD player is connected to a Dolby Pro Logic decoder Note DTS is not supported DIGITAL OUT Default settin...

Page 38: ...OFF Select this to turn off the HDMI audio output Note This player can output the following audio signals using HDMI 32 44 1 48 kHz 2ch linear PCM signals and bitstream signals Dolby Digital DTS and M...

Page 39: ...e colour system of the DVD system DVD and TV should match only then will it be possible to play a DVD on this system Before changing the TV system determine the colour system of your TV PAL Select thi...

Page 40: ...formatted to fit your TV 4 3 LETTER BOX Select this if you have a conventional TV In this case a wide picture with black bands on the upper and lower portions of the TV will be displayed 16 9 WIDE Sel...

Page 41: ...picture or vice versa TINT Increase the value to darken the picture or vice versa COLOR Increase the value to enhance the color in your picture or vice versa BLACK LEVEL Default setting 7 5 IRE USA m...

Page 42: ...When the resolution is changed the image may be corrupted or the output may take longer than normal Pressing the HDMI button for three seconds or more toggle the HDMI on off state Note When the playe...

Page 43: ...gher than or equal to 720P ON Turns on HD JPEG mode when the HDMI video output is 720P 1080i or 1080P OFF Turns off HD JPEG mode Setup Examples Disc Format TV Aspect Video S Video YCbCr Progressive OF...

Page 44: ...e Press 2 to go back to the previous menu item Press SETUP to exit the menu Using the AUDIO SUBTITLE and DISC MENU language You can select your preferred language settings for DVD playback If the sele...

Page 45: ...te VCD SVCD and CD have no level indication so the parental control function has no effect with these types of discs This also applies to most illegal DVD discs Some DVDs are not encoded with a rating...

Page 46: ...n English Macedonian Moldavian Russian Serbian and Ukrainian Note Supported subtitle extensions for DivX are srt smi sub ssa ass PBC Default setting ON The Play Back Control feature is applicable for...

Page 47: ...7586 Korean 7579 Kuanyama Kwanyama 7574 Kurdish 7585 Kwanyama Kuanyama 7574 Lao 7679 Latin 7665 Latvian 7686 Letzeburgesch 7666 Limburgan Limburger 7673 Limburger Kimburgan 7673 Limburgish Limburger 7...

Page 48: ...ts case and store upright Avoid leaving discs in excessively cold humid or hot environments including under direct sunlight Don t glue paper or put stickers onto the disc or use a pencil ball point pe...

Page 49: ...be exposed to smoke or steam Use on a thick rug or carpet or cover with cloth this may prevent proper cooling of the unit Place on an unstable surface or one that is not large enough to support all f...

Page 50: ...re is disturbance in the playback picture Due to the player s copy protection circuits connection of this device through a VCR or an AV selector may prevent recording or cause picture problems This is...

Page 51: ...the LPCM OUT setting is not set to 96 kHz page 38 Some discs are digital copy protected and do not output high sampling rate digital audio No DTS audio output If this unit is connected to a non DTS co...

Page 52: ...y What if no supported devices e g USB mouse keyboards are plugged into the unit The device may cause the unit to be unstable Remove the no supported device and unplug the power cord Wait for a few mi...

Page 53: ...io 2 R out 15 R out 3 Audio 1 L out 16 Blank 4 GND 17 GND 7 B out 19 Video out 8 Status 21 GND 1 1 G out 20 18 16 14 12 10 8 6 4 2 21 19 17 15 13 1 1 9 7 5 3 1 21 pin connector assignment Europe model...

Page 54: ...2008 09 PMC 541110153029M Printed in China 3139 245 31301...

Reviews: