Mantis 410733 Manual Download Page 2

Mantis

®

 XP Lawn Aerator • mantis.com

p/n 410733  Rev. B 4.12.18

© 2018 Schiller Grounds Care, Inc. All Rights Reserved.

INSTALLATION

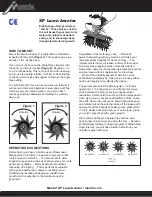
1.  First, you will need to understand that your Mantis

®

 XP 

has an inner and outer set of tines on each side of the 

tiller as shown in

 Figure 3

.

2.  Make sure the tiller is turned off.

3.  Remove the retaining pins from the outer set of tines 

(Figure 4)

 and remove the outer tines.

4.  Only after you have removed the outer set of tines, 

remove the retaining pins from the inner tines. Remove 

the inner tines from the transmission axle. 

(Figure 5)

5.  Place one set of inner aerator tines onto the left side 

axle of the transmission. Install the tine retaining pin. 

Repeat for the other side. 

6.  Place one set of outer aerator tines onto the left side 

axle of the inner aerator tines. The “D” shaped hole of 

the tine hub should be to the outside. Insert the tine 

retaining pin. Repeat for the other side. Make sure to 

match the orientation of the outer aerator tines with 

the orientation of the inner tines.

Figure 3

Inner Tines

Outer Tines

Figure 4

Figure 5

DO NOT reach your fingers and/or hand between 

the tine blades. DO NOT attempt to remove  

the inner set of tines until you have first  

removed the outer set of tines.

Original Operating Instructions

Traduction des instructions originales

Übersetzung der originalen Bedienungsanleitung

Summary of Contents for 410733

Page 1: ...ll make your lawn somewhat unsightly for about 10 days The improvements that you ll realize in terms of lawn vigor and color make regular aeration more than worth it Remember however that aeration is a radical procedure and your lawn will look unattractive for a few days Most of the unsightly aspects of aeration can be eliminated immediately by raking off your loose surface earth and irrigating im...

Page 2: ...set of inner aerator tines onto the left side axle of the transmission Install the tine retaining pin Repeat for the other side 6 Place one set of outer aerator tines onto the left side axle of the inner aerator tines The D shaped hole of the tine hub should be to the outside Insert the tine retaining pin Repeat for the other side Make sure to match the orientation of the outer aerator tines with ...

Page 3: ...la machine la pelouse ne sera pas très belle à voir pendant une dizaine de jours Mais les améliorations obtenues par une aération régulière en termes de vigueur et de couleur du gazon en valent largement la peine Garder toutefois à l esprit que l aération est un procédé radical et que la pelouse aura une apparence peu attrayante pendant quelques jours Une grande partie des aspects peu esthétiques ...

Page 4: ...ises d aération intérieures sur l axe de transmission gauche Mettre la goupille de retenue de fraise en place Répéter de l autre côté 6 Placer un jeu de fraises d aération extérieures sur l axe gauche des fraises d aération intérieures Le trou en forme de D du moyeu de fraise doit être vers l extérieur Mettre la goupille de retenue de fraise en place Répéter de l autre côté Veiller à ce que l orie...

Page 5: ...chine etwa 10 Tage lang nicht besonders attraktiv aussehen wird Aber die verbesserte Vitalität und kräftigere Farbe des Rasen beweisen wie wichtig eine regelmäßige Belüftung ist Denken Sie daran dass die Belüftung ein ziemlich radikaler Eingriff ist und Ihr Rasen ein paar Tage lang recht unansehnlich wirken wird Die meisten Probleme bezüglich des Erscheinungsbilds nach dem Belüften lassen sich abe...

Page 6: ...der inneren Hackelemente auf der linken Getriebeachse Bringen Sie den Haltestift der Hackelemente an Wiederholen Sie diese Arbeitsschritte auf der anderen Seite 6 Montieren Sie einen Satz der äußeren Hackelemente auf der linken Achse der inneren Lüfter Hackelemente Das D förmige Loch in der Hackelement Nabe muss sich an der Außenseite befinden Setzen Sie den Haltestift der Hackelemente ein Wiederh...

Reviews: