background image

MINI HI-FI SYSTEM

36

Remark: FM Frequency range: 87.00-108.00MHz ( Be-

yond the range, input is invalidity.)

NOTE

  1.  You may adjust the best radio effect by adjusting the 

FM antenna.

  2.  You can search further bands by pressing Search 

button when adjusted the FM antenna in a right posi-
tion.

  3.  If the band is not clear by auto search, you choose 

the way manual search adjustment by press Tune-/
Tune+ button.

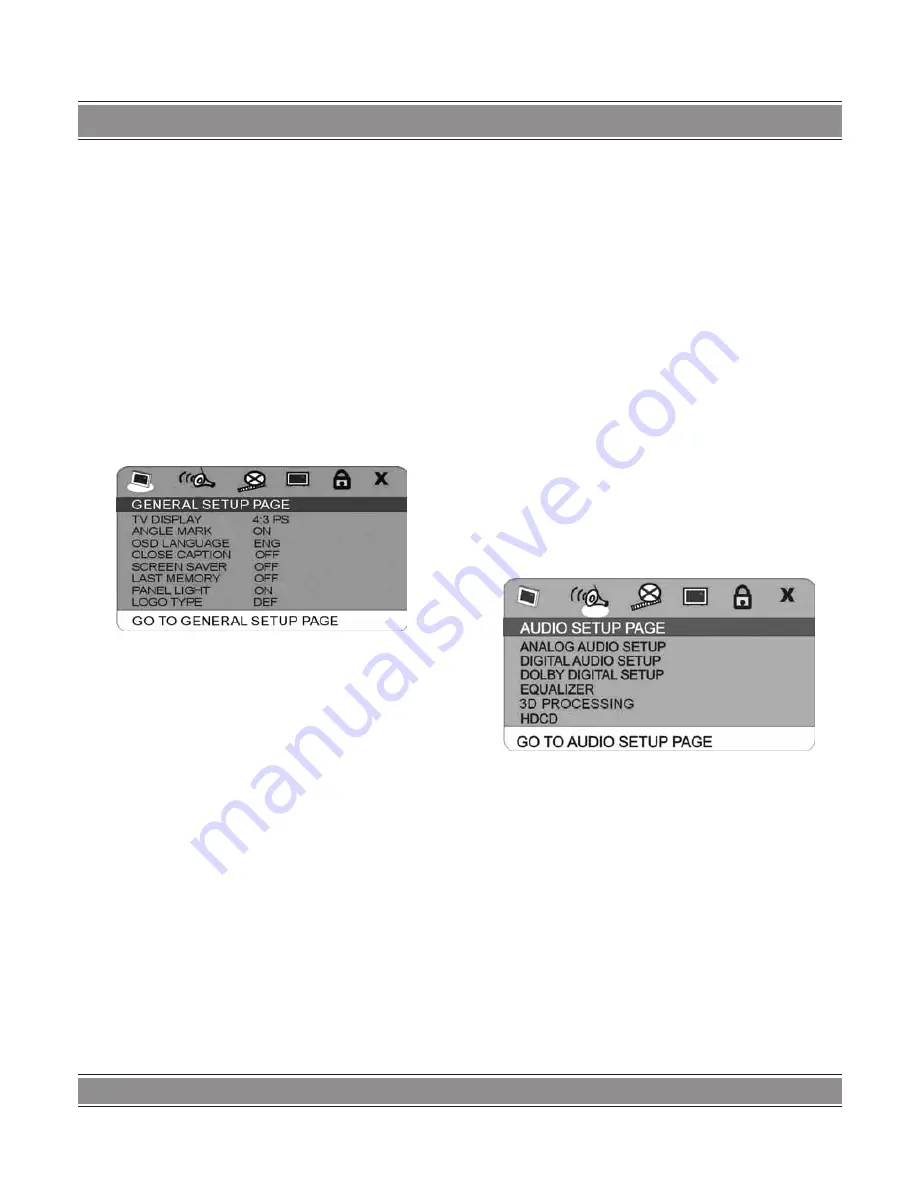
DVD Menu Setup

General Setup Page

Press the Setup button on the remote control to open 

the menu setup function, the TV screen will display the fol-
lowing figures. Press Left/Right buttons to move the differ-
ent setup pages; Also press the direction buttons to move 
cursor to the item you want, then press Play/Enter button 
again to enter the subdirectory.

  1.  TV Display (4:3 PS, 4:3 LB, 16:9)
–  No matter which format you select, if the screen is 

4:3 display, the image is able to be display in 4:3.

–  The DVD screen format is changeable.
–  When the screen is displayed in 4:3, the display for-

mat of DVD is 16:9, the image will be compressed.

  2.  Angle Mark

  If you select the angle mark, the multi-angle mark can 

be shown on the screen when the disc has the multi-angle 
pictures.

  3.  OSD Language

You can select English, Czech, German or Polish for the 

entire setup page.

  4.  Closed Captions

  When playing DVD disc, choose this OFF option to 

close caption, choose ON option to open the caption. The 
effect is subject to the disc you are playing.

  5.  Screen Saver

This  option  is  used  to  open/close  screen  saver  pro-

gram:

ON

: in the status of stop or no disc, the screen saver 

program will be automatically turned on within the setting 
time.

There will be a video setting image, and the device will 

turn to power saving mode, thus protecting your electrical 
appliance and prolonging its life span. Press any button to 
cancel the screen saver.

OFF

: the screen saver program will not be activated in 

any cases.

  6.  Last Memory

Select this OFF option to close memory function, choose 

ON option to open.

  7.  Panel Light

You can turn on or off panel light by setting panel light 

on or off.

  8.  Logo Type

In this option, you can select the default or captured pic-

ture as the opening desktop of the unit.

Audio Setup Page

  1.  Analog Audio Setup
–  Downmix
LT/RT: audio output from Left and Right channel
Stereo: stereo audio output
Virt. Surround: the main loudspeaker can output virtual 

surrounding sound effect.

–  D.R.C: there are three options: ON, OFF, AUTO.
  2.  Digital Audio Setup
–  Digital Output
When  playing  the  DOLBY,  or  MPEG  disc,  the  optical 

or coaxial terminal will be output in SPDIF/RAW format. 
Meanwhile  the  connected  amplifier  must  be  able  to  de-
code the DOLBY DIGITAL or MPEG.

SPDIF/PCM may be selected when the player is con-

nected with 2CH digital stereo amplifier.

–  LPCM Output

Summary of Contents for DVD104

Page 1: ...nual MiniHi FiSystem DVD104 Aby zapewni prawid ow obs ug sprz tu zapoznaj si dok adnie z instrukcj i zachowaj j na przysz o To ensure proper use of this product please read this User s Manual carefull...

Page 2: ...la zwi kszenia efektu wibracji 2 opatki do zmiany bieg w i 12 przycisk w fire Gaz i hamulec w peda ach no nych oraz 4 ro kierunkowy dr ek zmiany bieg w i hamulec r czny DVD 060 WiFi Player DVD 060 WiF...

Page 3: ...czanie cie ki d wi kowej 15 Szybkie przewijanie do przodu i cofanie do ty u 15 Poprzedni Nast pne 15 Wyb r napis w 15 Powtarzanie 15 Powtarzanie A B 15 Tytu 15 Efekty d wi kowe 16 Przywracanie ustawie...

Page 4: ...razie problem w 23 Specyfikacja 23 User sManual Precautions 24 Power Supply 24 Power Cord 24 Usage and Storage 24 Unit Placement 24 Condensation 24 Unit Cleaning 24 Disc Care 24 Disc Usage 24 Disc Cl...

Page 5: ...SWITCH AMONG TV FM AV INPUT AND DVD MODES 32 ZOOM 32 NUMBER BUTTONS 32 SPECTRUM 32 PROGRAM 32 Time Selection 33 VIRTUAL KEYBOARD 33 MP3 DISC PLAYING FUNCTION 34 MPEG4 JPEG PICTURE DISC PLAYING FUNCTIO...

Page 6: ...ilne z odtwarzaczami Odtwarzacz analogicznie tak e zosta oznaczony numerem regionu 2 przeznaczonym dla Europy Dyski z innych region w nie s kompatybilne i nie b d odtwarzane Dyski oznaczone jako ALL s...

Page 7: ...u ytkowa odbiornika w miejscu z nie sprawn wentylacj Nie wpychaj i nie wrzucaj adnych przedmiot w przez dziurki w obudowie ani do wtyk w Nara asz si w ten spos b na po ar pora enie pr dem nawet mierte...

Page 8: ...przechowywa p yty w ich pierwotnych opa kowaniach dzi ki czemu unikniemy ich z amania wygi cia i innych uszkodze mechanicznych Nie na le y wystawia p yt na dzia anie wysokich tempera tur du ej wilgotn...

Page 9: ...rward Channel 3 Nast pny Szybko do ty u przewijanie Kana Next Fast rewind Channel 4 Stop Wyb r Stop Select 5 Odtwarzanie Play Wprowadzenie Enter 6 Otwarcie Eject 7 Si a g osu 8 Ekran wy wietlacza 9 Od...

Page 10: ...TV 16 W czenie wy czenie zasilania 17 Gniazdo wej ciowe zasilania 18 Wyj cia g o nikowe lewe prawe L R 19 Z cze anteny UKF FM 20 Wyj cie do subwoofera 21 Wyj cia audio lewe prawe L R 22 Wej cia PC au...

Page 11: ...zeciwnym razie nie b dzie on dzia a prawid owo 3 Je eli okienko czujnika lub nadajnik pilota zdalnego sterowania s zas oni te obc materi mo e to do prowadzi do z ego odbioru sygna u lub ca kowicie to...

Page 12: ...j ce zosta n pod czone do gniazd sieciowych 2 Mo na ustawi odpowiedni system stosownie do Pa stwa systemu TV w czasie ogl dania r nych dysk w 3 Je eli istnieje kilka po cze pomi dzy odtwarza czem wide...

Page 13: ...cisn przycisk ustawie Se tup na pilocie zdalnego sterowania w celu otwarcia stro ny ustawie systemu przej na stron ustawie audio przez naci ni cie przycisk w ze strza kami a nast pnie przemie ci kurso...

Page 14: ...STEM 14 Pod czeniasystemu W trakcie pod czania Pa stwa sprz tu akustycznego prosimy oprze si na poni szym schemacie Upewni si e wszystkie po czenia s mocne i pewne Kable za silaj ce mog by pod czone n...

Page 15: ...nia Tune lub Tune b d pokazywane r ne pr dko ci szybkie go przewijania do przodu lub szybkiego cofania do ty u jak ni ej DO PRZODU FORWARD X 2 DO PRZODU X 4 DO PRZODU X 8 DO PRZODU X 16 DO PRZODU X 32...

Page 16: ...azanych pozycji Kasowanie Nacisn przycisk kasowania Clear w celu skasowa nia wprowadzonej cyfry Na przyk ad ustawienia zapro gramowanych piosenek Gotowo dopracy Nacisn przycisk gotowo ci do pracy Stan...

Page 17: ...o gram kursor automatycznie przemie ci si na Exit Ponownie nacisn przycisk odtwarzania wprowadzenia Play Enter w celu skasowania za programowanego odtwarzania Wyb rczasu W trybie odtwarzania nacisn pr...

Page 18: ...lu otwar cia podajnika na p yty w o y dysk MP3 nast pnie nacisn przycisk otwarcia Eject w celu zamkni cia podajnika na p yty Urz dzenie zaczyna odczytywa dysk a na ekranie odbiornika TV wy wietlany je...

Page 19: ...cyfr w wczas mo na naciska przyciski numerycz ne w celu wybierania bezpo redniego DVD USB Jest to najnowsza funkcja w multimedialnych odtwarza czach DVD nowej generacji Pod czenie urz dzenia USB w cz...

Page 20: ...k 8 a nast pnie nacisn przycisk T F w celu wpro wadzenia 993 i z kolei na cisn przycisk Save w celu za pisania tej cz stotliwo ci 4 Wyb r cie ki d wi kowej Nacisn przycisk MO ST na pilocie zdalnego st...

Page 21: ...LT RT Wyj ciowy sygna audio z kana u lewego i pra wego Stereo Wyj ciowy sygna audio stereofoniczny Wirtualny d wi k przestrzenny Virt Surround g o niki g wne mog emitowa efekt d wi ku przestrzennego D...

Page 22: ...ej pozycji mo na wstawi swoj ulubion tapet Stronaustawie preferencji PreferencePage Ta strona ustawie jest dost pna wy cznie kiedy od twarzacz nie ma za adowanego dysku lub podajnik na p y ty jest otw...

Page 23: ...wideo Tryb skanowania urz dzenia nie pasuje do trybu skanowania odbiornika TV Nie mo e by zrealizowane odtwarzanie W podajniku na p yty nie jest umieszczony aden dysk Nie jest w o ony aden dysk Dysk...

Page 24: ...anel and the body of the unit with a dry soft cloth Other areas can be cleaned using a soft cloth moistened with a mild detergent Do not clean with evapo rative solutions to avoid possible damage to t...

Page 25: ...TEM 25 FrontPanel 1 Power 2 Previous Fast forward Channel 3 Next Fast rewind Channel 4 Stop Select 5 Play Enter 6 Eject 7 Volume 8 Display screen 9 Remote control sensor 10 Earphone socket 11 Disc doo...

Page 26: ...Video output 14 Video input 15 TV antenna interface 16 Power on off 17 Power supply input 18 L R audio output 19 FM antenna interface 20 Subwoofer output 21 L R speaker output 22 L R audio input 23 C...

Page 27: ...should not exceed 7 meters or else it will be invalid 3 If the sensor or remote control emitter is stuck with foreign matters it may result in the malfunction in signal reception or not at all 4 The r...

Page 28: ...You may adjust the corresponding system according to your TV system while watching various discs 3 If there are multiple connections between video play er and TV please select one and unplug others s...

Page 29: ...he amplifi er While in of play or stop mode press the Setup button on the remote control to open the system setup page switch to audio setup page by pressing the directional buttons then move the curs...

Page 30: ...MINI HI FI SYSTEM 30 SystemConnection Please refer to the following figure to connect your acoustic equipment To keep all the connection correctly and firmly Power supply can be connected finally...

Page 31: ...ess CH button the device will skip to the previous one for play press CH button the device will skip to the next one SUBTITLESELECTION When the played DVD disc records multiple subtitles you can make...

Page 32: ...n the remote control can increase or reduce the vol ume of Treble Bass or Subwoofer SHORTCUT When play DVD discs press the Shortcut button to jump over the initial title menu or warnings Only for some...

Page 33: ...After it is done DVD player will start to the next item in the above screen There are 5 items in VCD screen Track Disc time Track time Repeat Time DISP Display There are 9 items in DVD screen Title T...

Page 34: ...it will begin to read the main directory will be displayed on the TV screen 2 Press the direction button to move the cur sor to the corresponding directory press Play Enter button to enter the next la...

Page 35: ...er Del CH Delete channel Select to delete the current channel which is not clear Quick Scan Select to search channel forward All Scan Select to search channel forward By the step of 1 MHz Audio Mode S...

Page 36: ...ns When playing DVD disc choose this OFF option to close caption choose ON option to open the caption The effect is subject to the disc you are playing 5 Screen Saver This option is used to open close...

Page 37: ...d Video Setup Page 1 Color Setting You can adjust the video output of sharpness bright ness contrast gamma hue saturation luma delay ac cording to your favor The adjustable range of sharpness is High...

Page 38: ...rared reception part of the player No image on the TV screen No video cables are connected or not securely con nected TV not set at video mode The scanning mode of the device does not match the TV sca...

Page 39: ...odtwarzania pilot 8 bitowe menu ekra nowe wy wietla 32 rodzaje napis w w 8 j zykach obs uga wielu k t w cztery rodzaje przybli ania i oddalania tryby obrazu 4 3 16 9 Up scalling 1080p progressive Sca...

Page 40: ...a tel 48 22 332 34 63 lub e mail serwis manta com pl od poniedzia ku do pi tku w godz 9 00 17 00 Producent zastrzega sobie mo liwo wprowadzenia zmian w specyfikacj produktu bez uprzedzenia Made in P R...

Reviews: