12
IT
EN
DE
5
MRT 1850 - 2150 - 2540
ACCESSORY WITHOUT HYDRAULIC
SYSTEM AND HYDRAULIC LOCKING
(OPTIONAL).
Engaging the accessory
- Check that the accessory is in a position
which simplifies connection of the snap
coupling. If it is badly positioned, take
the necessary precautions to move it in
the conditions of maximum safety.
- Check that the rods of the locking
cylinder are retracted.
- Position the lift-truck with the boom
lowered squarely in front of and parallel
to the accessory and tilt the snap
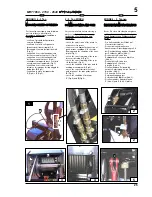
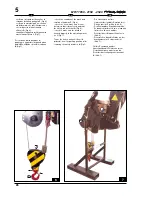
coupling forward (Fig.A).
- Bring the snap coupling into position
below the accessory’s connection pipe,
raise the boom slightly and tilt the
connection back to position the
accessory (Fig.B).
- Raise the accessory off the ground for
easier engagement.
- Operate the optional control to lock the
accessory
Hydraulic locking and release
(optional)
- Accessories are locked and released
with the optional control (which can
be operated by a button or by the
manipulator itself, depending on the
type of lift truck in question), by means
of the pins which must project from the
holes ofthe quick coupling (Fig. C).
Removing (and putting down) the
accesory
- Proceed in reverse direction to the
ENGAGING THE ACCESSORY
procedure, taking care to place it in a
safe position on firm, flat ground.
MONTAGE DES ZUBEHÖRTEILS MIT
HYDRAULISCHER VERRIEGELUNG
Einsetzen des Anbaugeräts
- Vergewissern Sie sich, daß das
Anbaugerät sich in einer Stellung
befindet, in der die Schnellkupplung
leicht einrasten kann. Sollte das Gerät
schlecht ausgerichtet sein, ergreifen
Sie alle erforderlichen
Vorsichtsmaßnahmen, um es in aller
Sicherheit versetzen zu können.
- Vergewissern Sie sich, daß die Stäbe
des Verriegelungszylinders
eingefahren sind.
- Positionieren Sie den Gabelstapler mit
gesenktem Arm genau gegenüber und
parallel zum Anbaugerät. Neigen Sie
die Schnellkupplung nach vorne (Abb.A).
- Bringen Sie die Schnellkupplung unter
das Kupplungsrohr des Anbaugeräts,
heben Sie den Arm leicht an und
neigen Sie die Kupplung selbst nach
hinten, um das Anbaugerät in Position
zu bringen (Abb.B).
- Heben Sie das Anbaugerät vom
Boden an, um das Einrasten zu
vereinfachen.
- Das Bedienelement Optional betätigen,
um das Zubehörteil zu verriegeln.
Hydraulische Ver- und Entriegelung
(wahlweise)
- Das Ver- bzw. Entriegeln eines
etwaigen Zubehörteils erfolgt über die
Benutzung des Bedienelements
Optional (Bedienelement, das je nach
dem Hubstapler, den man besitzt, mit
einer speziellen Taste oder mit dem
Vierwegschalter betätigt werden kann)
mittels der Bolzen, die aus den
Öffnungen der Schnellkupplung
austreten müssen (Fig. C).
Abnehmen (und Ablegen) des
Anbaugeräts
- Gehen Sie in umgekehrter Reihenfolge
wie beim EINSETZEN DES
ANBAUGERÄTS vor und achten Sie
darauf, das Anbaugerät in einer
sicheren Stellung auf festem, ebenem
Untergrund abzulegen.
MONTAGGIO DELL’ACCESSORIO CON
BLOCCO IDRAULICO (OPZIONAL).
Presa dell’accessorio
- Verificare che l’accessorio sia in una
posizione che faciliti l’aggancio
dell’attacco rapido. Nel caso in cui
fosse male orientato, prendete le
precauzioni necessarie per spostarlo in
condizioni di massima sicurezza.
- Verificare che le aste del martinetto di
bloccaggio siano rientrate.
- Posizionare il carrello elevatore con il
braccio abbassato ben di fronte e
parallelo all’accessorio e inclinare
l’attacco rapido in avanti (Fig.A).
- Portare l’attacco rapido sotto il tubo
d’aggancio dell’accessorio, alzare
leggermente il braccio e inclinare
l’attacco stesso all’indietro per
posizionare l’accessorio (Fig.B).
- Disimpegnare l’accessorio dal suolo
per agevolare il bloccaggio.
- Azionare il comando optional per
bloccare l’accessorio.
Bloccaggio e sbloccaggio idraulico
(opzional)
- Il bloccaggio e lo sbloccaggio di un
eventuale accessorio avviene tramite
l’utilizzo del comando optional
(comando che può essere azionato da
un apposito pulsante o dal
manipolator stesso a seconda del tipo
di carrello elevatore che si possiede)
tramite i perni che debbano fuoriuscire
dai fori dell’attacco rapido (Fig. C).
Rimozione (e posa) dell’accessorio
- Procedere in senso inverso a quello
della PRESA DELL’ACCESSSORIO
facendo attenzione a posare il
medesimo in posizione sicura su suolo
compatto e piano.
A
B
C


