Manhattan MSKL MS-3020 User Manual Download Page 6


MSKL MS-3020 User Manual 

2.2 Set the SCSI ID 


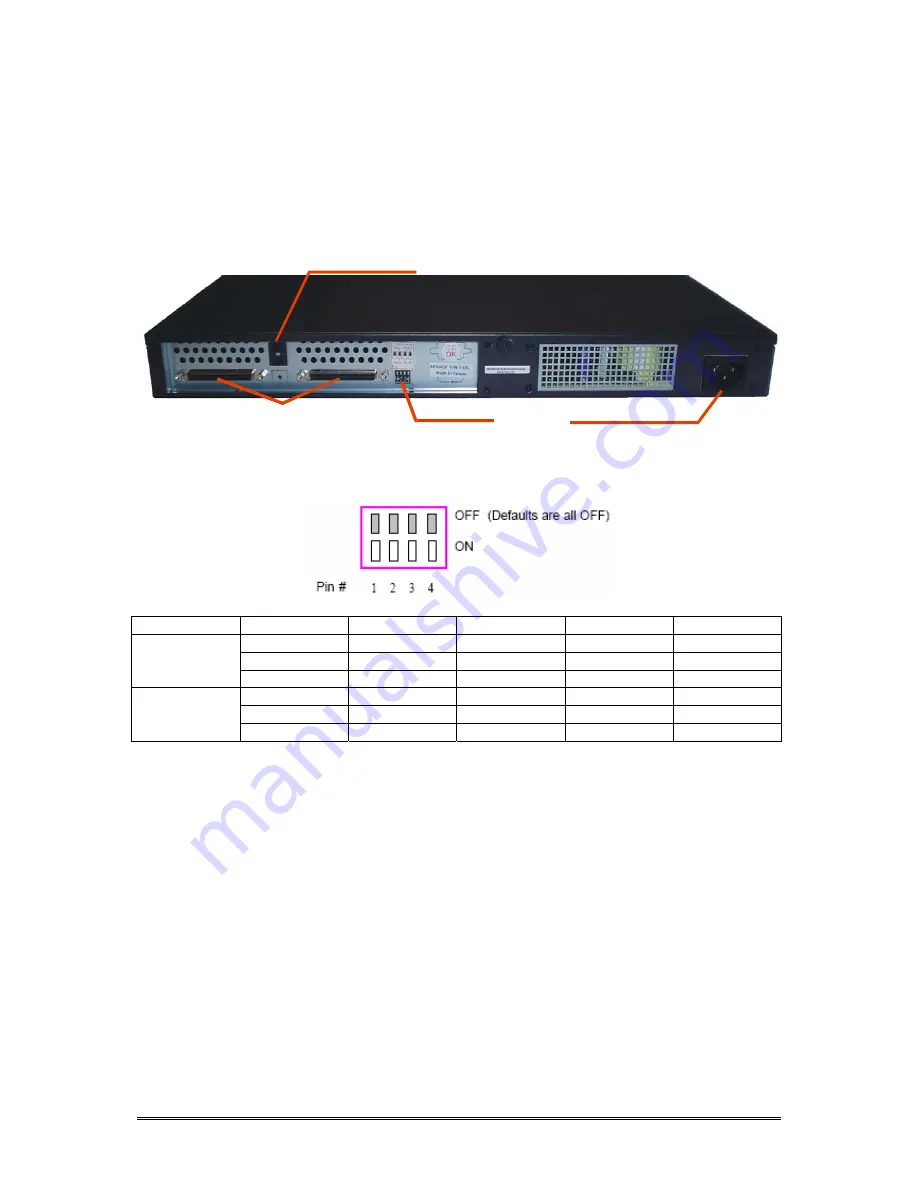
On the rear panel of the MS-3020 there is a SCSI ID switch as figure 2-2 shows. Set the SCSI ID by 

adjusting the switch up or down. (Don’t set ID 7. It is normally reserved for the SCSI host adapter) 

 
Setting SCSI ID and configuration mode: Be sure that each device has a unique ID number (see 1.6). 

No matter how many MS-3020s (up to 15) are installed and connected, the SCSI ID set on every 

switch cannot be the same. The selectable number for the MS-3020 is from 0 to 15. 


DIP Switch

SCSI ID Switch 

 Two HD68 SCSI

Connectors 

AC Power Connector 


Figure 2-2 


2.3 Set the Mode 


Mode 

Transfer Rate 

Pin 1 

Pin 2 

Pin 3 

Pin 4 

160MB/sec OFF 

OFF 

OFF 

ON 

80MB/sec 

OFF OFF OFF OFF 

JBOD 

40MB/sec 

OFF OFF ON OFF 

160MB/sec OFF 

ON 

OFF 

ON 

80MB/sec OFF 

ON 

OFF 

OFF 

Normal 

40MB/sec OFF 

ON 

ON 

OFF 

Table 2-2 


1.


Pin 1: Reserved 

The default is OFF. 


2.


Pin 2: JBOD Mode vs. Normal Mode 

The default is JBOD. It combines 2 or more hard disk drives into a big one. The enlarged 

capacity is convenient for mass data storage. In Normal mode the SCSI adapter will detect 

the hard disk drives you have connected. You need to enable the SCSI adapter’s LUN support. 

Take Adaptec AHA-39160 as example. In SCSI Bios under point SCSI options you need to set 

the Multiple LUN to the on state so that the computer can detect all hard disk drives. 


3.


Pin 3: SCSI Host Transfer Rate at 80MB/s vs. 40MB/s 

The default is 80MB/s. If the SCSI adapter is not capable or the signals become unstable after 

connecting some MS-3020, lower the speed to 40MB/s. 


4.


Pin 4: SCSI Host Transfer Rate at 160MB/s 
The default is off, but if pin 4 is adjusted to ON, the highest transfer rate will reach 160MB/s. 


Summary of Contents for MSKL MS-3020

Page 1: ...MSKL MS 3020 User Manual User Guide MSKL MS 3020...

Page 2: ...communications However there is not guarantee that interference will not occur in a particular installation If this equipment does cause interference to radio or television equipment reception which...

Page 3: ...0GB 32 hard disk drives Support 48 bit LBA Big Drive Technology hard disk drives over 137GB Built in RISC microcontroller core for improving chip performance On board flash ROM for easy firmware updat...

Page 4: ...fer and processing While connecting more than one SCSI device each device should have different ID numbers 2 Terminator SCSI is featured with high scalability In order to ensure reliable data transmis...

Page 5: ...us 1 Power LED Green light Online No light Offline 2 Primary Master HDDs Power Signal LED Green light Online Red light offline Blinking red light Bad sector 3 Primary Master HDDs Access Signal LED Yel...

Page 6: ...MB sec OFF ON OFF ON 80MB sec OFF ON OFF OFF Normal 40MB sec OFF ON ON OFF Table 2 2 1 Pin 1 Reserved The default is OFF 2 Pin 2 JBOD Mode vs Normal Mode The default is JBOD It combines 2 or more hard...

Page 7: ...stall the hard disk drives into the trays of the MS 3020 1 Open the tray by pressing its handle Figure 2 4 2 Pull the handle to let the tray out Figure 2 5 3 Put a hard disk drive into the tray Figure...

Page 8: ...20 Connect any one of the SCSI ports on the back of the MS 3020 to the external SCSI port on the host PC with the enclosed SCSI LVD cable Then plug a terminator into another SCSI port on the back of t...

Page 9: ...r where the MS 3020 is connected It will drop the performance of the MS 3020 2 It is invalid to adjust DIP switch during operation Before changing the setting power off the host PC and the MS 3020 fir...

Page 10: ...was set right and if signal line was connected badly 2 Red LED lights after installing a HDD If you have installed a hard disk drive but the red LED lights please do the following three things Re plu...

Page 11: ...the system See if it display LUN 3 If not follow the BIOS setup procedure stated in 2 3 5 The HDDs capacity isn t found in the system There let s take Windows XP as an example Right click My Computer...

Page 12: ...update the firmware of the MS 3020 1 Put the support CD into CD ROM and find the program by the following path E Utility Bridge_Smart_Uti Setup exe 2 Click Next to install according to the instruction...

Page 13: ...to the last 3 numbers and an alphabet of the SCSIDE model like 150L If the old versions alphabet is L you should choose a new version with L too 5 Click Update SCSIDE Firmware choose the new firmware...

Reviews: