background image

Driver Installation Verification

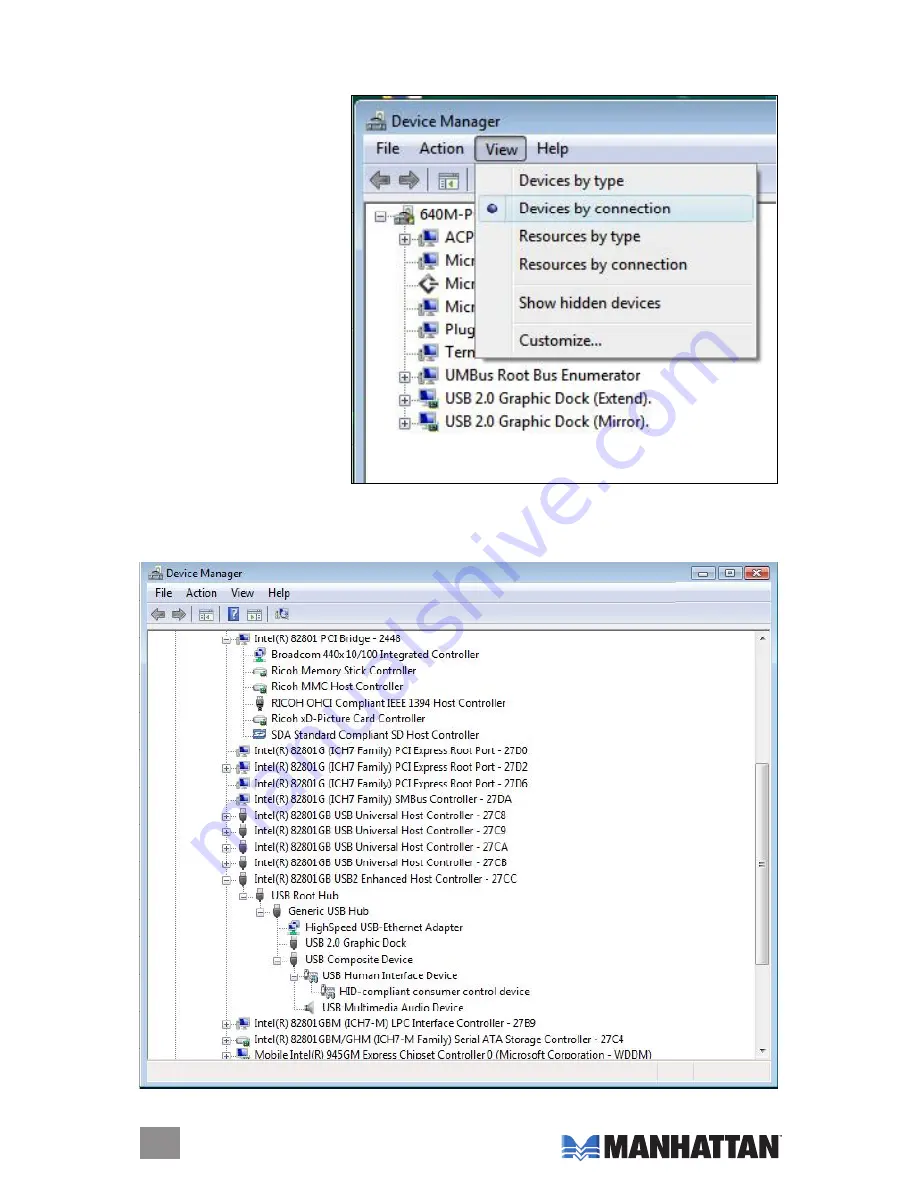
To confirm that the above installation procedure was successful, follow these steps:


1.  In the desktop Start menu,  

  go to My Computer → 


  Properties → Device 


  Manager. Click “View” and  

  select “devices by  

  connection.”


2.  Click “Intel

®

 82801GB USB2 enhanced Host Controller-27CC,” then click “USB Root Hub.” 

  The device Manager screen (below) will display “Generic USB Hub,” where you’ll see the 

  New Hardware devices, including the Multi-Port docking Station (“USB 2.0 Graphic dock”).

10

INSTAllATIoN

Summary of Contents for 179102

Page 1: ...Multi Port Docking Station with Enhanced Video user manual Model 179102 MAN 179102 UM 0608 01 ...

Page 2: ......

Page 3: ...to 480 Mbps for external storage printing and other activities The easy to follow instructions in this user manual help make setup and operation quick and simple so you ll also soon be enjoying the benefits of these additional features Provides four Hi Speed USB 2 0 two audio one 10 100 Mbps RJ 45 and one SVGA ports to connect additional peripherals Plug and Play Windows compatible Lifetime Warran...

Page 4: ...ion 5 Driver Installation Verification 7 Driver Uninstallation 8 Windows Vista 9 Driver Installation 9 Driver Installation Verification 10 Driver Uninstallation 11 DEVICE FUNCTIONS 11 FREQUENTLY ASKED QUESTIONS OPERATION TIPS 14 SPECIFICATIONS 15 section page contents ...

Page 5: ...Windows XP 2000 Driver Installation Installing the device driver enables your computer s operating system to recognize the docking station and its ports once it s connected Check your operating system and refer to the appropriate installation procedure here or below for Windows Vista to begin installing the device driver Make sure the Multi Port Docking Station is unplugged from your PC or noteboo...

Page 6: ... 5 When the InstallShield Wizard Complete screen displays select Yes I want to restart my computer now and click Finish to reboot 6 Connect the Multi Port Docking Station to your PC or notebook computer When the Found New Hardware Wizard screen appears in Windows XP select Yes now and every time I connect a device and click Next to continue 7 Select Install the software automatically and click Nex...

Page 7: ...ove installation procedure was successful follow these steps 1 In the desktop Start menu go to My Computer Control Panel System Hardware Device Manager Click View and select Devices by connection 2 Click Standard Enhanced PCI to USB Host Controller then click USB Root Hub The Device Manager screen below will display Generic USB Hub where you should see the New Hardware devices including the Multi ...

Page 8: ...t menu go to Settings in a classic Start menu only Control Panel Add or Remove Programs Select USB 2 0 Graphic Dock version number and click either Change or Remove 2 On the Confirm Uninstall prompt that displays click OK to continue 3 On the subsequent Driver Uninstall screen select Yes I want to restart my computer now click Finish to reboot completing the driver uninstall installation ...

Page 9: ...aunched automatically If the setup program does not begin automatically go to Start then Run then enter D Disk 1 Setup exe where D is the path of your CD ROM drive click OK 2 When the InstallShield Wizard welcome screen displays click Next to continue 3 When the License Agreement screen displays and you have reviewed its contents select I accept the terms of the license agreement and click Next 4 ...

Page 10: ... to My Computer Properties Device Manager Click View and select Devices by connection 2 Click Intel 82801GB USB2 Enhanced Host Controller 27CC then click USB Root Hub The Device Manager screen below will display Generic USB Hub where you ll see the New Hardware devices including the Multi Port Docking Station USB 2 0 Graphic Dock 10 installation ...

Page 11: ...the Confirm Uninstall prompt that displays click OK to continue 3 On the subsequent Driver Uninstall screen select Yes I want to restart my computer now click Finish to reboot completing the driver uninstall functions The Multi Port Docking Station works with LCD or CRT monitors Click the UVD icon to choose one of three modes Primary Extended and Mirror plus Off and Rotation options Clicking the U...

Page 12: ...e bottom right corner of the desktop to make this function work properly Extended Mode By default the monitor connected to the Multi Port Docking Station will work as the extended desktop which expands the primary Windows desktop of your system You can change the relative position of this extended desktop in Display Properties Settings Mirror Mode In this mode the Windows desktop will be replicate...

Page 13: ...on simply disables the Multi Port Docking Station Rotation This presents further options Right Left Flip or Normal for setting the orientation of the secondary CRT LCD monitor in Extendedor Primary mode 13 functions ...

Page 14: ...going to Display Properties Settings Advanced Settings NOTE Make sure you select the USB 2 0 VGA device first and not set the refresh rate higher than what your monitor can support as this can damage your monitor You can also try to reset refresh resynchronize your monitor Q Why doesn t Direct3D work A This is a current limitation of the Multi Port Docking Station Check for driver updates in the f...

Page 15: ...0 1920 x 1200 16 bits 16 9 1920 x 1080 16 bits 16 10 1680 x 1050 16 32 bits 16 10 1440 x 900 16 32 bits 16 10 1280 x 800 16 32 bits 15 9 1280 x 768 16 32 bits For Standard Monitor 5 4 1280 x 1024 16 32 bits 4 3 1600 x 1200 16 32 bits 4 3 1400 x 1050 16 32 bits 4 3 1280 x 960 16 32 bits 4 3 1152 x 864 16 32 bits 4 3 1024 x 768 16 32 bits 4 3 800 x 600 16 32 bits Package Contents Multi Port Docking ...

Page 16: ...All products mentioned are trademarks or registered trademarks of their respective owners MANHATTAN offers a complete line of PC Components Peripherals Cables and Accessories Ask your local computer dealer for more information or visit us online at ...

Reviews: