background image

Commissioning and operation

48

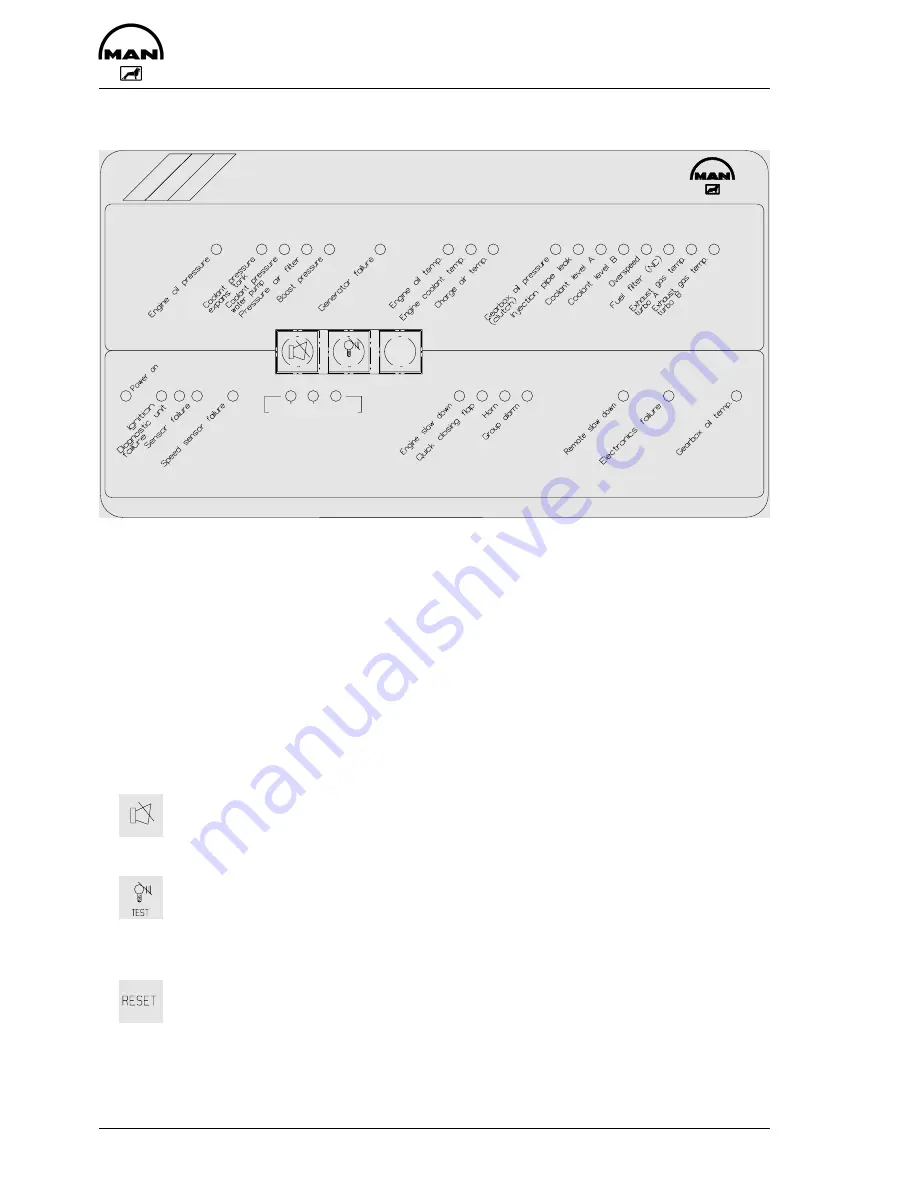
Terminal box in the engine room / interface with light-emitting keys

TYP BE3

Serial data activity

MAN Marine Diesel

RESET

TEST

The terminal box with light-emitting diodes functions at the same time as an engine room
monitoring panel.

If an alarm is issued, the corresponding light-emitting diode lights up. The following re-
lays are activated on the diagnosis unit:

D

Engine slow down (main alarm) = reduction of engine speed

D

Horn = acoustic alarm

D

Group alarm = collective fault indication

The keys are intended for:

D

Horn off

Switches off the alarm horn and the integrated buzzer

D

Flashing light off, transition to continuous light / test of light-emitting diodes

Switches off the flashing signal of the relevant warning lamp, i.e. the flashing
light switches to continuous light. Before the flashing signal is cleared, the
alarm horn must be switched off.

D

Reset

Clearing the alarm message (red warning lamp goes out)

Requirement for clearing an alarm message is:
– Pressing the keys “Horn off” and “Test” in that order
– Removing the cause of the alarm

Summary of Contents for D 2840 LE 403

Page 1: ......

Page 2: ......

Page 3: ...3 Operating Instructions MAN Marine Diesel Engines...

Page 4: ...4...

Page 5: ...test state of the art However trouble free operation and high performance can only be achieved if the specified maintenance intervals are observed and only approved fuels lubricants and coolants are u...

Page 6: ...operation due to the sew ing machine effect in particular if they are used between parts with different rates of lin ear expansion under heat e g aluminium and cast iron and leaks may then occur Examp...

Page 7: ...ne views 14 First commissioning 16 Commissioning 18 Starting 19 Operation monitoring 20 Shutting down 49 Maintenance and care 50 Lubrication system 50 Fuel system 53 Cooling system 56 V belts 59 Alter...

Page 8: ...number Rating speed Note The manufacturer of the complete ready to use machine in which this engine is to be installed must take the further action necessary in the context of indirect safety related...

Page 9: ...propriate spaces The engine type plates are on the crank case see illustration Model delivered on installed on Engine serial number Order number MAN Nutzfahrzeuge Aktiengesellschaft Typ Motor Nr Engin...

Page 10: ...peration for the first time read the oper ating instructions carefully and familiarize yourself with the critical points If you are unsure ask your MAN representative D For reasons of safety we recomm...

Page 11: ...ircuit only when the engine has cooled down If opening while the engine is still warm is unavoidable comply with the instructions in the chapter entitled Maintenance and Care D Neither tighten up nor...

Page 12: ...nt Pay attention to cleanliness The Diesel fuel must be free of water See Maintenance and care D Have the engine maintained at the specified intervals D Do not switch off the engine immediately when i...

Page 13: ...s are not to the expected as a result of handling used engine oil Health precautions D Avoid prolonged or repeated skin contact with used engine oil D Protect your skin by means of suitable agents cre...

Page 14: ...Commissioning and operation 14 Engine views D 2840 LE 403 1 2 3 4 5 6 7 8 9 10 11 12 13 8 7 6 9 18 17 16 15 14...

Page 15: ...Intercooler 4 Coolant filler neck 5 Oil filler neck 6 Oil separator valve for crankcase breather 7 Air intake 8 Turbocharger 9 Exhaust pipe 10 Oil dipstick 11 Starter motor 12 Oil sump 13 Engine crank...

Page 16: ...l output gradually Note Use only approved fuels lubricants etc see brochure Fuels lubricants etc Otherwise the manufacturer s warranty will become null and void Filling with fuel Caution Fill the tank...

Page 17: ...risk of frost drain the raw wa ter pump Filling with engine oil Caution Do not add so much engine oil that the oil level rises above the max marking on the dipstick Overfilling will result in damage t...

Page 18: ...approx 20 minutes after the unit has been switched off D Pull out dipstick arrow D wipe it with a clean lintfree cloth D and push it in again up to the stop D Pull out dipstick again The oil level sho...

Page 19: ...ter key through to position III Turn key further up to the stop position III The display lamp goes out The starter mo tor is actuated Lube oil pressure must build up at the oil pressure gauge If it do...

Page 20: ...see page 23 4 Engine room panel MMDS EP see page 31 For operation and speed adjustment MAN provides the following equipment 5 Drive lever control system Mini Marex made by Mannesmann Rexroth see page...

Page 21: ...hes between the following types of alarm error messages D Preliminary alarm the corresponding light emitting diode flashes D Main alarm the corresponding light emitting diode flashes light emitting di...

Page 22: ...ill Function test of the warning lamps If there is no alarm the warning lamps can be tested When the Test key is pressed all the warning lamps must light up Dimming All alarm LEDs are dimmed automatic...

Page 23: ...guages German English French Ital ian and Spanish Scrolling with the PAGE key enables the user to call up all the important engine data Another key is used to show current alarms or warnings Motordre...

Page 24: ...C Oil pressure gearbox 19 bar Page 2 Actual value example P2 Engine speed 2100 rpm Coolant pressure compensator reservoir 830 mbar Coolant pressure water pump 3 9 bar Oil temperature engine 103 C Bat...

Page 25: ...d ship specific warning If there are more than 5 alarms e g during commissioning in the shipyard the alarms can be displayed in groups of five A2 to An by pressing the ALARMS key again All alarms are...

Page 26: ...nds System Failure The front plate of the device has a red LED with the description System Failure This is activated in the following two cases A Failure of the serial data from the Safety Alarm and D...

Page 27: ...reset key can be used to reset a slow down or stop alarm A reduction alarm can only be reset after reduction of the speed below 800 rpm If the corresponding criteria have been met horn and optics tes...

Page 28: ...ns By holding the ALARMS key for at least 5 seconds you enter the configuration menu The keys are now given the significance described at Menu function The new alloca tion is shown in the bottom line...

Page 29: ...acceptance all the settings for language and unit have been con cluded and highlighted accordingly in black The selection cursor jumps to the second last line to the item exit exit back set time servi...

Page 30: ...to the second last line to the item exit the time setting is now concluded exit Back get mmds time You return to the main menu by pressing the PRG key Prg or the Menu key ALARMS Men In the event of an...

Page 31: ...peratur 120 C Ladelufttemperatur 64 C Kuehlwassertemp 83 C Motoroeldruck 4 3 bar M 1 A 3 ALARMS Men PAGE RESET Prg Engine run System Fail Alarm MAN MARINE DIESEL TYP MMDS EP TEST 51 27720 7018 The fun...

Page 32: ...MAN Operation of the control system Command master Infinitely variable speed adjustment Infinitely variable speed adjustment Max speed Max speed lock Forwards area Gearbox forwards lock Neutral Gearbo...

Page 33: ...g periods BEFORE and AFTER clutch engaging can be set Maximum engine speed position Position shows the maximum engine speed for the Forwards and Backwards Range Between positions and the engine speed...

Page 34: ...thmic extinguishing of the command master lighting 4 Release the Command takeover key The engine idles and the gearbox clutch remains disengaged The control lever can now be moved towards position max...

Page 35: ...command takeover Key Syn Trol T2 This key can be used to ENABLE and DISABLE special functions enabled be forehand in the setting unit key is permanently illuminated weakly via LED 6 The following spe...

Page 36: ...idling speed during this period While the control system is in the function Synchronisation the engine speeds of both power units can only be changed using the control lever of the Master system If th...

Page 37: ...he trolling mode is enabled the clutch is set to its highest slip level 100 slip The engine continues to idle and the gearbox is in neutral If the command master lever is set in position lock the gear...

Page 38: ...mmand display indicates which command master is currently in command The Command displays of the other control stands are disabled If the command is requested on this master the Command display flashe...

Page 39: ...continuously Acoustic signal transmitter sounds with fast intermittent tone on all control stands The display Command flashes rapidly If the control system continues to issue long lighting and tone in...

Page 40: ...r in the Neutral posi tion or in the same travel direction position as the lever of the command master that is in command The command change for this variant takes place in two steps 1st step Command...

Page 41: ...ommand change The command change takes place in one step Command takeover on the selected control stand Execution Press Command key white to take over the command on this control stand Consequence The...

Page 42: ...ing the corresponding function keys A green LED indicates standby mode Operation is by means of six keys on the front which light up when a requested mode is reached and thus return the corresponding...

Page 43: ...mergency stop switch is unlocked Operation function of emergency operation unit in operation Enabling emergency operation unit The system is ready for operation standby after the ignition is switched...

Page 44: ...shift As long as the desired state has not yet been reached the key that has been pressed flashes It goes out as soon as another control command is issued or it signals with continuous light that the...

Page 45: ...y other operating key also flashing Failure of the internal engine speed signal function still possible with delayed shift times Green LED on red LED flashing together with the forwards key Fault foll...

Page 46: ...d at the engine these blow in the event of overcurrent or short circuit If a fuse as blown the engine can no longer be started The fuses can be reset by the operator using the keys fitted There are tw...

Page 47: ...y the operator using the keys fitted Top side of terminal box with the keys for fuses F5 F6 F7 Charge control lamp on the terminal box A charge control lamp is fitted on the ter minal box This should...

Page 48: ...tion of engine speed D Horn acoustic alarm D Group alarm collective fault indication The keys are intended for D Horn off Switches off the alarm horn and the integrated buzzer D Flashing light off tra...

Page 49: ...key only reacts when alarms are acknowledged If the following light emitting diodes light up there is a fault D Diagnostic unit failure The diagnosis unit is defective D Sensor failure A sensor is de...

Page 50: ...e remove the oil drain plugs on the oil sump and the oil filter bowl and allow the old oil to drain off completely Use a vessel of sufficient size to ensure that the oil does not overflow As the oil d...

Page 51: ...diately Check oil pressure and check that there is no oil leakage Then shut down the engine After about 20 minutes check the oil level D Pull out dipstick arrow D wipe it with a clean lintfree cloth D...

Page 52: ...d scalds D After releasing the clamping bolts remove filter bowls D Renew filter cartridges Thoroughly clean all other parts in cleaning fluid do not allow cleaning fluid to enter the oil circuit D Us...

Page 53: ...njection pump nor the control unit must be modified in any way If the lead seal is damaged the engine warranty will become null and void Faults We urgently recommend that you have faults in the inject...

Page 54: ...ste and must be dis posed of accordingly Change over fuel filter Where the changeover type filter is installed the servicing procedure is for the filter side requiring to be shut off with the engine r...

Page 55: ...as dangerous waste and must be dis posed of accordingly Bleeding the fuel system Note To bleed the fuel system switch on the ignition so that the EHAB will be open An arrow on the filter head indicate...

Page 56: ...with regulations Drain coolant as follows but only when the engine has cooled down D Briefly open cap large cap on the filler neck of the expansion tank for pressure compensation D Remove drain screws...

Page 57: ...rect Find the cause of the loss of coolant and have it eliminated D Remove cap large cap D Fill in the coolant slowly D During the filling procedure the liquid cooled turbochargers and the inter coole...

Page 58: ...turn the cap large cap with safety valve to the first stop let off pressure then open carefully Note Don t open the cooling system when the engine is at operating temperature This causes a pressure l...

Page 59: ...pwards If pressure is maintained after the spring has disengaged a false reading will be obtained Reading of tension D Read of the tensioning force of the belt at the point where the top surface of th...

Page 60: ...ighten lock nut and fixing bolts To replace the V belts loosen lock nut and swing alternator inwards Tension pulley at bottom right D Remove fixing bolts D Remove lock nut D Adjust nut until V belts h...

Page 61: ...ately and remedy the fault in the electrical system D Do not run the engine unless the battery charge control is in satisfactory order D Do not short circuit the connections of the alternator with tho...

Page 62: ...e nameplate Firing order 1 6 5 10 2 7 3 8 4 9 Valve clearance cold engine Intake 0 50 mm Exhaust 0 60 mm Valve timing Intake opens 12 before TDC Intake closes 48 after BDC Exhaust opens 61 before BDC...

Page 63: ...nd sump 33 l deep V48 51 l Oil pressure during operation depend ing on oil temperature oil viscosity class and engine rpm must be monitored by oil pressure moni tors gauges Oil filter Full flow filter...

Page 64: ...0 6 7 2 11 4 9 Valve clearance cold engine Intake 0 50 mm Exhaust 0 60 mm Valve timing Intake opens 24 before TDC Intake closes 36 after BDC Exhaust opens 63 before BDC Exhaust closes 27 after TDC Fue...

Page 65: ...semi shallow 33 l for 38 45 tilt 48 l Oil pressure during operation depend ing on oil temperature oil viscosity class and engine rpm must be monitored by oil pressure moni tors gauges Oil filter Full...

Page 66: ...ensation in fuel D D D D Air filter clogged D Electric circuit interrupted D Batteries flat D Starter solenoid switch defective D D D D D Start of delivery not correct incorrectly set D Injection nozz...

Page 67: ...xpansion tank radiator defec tive or leaking D Temperature gauge defective D Coolant pipes leaking blocked or twisted D Oil level in sump too low D Engine temperature too high D Oil filter clogged D D...

Page 68: ...nd care 50 61 N Nameplates 9 O Operation monitoring 20 49 Charge control lamp on the terminal box 47 Display device MMDS L 21 Display device MMDS LC 23 Drive lever control system Mini Marex 32 Emergen...

Page 69: ......

Page 70: ......

Reviews: