background image

MALLINCAM SDI User Manual


November 11, 2014


SDI User Manual 

Page 24 


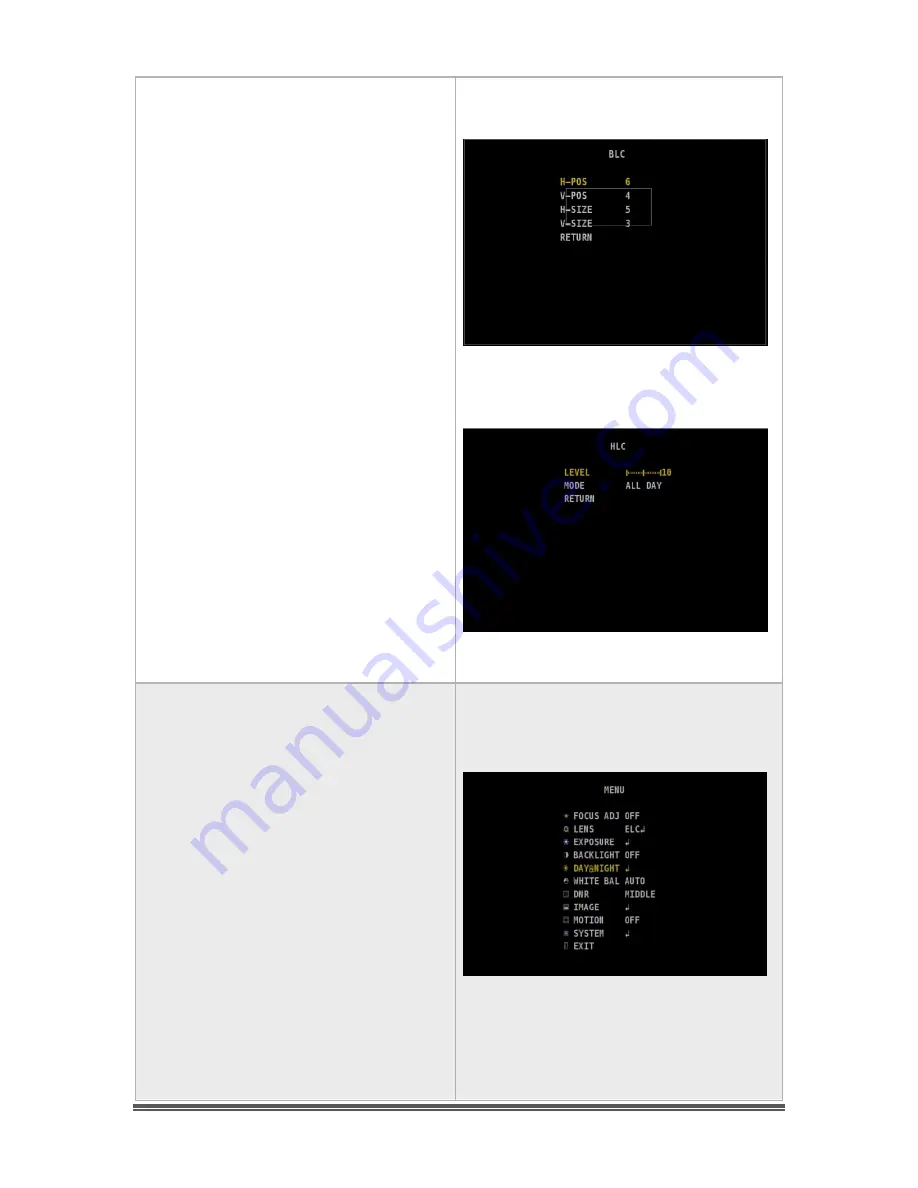
HLC 


This High Light Compensation control 
helps control or mask a bright light 
source.  The bright source will be 
masked with black when HLC is 
operating. 
 
You are presented with a sub-menu that 
allows you to make finer adjustments to 
this control. 
 
You can adjust the LEVEL at which the 
compensation takes place from 0 to 20.   
The lower the number the quicker the 
HLC will start making the black mask 
over the bright spots on the image. 
 
And you can tell the SDI to make these 
adjustments all the time or only at Night. 


DAY&NIGHT 


This control allows you to display the 
images in Colour or Black and White. 
This control also has settings to help the 
camera adjust to low light conditions. 


Summary of Contents for SDI Camera

Page 1: ...of the camera s various settings Imaging techniques with the various hardware and software options will be covered along with how to broadcast the output of the Mallincam SDI camera on the Internet Th...

Page 2: ...Revision Sheet SDI User Manual Page ii Version Date Revision Description 1 0 11 16 2014 Template Creation for MALLINCAM SDI Camera...

Page 3: ...deo 8 Power 8 Connecting the MALLINCAM SDI to your Computer for Video 9 Composite Video 9 Software Requirements 9 Hardware Requirements 9 Attaching the Video Cable to MALLINCAM SDI Camera 10 3 Operati...

Page 4: ...EXTERN S W 26 AGC THRES 26 AGC MARGIN 26 DELAY 26 WHITE BAL 27 AUTO 27 AUTOext 27 PRESET 28 MANUAL 28 DNR 29 IMAGE 29 SHARPNESS 30 GAMMA 30 COLOR GAIN 30 MIRROR 30 FLIP 30 D ZOOM 31 ACE 31 DEFOG 31 SH...

Page 5: ...ork 41 Appendix C Connecting Serial to Mallincam SDI 48 What you Need 48 What to Do 49 Appendix D Displaying SDI on your Computer 50 Magewell SDI Dongle XI100DUSB SDI 50 BlackMagic UltraStudio SDI 51...

Page 6: ...e latest in Technology offered by Panasonic using the new 1 3 Inch 2 1 MP High Speed Maicovicon MOS sensor making it ideal for planetary Lunar and Solar Imaging under live condition on a monitor or th...

Page 7: ...I Deluxe Package Mallincam SDI camera body BNC to RCA adapter 1 25 eyepiece adapter SVBS 10 meter cable 120 volts AC to 12 volts DC Regulated power supply These attachments will provide you with the a...

Page 8: ...l size 1944 H X 1092 V Active Pixels CCD Size 1 3 5 59mm H 4 68mm V Video Output Format NTSC or PAL HD SDI Video BNC Female Connector Composite Video BNC Female Connector Gain Control Auto Manual Expo...

Page 9: ...e 6 The Camera its Anatomy The Mallincam SDI camera is a rectangular based camera with a rear connection ports for power video and communications and a front c mount opening It is 4 long by 2 5 tall a...

Page 10: ...use This dedicated SDI cable will provide the best image possible with the Mallincam SDI Composite Video The Composite Signal is obtained by connecting the included 10m MallinCam Video Cable from the...

Page 11: ...t align the two little openings on the BNC cable male with the two notches on the adapter s BNC female connector push and twist so the notches slide into place This locks the connector to the cable Po...

Page 12: ...n image from your video capture device Some suggestions are AMCAP SharpCap SplitCam ManyCam WebCamMax Each software has its pros and cons depending upon what you require the software do Using SplitCam...

Page 13: ...he MALLINCAM SDI Camera to allow for capture of the video signal Now all we need to do is start the video display software of your choice to display the image Remember what ever software choice you ma...

Page 14: ...deo Display Software Place your MALLINCAM SDI Camera on your telescope and point the telescope at a recognizable object Power up your MALLINCAM SDI Camera and monitor start your Video Display Software...

Page 15: ...on of MallinCam SDI controls and Software controls to produce the best possible image Press on the Down Button and the OSD Menu should highlight the LENS selection Press the down button once more to h...

Page 16: ...le you become at manipulating the controls in the day time the easier it will be when you are under the night sky The MallinCam SDI is an imaging camera whose capabilities are in the hands of the user...

Page 17: ...or On Screen Display image control Once you get the hang of locating the settings it will be worth your time to peruse the Chapter Understanding the OSD to get a deeper comprehension how the adjustmen...

Page 18: ...X3 X4 X5 X6 X7 X8 AGC 0 TO 20 BACKLIGHT OFF HLC LEVEL 0 TO 20 MODE ALL DAY NIGHT ONLY BLC H POS 0 TO 20 V POS 0 TO 20 H SIZE 0 TO 20 V SIZE 0 TO 20 DAY NIGHT MODE COLOR B W EXTERN AUTO IR LED OFF ON A...

Page 19: ...o 60 V SIZE 0 to 40 Y LEVEL 0 to 20 CR LEVEL 0 to 20 CB LEVEL 0 to 20 MOTION OFF ON SENSITIVITY 0 to 20 WINDOW TONE 0 to 6 DET H POS 0 to 60 DET V POS 0 to 40 DET H SIZE 0 to 60 DET V SIZE 0 to 40 MOT...

Page 20: ...to save the setting adjustments you have made MENU MAIN This is the main menu for the Mallincam SDI It is from here that you select which setting you would like to adjust Menu selections include FOCUS...

Page 21: ...LC Electronic Light Control ALC Auto Level Control We recommend using ELC at NORMAL ELC This causes the camera to modify the bias voltage on the CCD chip resulting in a variable light sensitivity Prov...

Page 22: ...fixed lens the telescope the ALC command will not affect the image The ALC command provides you with 3 Options INDOOR Not used astronomy applications OUTDOOR Not used astronomy applications DEBLUR DE...

Page 23: ...command allows you to control all aspects of the Exposure From here you can adjust the BRIGHTNESS SHUTTER SENS UP AGC BRIGHTNESS This control allow you to adjust the Brightness of the image The values...

Page 24: ...s is the best setting MANUAL The MANUAL mode in the SHUTTER setting allows you to adjust the speed thus giving you more control You can set the Shutter Speed in seconds to 1 60000 1 30000 1 16000 1 80...

Page 25: ...of factors The available Ranges are OFF X2 X3 X4 X5 X6 X7 X8 Note SENS UP only works when the SHUTTER is in AUTO or FLICKER Mode AGC This is the Automatic Gain Control for the SDI which amplifies the...

Page 26: ...types of Backlight compensation functions BLC Back Light Compensation HLC High Light Compensation BLC This Back Light Compensation control helps counter balance the screen image by increasing the bri...

Page 27: ...make finer adjustments to this control You can adjust the LEVEL at which the compensation takes place from 0 to 20 The lower the number the quicker the HLC will start making the black mask over the br...

Page 28: ...am SDI also has an AUTO setting which will switch between the COLOR and B W Mode according to light conditions There is also an EXTERN setting which is not active in this camera Note COLOR will most l...

Page 29: ...t available on the Mallincam SDI AGC THRES The DAY NIGHT switch depends upon the AGC level that is used to increase the brightness of the image The higher the value then the darker the image is requir...

Page 30: ...trol gives you re the following settings AUTO AUTOext PRESET MANUAL AUTO This setting allows the SDI to work within its temperature colour range IT determines what White Balance output to use by readi...

Page 31: ...or It you change locations or brightness in the image you may have to PRESET it again MANUAL You can use the MANUAL setting to fine tune your colours First set the White Balance by using the AUTO or A...

Page 32: ...low light conditions This control provides 4 possible settings OFF LOW MIDDLE HIGH I usually leave this on MIDDLE when imaging planets IMAGE This control allows you to optimize the image quality by a...

Page 33: ...0 55 0 6 and 0 65 The small the number the brighter the image Setting GAMMA to 0 6 is a great place to start COLOR GAIN This changes the Color Gain of the SDI You can select a value from 0 to 20 Using...

Page 34: ...t of the image on the screen You have 4 levels to choose from OFF LOW MIDDLE and HIGH I find OFF the best choice for astronomical applications DEFOG During seeing conditions with Fog rain or even inte...

Page 35: ...to 100 PRIVACY This control has no astronomical applications When activated set to ON you will be presented with a sub menu that allows you to black out up to 16 0 thru 15 masking regions on your ima...

Page 36: ...DET H_POS Sets the horizontal location of the Detection Zone box from 0 to 60 if you use this control I would leave at 0 DET V POS Sets the vertical location of the Detection Zone box from 0 to 40 if...

Page 37: ...lar boxes around parts of the image that are moving Choices are ON or OFF ALARM This control is not activated on the SDI SYSTEMING The SYSTEMING control is where so set the parameters for using the Ma...

Page 38: ...that the SDI uses You are the option of choosing the FULL contrast range or a reduced contrast range using COMP or you can select a 20 levels of contract reduction by using the USER option and select...

Page 39: ...TOR Not used for astronomical applications leave at 1 FRAME RATE This sets the frame rate of the video output Leave at 30 fps our capture standard in Canada Other setting is 25 fps CVSB This control s...

Page 40: ...r Bar With the COLORBAR set to ON you can determine if the SDI is outputting a signal through the video port without imaging anything RESET This control will reset the Mallincam SDI back to factory de...

Page 41: ...t in case I forget I will always use the same port for each device so that I will not have multiple versions of the drivers for multiple USB ports you are just teasing the windows gods if you mix and...

Page 42: ...downloaded When you see the green USB 2 0 HD HV Grabber screen CLICK on the option Install Drivers You may receive a Windows warning asking you if you want to allow the installation to run Click Yes F...

Page 43: ...rce called USB 2828x Device This is the driver for either the MCV 1 or MCV 1e device This is the one we want Select it Power up your Signature and you should be able to see the camera s images on the...

Page 44: ...m messages One of the most important decisions you will need to make with broadcasting the image of the MALLINCAM SDI is what Video capture software are you going to use Some simple suggestions You ca...

Page 45: ...litcam WebcamMax choose Desktop Capture as the source Adjust the Resolution and frames second fps value on Manycam Splitcam WebcamMax This will be trial and error it all depends upon resolution bandwi...

Page 46: ...t be presented with the Channel Line Up screen for Night Skies network Click on the Login selection on the upper right hand side of the screen You will be presented with the Channel Launch Sign In scr...

Page 47: ...he other NSN views understand what you are doing When initially setting up which usually takes longer when you are learning I usually type the message Setting Up the Camera then CLICK on the SEND butt...

Page 48: ...e Pull Down list to select your camera of choice CLICK on CLOSE to Continue NSN will remember what camera you chose from the last visit So usually you only have to go through this process whenever you...

Page 49: ...ee what settings the NSN viewers say is the best Select your Frame Rate From its Pull Down Menu I usually leave it at 15 fps but I have used 30 fps at times Again trial and error for your system CLICK...

Page 50: ...ou or if there is noise Remember there are settings for the microphone in the camera settings window I have become hooked on Splitcam With my dual monitor system I have Splitcam grab my Video device U...

Page 51: ...you need to create a connection path between your computer and the RS485 port on the Mallincam SDI Once that path is create you can then control the camera thru software I create a simple piece of so...

Page 52: ...k of the Mallicam SDI Connect a wire from the Rx of the adapter to the Rx of the SDI Connect a wire from the Rx of the adapter to the Rx of the SDI Connect a wire from the Gnd of the adapter to the Gn...

Page 53: ...use a USB2 port it will automatically maximize the thru put for the USB2 connection Magewell SDI Dongle XI100DUSB SDI This product is plug and play so all you need to do is plug in the dongle it will...

Page 54: ...in the Mallincam SDI BlackMagic Control Panel and Video software for the image to be seen Connect the USB3 Cable from the Ultrastudio to a USB2 Port on the Computer Connect the SDI cable from the back...

Page 55: ...n 1080p vs 720p matching the expected input resolution including fps When I have my Video Software connect to my Mallincam through my MCV 1 adapter I only see a Blue screen Diagnosis The MCV 1 or othe...

Page 56: ...nt depends on object SENSE UP OFF Not used in Manual Shutter AGC 5 This gives wiggle room 3 DNR SETTING Middle Personal Preference 4 IMAGE SHARPNESS 15 This gives wiggle room GAMMA 0 5 Depends on Moni...

Page 57: ...nual Page 54 Appendix G Notes Menu Parameter Setting Comments 1 LENS ELC 2 Exposure BRIGHTNESS SHUTTER SENSE UP AGC 3 DNR SETTING 4 IMAGE SHARPNESS GAMMA COLOR GAIN ACE 5 Day Night D N Mode 6 White Ba...

Page 58: ..._____________ _______________________________________ _______________________________________ _______________________________________ _______________________________________ __________________________...

Page 59: ......

Reviews: