10
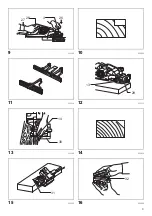
Chamfering (Fig. 14 & Fig. 15)
To make a chamfering cut as shown in the figure, align the
“V” groove in the front base with the edge of the
workpiece and plane it.
MAINTENANCE
CAUTION:
• Always be sure that the tool is switched off and
unplugged before attempting to perform inspection or
maintenance.
• Never use gasoline, benzine, thinner, alcohol or the
like. Discoloration, deformation or cracks may result.
To maintain product SAFETY and RELIABILITY, repairs,
carbon brush inspection and replacement, any other
maintenance or adjustment should be performed by
Makita Authorized or Factory Service Centers, always
using Makita replacement parts.
Sharpening the planer blades (only for
tool with conventional blades)
Always keep your blades sharp for the best performance
possible. Use the sharpening holder to remove nicks and
produce a fine edge.
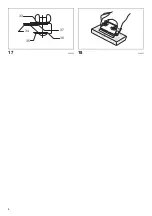
(Fig. 16)
First, loosen the two wing nuts on the holder and insert
the blades (A) and (B), so that they contact the sides (C)
and (D). Then tighten the wing nuts.
(Fig. 17)
Immerse the dressing stone in water for 2 or 3 minutes
before sharpening. Hold the holder so that the both blades
contact the dressing stone for simultaneous sharpening at
the same angle.
(Fig. 18)
Summary of Contents for MT111
Page 4: ...4 17 004952 18 004953 33 34 35 37 36...
Page 24: ...24 GEA012 2 1 2 3 1 2 3 4 5 6 RCD RCD 7 RCD 30 mA 8 EMF 9 10 1 2 3 4 5 6 7...
Page 25: ...25 8 9 ANSI Z87 1 EN 166 AS NZS 1336 1 2 3 4 5 6 7 8 9 1 2 GEB167 1 1 2 3 4 5 6...
Page 26: ...26 7 8 9 10 11 12 13 14 15 16 17 Makita 18 1 2 OFF Makita 3 4 5...
Page 27: ...27 3 6 7 1 2 3 4 5 6 7 8 9 10 1 9 A B EN0004 1 A B B A B A...
Page 28: ...28 8 1 2 3 9 10 0 3 0 6 11 12 13 20 14 15 V Makita Makita 16 A B C D 17 2 3 18...
Page 29: ...29...
Page 30: ...30...
Page 31: ...31...


