9
Set the dust cover so that the notch of the dust cover fits
to the protrusion of the bearing box.
Secure the dust cover band B by firmly tightening the
screws.
To remove the dust cover, follow the installation
procedure in reverse.
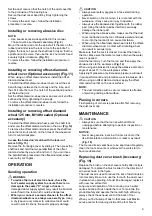
Installing or removing abrasive disc
NOTE:
• Use sander accessories specified in this manual.
These must be purchased separately.
(Fig. 9)
Mount the rubber pad onto the spindle. Fit the disc on the
rubber pad and screw the lock nut onto the spindle. To
tighten the lock nut, press the shaft lock firmly so that the
spindle cannot revolve, then use the lock nut wrench and
securely tighten clockwise.
(Fig. 10)
To remove the disc, follow the installation procedure in
reverse.
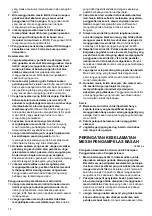
Installing or removing offset-diamond-
wheel cover (Optional accessory) (Fig. 11)
When using an offset diamond wheel, install the offset-
diamond-wheel cover.
To install the offset-diamond-wheel cover, insert the set
band through between the tool body and the tube, and
then fit it onto the tool. The notch of the set band position
just below the joint.
Set the offset-diamond-wheel cover and secure it and the
set band by firmly tightening the screws.
To remove the offset-diamond-wheel cover, follow the
installation procedure in reverse.
Installing or removing offset diamond
wheel 125 mm, M14 threaded (Optional
accessory)
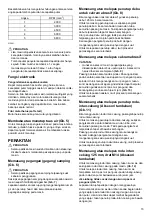
To install the offset diamond wheel, press the shaft lock,
and screw the offset diamond wheel on the tool.
(Fig. 12)
To remove the offset diamond wheel, press the shaft lock,
place the lock nut wrench on the holes of the wheel and
turn it counterclockwise.
In case the holes don’t match with the lock nut
wrench (Fig. 13)
Remove the front-edge cover by sliding it. Then press the
shaft lock and hold the two parallel flats of the offset
diamond wheel by a wrench and turn it. If you can’t see
the parallel flats, press down the offset-diamond-wheel
cover with your fingers.
OPERATION
Sanding operation
WARNING:
•
To reduce the risk of electric shock, check the
tool’s water supply system to ensure there is no
damage to the seals (“O” rings) or hoses.
A
damaged water supply system may result in abnormal
water flow to the tool which could be dangerous.
•
When you connect a vacuum cleaner to the offset-
diamond-wheel cover, always use a wet type.
Using
a dry type vacuum cleaner to collect wet dust could
result in electric shock, fire and/or property damage.
CAUTION
• Always wear safety goggles or a face shield during
operation.
• Never switch on the tool when it is in contact with the
workpiece, it may cause an injury to operator.
• Always use the abrasive disc together with the rubber
pad. Using the rubber pad by itself may seriously
damage the rubber pad.
• When using the abrasive disc, make sure that the dust
cover is attached on the tool. Otherwise water and dust
come into the tool and it can cause tool failure.
• When using the offset diamond wheel, install the offset-
diamond-wheel cover. Contact with a rotating wheel
can result in serious injury.
Make sure that the cock is closed. Connect the hose to
the tool. Make sure that water comes out when the water
lever is opened.
Hold the tool firmly. Turn the tool on and then apply the
abrasive disc to the workpiece.
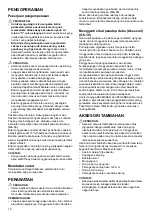
(Fig. 14)
When using an abrasive disc, keep the abrasive disc at an
angle of about 15° to the workpiece surface.
Apply slight pressure only. Excessive pressure will result
in poor performance and premature wear to abrasive disc.
When using an offset diamond wheel, apply the offset
diamond wheel flat on the work surface.
NOTE:
• The dust collection with a vacuum cleaner is effective
only when grinding a flat surface.
Planing in corners
Flush planing of corners is possible after first removing
the dust cover cap.
MAINTENANCE
CAUTION
• Always be sure that the tool is switched off and
unplugged before attempting to perform inspection or
maintenance.
NOTICE:
• Never use gasoline, benzine, thinner, alcohol or the
like. Discoloration, deformation or cracks may result.
(Fig. 15)
The tool and its air vents have to be kept clean. Regularly
clean the tool’s air vents or whenever the vents start to
become obstructed.
Replacing dust cover brush (Accessory)
(Fig. 16)
Replace the brush on the dust cover shortly after its tip is
damaged. To replace the brush, slide it in the direction of
arrow as shown in the figure.
The dust cover is used to reduce the risk of dust intrusion
into tool body. Be sure to use the tool with the dust cover
in place when operating. Should it be damaged, replace it
with new one without fail.
Long use and operation of the tool using much water
causes buildup of dust inside the tool. To maintain the
product safety and operate the tool with high efficiency,
always check the exhaust vent at the back of tool.
When you find buildup of dust in that area, ask Makita
service center for cleaning inside of the tool. Never


