


12
OPERATING INSTRUCTIONS
Charging
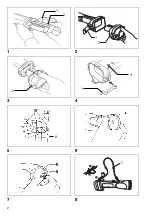
For ML702 (Fig. 1), ML902 (Fig. 1) and ML901 (Fig. 2)
Charge the battery cartridge with the Makita charger
before use. To remove the battery cartridge, pull out the
set plate on the torch/flashlight and grasp both sides of
the cartridge while withdrawing it from the torch/flash-
light. After charging, insert the battery cartridge into the
torch/flashlight and snap the set plate back into place.
For ML903 (Fig. 3)
Charge the battery cartridge with the Makita charger
before use. To remove the battery cartridge, withdraw it
from the torch/flashlight while pressing the buttons on
both sides of the cartridge. After charging, insert the bat-
tery cartridge into the torch/flashlight all the way until it
locks in place with a little click.
NOTE:
Battery cartridge 9100, 9102, 9100A and 9102A can be
used on ML903 if you install the set plate. Install the set
plate on ML903 with the screw provided as shown in
Fig. 4
.
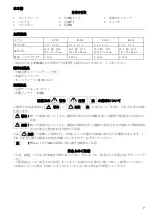
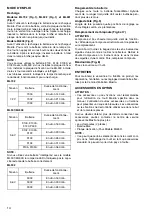
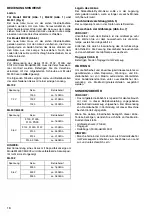
The following tables indicate the charging time and oper-
ating time on a single charge.
ML702
ML901/ML903
NOTE:
If you use a power checking battery on Model ML901/
ML903, the power checking battery will not indicate the
remaining battery capacity properly.
ML902
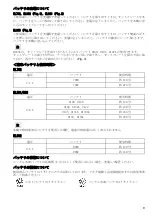
Storing battery cartridge
Always charge the Nickel Metal Hydride battery cartridge
before storing it when you do not use it for more than six
months.
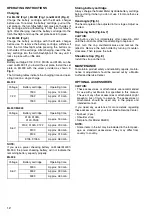
Head angle (Fig. 5)
The head angle can be adjusted in four stages. Adjust as
desired.
Replacing bulb (Fig. 6 & 7)
CAUTION:
The bulb is very hot immediately after operation. Wait
until the bulb cools off before attempting to replace it.
First, turn the ring counterclockwise and remove the
reflector. Remove the bulb holder by turning it counter-
clockwise. Then replace the bulb.
Shoulder strap (Fig. 8)
Install the strap on the tool.
MAINTENANCE
To maintain product safety and reliability, repairs, mainte-
nance or adjustment should be carried out by a Makita
Authorized Service Center.
OPTIONAL ACCESSORIES
CAUTION:
• These accessories or attachments are recommended
for use with your Makita tool specified in this manual.
The use of any other accessories or attachments might
present a risk of injury to persons. The accessories or
attachments should be used only in the proper and
intended manner.
If you need any assistance for more details regarding
these accessories, ask your local Makita Service Center.
• Bulb set (2 pcs)
• Shoulder strap
• Set plate (For Model ML903)
NOTE:
• Some items in the list may be included in the tool pack-
age as standard accessories. They may differ from
country to country.
Voltage Battery
cartridge
Operating
time
7.2 V
7000 Approx.
140
min.
7002
Approx. 210 min.
7033
Approx. 240 min.
Voltage Battery
cartridge
Operating
time
9.6 V
9100, 9100A,
9120, PA09
Approx. 160 min.
9102, 9102A, 9122
Approx. 230 min.
9133
Approx. 260 min.
9134
Approx. 310 min.
9135, 9135A
Approx. 360 min.
Voltage Battery
cartridge
Operating
time
9.6 V
9000
Approx. 160 min.
9002
Approx. 230 min.
9033
Approx. 260 min.