


9 ENGLISH
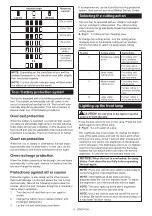
Indicator lamps
Remaining
capacity
Lighted
Off
Blinking
75% to 100%
50% to 75%
25% to 50%
0% to 25%
Charge the
battery.
The battery
may have
malfunctioned.
NOTE:
Depending on the conditions of use and the
ambient temperature, the indication may differ slightly
from the actual capacity.
NOTE:
The first (far left) indicator lamp will blink when
the battery protection system works.
Tool / battery protection system
The tool is equipped with a tool/battery protection sys
-
tem. This system automatically cuts off power to the
motor to extend tool and battery life. The tool will auto
-
matically stop during operation if the tool or battery is
placed under one of the following conditions:
Overload protection
When the battery is operated in a manner that causes
it to draw an abnormally high current, the tool automat
-
ically stops without any indication. In this situation, turn
the tool off and stop the application that caused the tool
to become overloaded. Then turn the tool on to restart.
Overheat protection
When the tool or battery is overheated, the tool stops
automatically and the lamp blinks. In this case, let the
tool and battery cool before turning the tool on again.
Overdischarge protection
When the battery capacity is not enough, the tool stops
automatically. In this case, remove the battery from the
tool and charge the battery.
Protections against other causes
Protection system is also designed for other causes
that could damage the tool and allows the tool to stop
automatically. Take all the following steps to clear the
causes, when the tool has been brought to a temporary
halt or stop in operation.
1. Turn the tool off, and then turn it on again to
restart.
2. Charge the battery(ies) or replace it/them with
recharged battery(ies).
3. Let the tool and battery(ies) cool down.
If no improvement can be found by restoring protection
system, then contact your local Makita Service Center.
Selecting the cutting action
This tool can be operated with an orbital or a straight
line (up and down) cutting action. The orbital cutting
action thrusts the jig saw blade forward and increases
cutting speed.
►
Fig.3:
1.
Cutting action changing lever
To change the cutting action, turn the cutting action
changing lever to the desired cutting action position.
Refer to the table to select the appropriate cutting
action.
Position
Cutting action
Applications
0
Straight line cutting
action
For cutting mild
steel, stainless
steel and plastics.
For clean cuts in
wood and plywood.
I
Small orbital
cutting action
For cutting mild
steel, aluminum
and hard wood.
II
Medium orbital
cutting action
For cutting wood
and plywood.
For fast cutting in
aluminum and mild
steel.
III
Large orbital
cutting action
For fast cutting in
wood and plywood.
Lighting up the front lamp
CAUTION:
Do not look in the light or see the
source of light directly.
Press the lock switch to turn on the lamp. Press the lock
switch again to turn off the lamp.
►
Fig.4:
1.
Lock switch
2.
Lamp
The brightness has three levels. To change the bright
-
ness of the lamp, press and hold the lock switch when
turning on the lamp. About 1 second after pressing and
holding the lock switch, the brightness of the lamp will
start to decrease. The brightness returns to the highest
level from the lowest level and repeats the decrease.
Release the lock switch when you reach the desired
brightness. It turns the tool into standby mode, too.
NOTICE:
When the tool is overheated, the lamp
blinks. Cool down the tool fully before operating
the tool again.
NOTE:
Press and hold the lock switch continuously to
cycle through the three brightness levels.
NOTE:
The brightness of the lamp cannot be
adjusted while the tool is in standby mode. To adjust
the brightness, turn the tool off and then on again.
NOTE:
The lamp lights up at the same brightness
level as the last time the tool was used.
NOTE:
Use a dry cloth to wipe the dirt off the lens of
the lamp. Be careful not to scratch the lens of lamp, or
it may lower the illumination.
Summary of Contents for JV001GZ
Page 2: ...2 1 2 3 Fig 1 1 2 Fig 2 1 Fig 3 2 1 Fig 4 1 2 Fig 5 1 Fig 6 2 1 Fig 7...
Page 3: ...3 1 3 4 2 Fig 8 1 2 3 Fig 9 1 2 Fig 10 1 2 Fig 11 2 1 Fig 12 1 2 Fig 13 1 Fig 14...
Page 4: ...4 1 2 Fig 15 1 2 Fig 16 Fig 17 3 1 2 Fig 18 1 2 3 6 5 4 Fig 19 3 1 2 Fig 20 Fig 21 Fig 22...
Page 5: ...5 Fig 23 1 Fig 24 4 2 1 3 Fig 25 1 Fig 26 1 2 3 4 5 Fig 27 1 2 3 Fig 28 1 2 3 Fig 29...
Page 68: ...68 A 1 2 3 4 5 6 7 8 9 10 11 12 13 14 15...
Page 70: ...70 1 1 2 3 2 1 2 75 100 50 75 25 50 0 25...
Page 71: ...71 1 2 3 Makita 3 1 0 I II III 4 1 2 1 5 1 2 10 6 1 6 1...
Page 72: ...72 4 6 3 6 3 4 3 6 1 4 6 1 6 1 3 1 2 1 3 4 6 1 6 1 6 Makita...
Page 73: ...73 7 1 2 8 1 2 3 4 9 1 2 3 III 10 1 2 11 1 2 12 1 2 13 1 2 14 1 Makita 15 1 2 16 1 2 0 45 17...
Page 75: ...75 28 1 2 3 29 1 2 3 B 8 B 13 B 16 B 17 58 Makita Makita Makita Makita 4 Makita...


