background image

5 ENGLISH

12. 

Cut wood only. Do not use chain saw for purposes 

not intended.

 For example: do not use chain saw for 

cutting plastic, masonry or non-wood building materi-

als. Use of the chain saw for operations different than 

intended could result in a hazardous situation.

13. 

Causes and operator prevention of kickback:

Kickback may occur when the nose or tip of the 

guide bar touches an object, or when the wood 

closes in and pinches the saw chain in the cut. 

Tip contact in some cases may cause a sudden 

reverse reaction, kicking the guide bar up and 

back towards the operator. Pinching the saw chain 

along the top of the guide bar may push the guide 

bar rapidly back towards the operator. Either of 

these reactions may cause you to lose control of 

the saw which could result in serious personal 

injury. Do not rely exclusively upon the safety 

devices built into your saw. As a chain saw user, 

you should take several steps to keep your cutting 

jobs free from accident or injury.

Kickback is the result of tool misuse and/or incor-

rect operating procedures or conditions and can be 

avoided by taking proper precautions as given below:
• 

Maintain a firm grip, with thumbs and fingers 

encircling the chain saw handles, with both 

hands on the saw and position your body 

and arm to allow you to resist kickback 

forces. Kickback forces can be controlled by 

the operator, if proper precautions are taken. 

Do not let go of the chain saw.

• 

Do not overreach and do not cut above 

shoulder height. This helps prevent unin-

tended tip contact and enables better control 

of the chain saw in unexpected situations.

• 

Only use replacement bars and chains spec

-

ified by the manufacturer. Incorrect replace

-

ment bars and chains may cause chain 

breakage and/or kickback.

• 

Follow the manufacturer’s sharpening and 

maintenance instructions for the saw chain. 

Decreasing the depth gauge height can lead 

to increased kickback.

14. 

Before starting work, check that the chain 

saw is in proper working order and that its 

condition complies with the safety regulations. 

Check in particular that:

• 

The chain brake is working properly;

• 

The run-down brake is working properly;

• 

The bar and the sprocket cover are fitted correctly;

• 

The chain has been sharpened and ten

-

sioned in accordance with the regulations.

15. 

Do not start the chain saw with the chain cover 

being installed on it.

 Starting the chain saw with the 

chain cover being installed on it may cause the chain 

cover to thrown out forward resulting in personal injury 

and damage to objects around the operator.

SAVE THESE INSTRUCTIONS.

WARNING:


DO NOT let comfort or familiarity 

with product (gained from repeated use) replace 

strict adherence to safety rules for the subject 

product. MISUSE or failure to follow the safety 

rules stated in this instruction manual may cause 

serious personal injury.

Important safety instructions for 

battery cartridge

1. 

Before using battery cartridge, read all instruc-

tions and cautionary markings on (1) battery 

charger, (2) battery, and (3) product using battery.

2. 

Do not disassemble battery cartridge.

3. 

If operating time has become excessively 

shorter, stop operating immediately. It may 

result in a risk of overheating, possible burns 

and even an explosion.

4. 

If electrolyte gets into your eyes, rinse them out 

with clear water and seek medical attention right 

away. It may result in loss of your eyesight.

5. 

Do not short the battery cartridge:

(1) 

Do not touch the terminals with any con-

ductive material.

(2) 

Avoid storing battery cartridge in a con-

tainer with other metal objects such as 

nails, coins, etc.

(3) 

Do not expose battery cartridge to water 

or rain.

A battery short can cause a large current 

flow, overheating, possible burns and even a 

breakdown.

6. 

Do not store the tool and battery cartridge in 

locations where the temperature may reach or 

exceed 50 °C (122 °F).

7. 

Do not incinerate the battery cartridge even if 

it is severely damaged or is completely worn 

out. The battery cartridge can explode in a fire.

8. 

Be careful not to drop or strike battery.

9. 

Do not use a damaged battery.

10. 

The contained lithium-ion batteries are subject 

to the Dangerous Goods Legislation require-

ments. 

For commercial transports e.g. by third parties, 

forwarding agents, special requirement on pack-

aging and labeling must be observed. 

For preparation of the item being shipped, consult-

ing an expert for hazardous material is required. 

Please also observe possibly more detailed 

national regulations. 

Tape or mask off open contacts and pack up the 

battery in such a manner that it cannot move 

around in the packaging.

11. 

Follow your local regulations relating to dis-

posal of battery.

SAVE THESE INSTRUCTIONS.

Summary of Contents for DUC353PG2

Page 1: ...INSTRUCTION MANUAL Cordless Chain Saw DUC303 DUC353 DUC400 ENGLISH Original instructions Read before use ...

Page 2: ...th battery cartridge according to EPTA Procedure 01 2003 WARNING Use appropriate combination of the guide bar and saw chain Otherwise personal injury may result Symbols The following show the symbols used for the equip ment Be sure that you understand their meaning before use Read instruction manual Wear safety glasses Wear ear protection Wear a helmet goggles and ear protection Use appropriate pr...

Page 3: ...ble liquids gases or dust Power tools create sparks which may ignite the dust or fumes 3 Keep children and bystanders away while operating a power tool Distractions can cause you to lose control Electrical Safety 1 Power tool plugs must match the outlet Never modify the plug in any way Do not use any adapter plugs with earthed grounded power tools Unmodified plugs and matching outlets will reduce ...

Page 4: ...urns or a fire 4 Under abusive conditions liquid may be ejected from the battery avoid contact If contact acci dentally occurs flush with water If liquid contacts eyes additionally seek medical help Liquid ejected from the battery may cause irritation or burns Service 1 Have your power tool serviced by a qualified repair person using only identical replacement parts This will ensure that the safet...

Page 5: ...and ten sioned in accordance with the regulations 15 Do not start the chain saw with the chain cover being installed on it Starting the chain saw with the chain cover being installed on it may cause the chain cover to thrown out forward resulting in personal injury and damage to objects around the operator SAVE THESE INSTRUCTIONS WARNING DO NOT let comfort or familiarity with product gained from r...

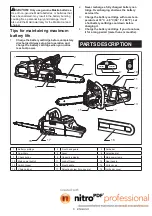
Page 6: ... fully charged battery car tridge Overcharging shortens the battery service life 3 Charge the battery cartridge with room tem perature at 10 C 40 C 50 F 104 F Let a hot battery cartridge cool down before charging it 4 Charge the battery cartridge if you do not use it for a long period more than six months PARTS DESCRIPTION 2 1 17 3 4 5 6 11 13 15 12 18 7 8 10 16 9 14 1 Battery cartridge 2 Front ha...

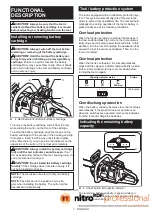
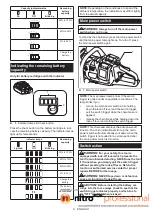
Page 7: ...eing inserted correctly NOTE The tool does not work with only one battery cartridge NOTE Pay attention to the position of your fin gers when installing the battery The button will be depressed unintentionally Tool battery protection system The tool is equipped with a tool battery protection sys tem This system automatically cuts off power to the motor to extend tool and battery life The tool will ...

Page 8: ...if the switch trigger is pulled under unoperatable conditions The lamp blinks if you turn on the main power switch while holding down the lock off lever and the switch trigger pull the switch trigger while the chain brake is applied release the chain brake while holding down the lock off lever and pulling the switch trigger NOTE This chain saw employs the auto power off function To avoid unintenti...

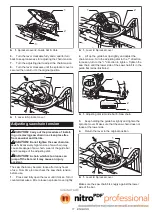
Page 9: ...t is performed the saw may not be used under any circumstances Consult our authorized service center 1 Press the lock off lever then pull the switch trig ger The saw chain starts immediately 2 Push the front hand guard forwards with the back of your hand Make sure that the chain saw comes to an immediate standstill 2 3 1 2 3 1 1 Front hand guard 2 Unlocked position 3 Locked position Checking the r...

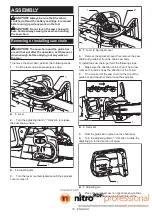
Page 10: ...release the saw chain tension 1 1 Adjusting dial 3 Turn the lever counterclockwise until the sprocket cover comes off 1 2 1 Lever 2 Sprocket cover 4 Remove the sprocket cover then remove the saw chain and guide bar from the chain saw body To install the saw chain perform the following steps 1 Make sure the direction of the chain The arrow mark on the chain shows the direction of the chain 2 Fit in...

Page 11: ...o loose can jump off the bar and it may cause an injury accident The saw chain may become loose after many hours of use From time to time check the saw chain tension before use 1 Press and fully open the lever until it clicks Turn it counterclockwise a little to loosen sprocket cover lightly 1 2 1 Lever 2 Sprocket cover 2 Lift up the guide bar tip slightly and adjust the chain tension Turn the adj...

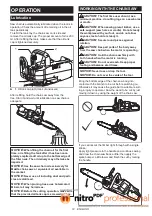
Page 12: ...re that the provided oil tank cap is screwed in place WORKING WITH THE CHAIN SAW CAUTION The first time user should as a minimum practice do cutting logs on a saw horse or cradle CAUTION When sawing precut timber use a safe support saw horse or cradle Do not steady the workpiece with your foot and do not allow anyone else to hold or steady it CAUTION Secure round pieces against rotation CAUTION Ke...

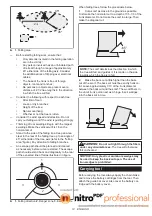
Page 13: ...rst Then make the final cut from the tensioned side B This prevents the bar from becoming trapped A B A B Limbing CAUTION Limbing may only be performed by trained persons A hazard is presented by the risk of kickback When limbing support the chain saw on the trunk if possible Do not cut with the tip of the bar as this pres ents a risk of kickback Pay particular attention to branches under tension ...

Page 14: ...d be planned and cleared as necessary before cuts are started The escape path should extend back and diagonally to the rear of the expected line of fall as illustrated in figure 1 2 2 3 3 1 Felling direction 2 Danger zone 3 Escape route When felling trees follow the proceduers below 1 Cut a scarf as close to the ground as possible First make the horizontal cut to a depth of 1 5 1 3 of the trunk di...

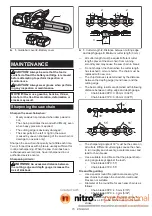
Page 15: ...1 1 3 1 1 Cutter length 2 Distance between cutting edge and depth gauge 3 Minimum cutter length 3 mm All cutter length must be equal Different cutter lengths prevent the saw chain from running smoothly and may cause the saw chain to break Do not sharpen the chain when the cutter length has reached 3 mm or shorter The chain must be replaced with new one The chip thickness is determined by the dista...

Page 16: ...t of the depth gauge again Cleaning the guide bar Chips and sawdust will build up in the guide bar groove They may clog the bar groove and impair the oil flow Clean out the chips and sawdust every time when you sharpen or replace the saw chain Cleaning the sprocket cover Chips and saw dust will accumulate inside of the sprocket cover Remove the sprocket cover and saw chain from the tool then clean...

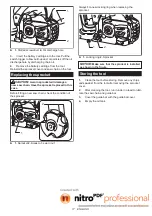
Page 17: ...n Have the sprocket replaced in this case Before fitting a new saw chain check the condition of the sprocket 1 2 1 Sprocket 2 Areas to be worn out Always fit a new locking ring when replacing the sprocket 1 2 1 Locking ring 2 Sprocket NOTICE Make sure that the sprocket is installed as shown in the figure Storing the tool 1 Clean the tool before storing Remove any chips and sawdust from the tool af...

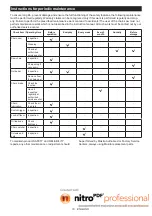
Page 18: ...ce center Check item Operating time Before operation Everyday Every week Every 3 month Annually Before storage Chain saw Inspection Cleaning Check at authorized service center Saw chain Inspection Sharpening if necessary Guide bar Inspection Remove from the chain saw Chain brake Check the function Have it inspected regularly at authorized service center Chain lubrication Check the oil feed rate Sw...

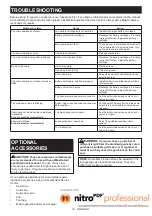
Page 19: ...harg ing is not effective replace the battery cartridge The drive system does not work correctly Ask the authorized service center in your region for repair The main power lamp is blinking Switch trigger is pulled under an unoperat able condition Pull the switch trigger after the main power switch is turned on and the chain brake is released Chain does not stop even the chain brake is activated St...

Page 20: ...www makita com Makita Europe N V Makita Corporation 3 11 8 Sumiyoshi cho Anjo Aichi 446 8502 Japan Jan Baptist Vinkstraat 2 3070 Kortenberg Belgium 885537 222 EN 20160808 ...

Reviews: