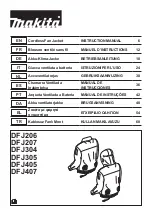
Makita DFJ304 Instruction Manual Download Page 9

9 ENGLISH

PARTS DESCRIPTION

► 

Fig.1

1

Battery holder (10.8 V / 

10.8 V - 12 V max) 

(optional accessory)

2

Battery holder (14.4 V 

/18 V)


(optional accessory)

3

Loop for name badge

4

Loop for arm badge

5

Sleeve holder

6

Battery pocket

7

Mesh pocket for ice pack

8

Fan unit

9

Power cable

10

Anti-slip rubber 

(DFJ207, DFJ305 and 

DFJ407 only)

11

Hood 

(DFJ207, DFJ305 and 

DFJ407 only)

-

-

INSTALLATION

Installing or removing the battery 

cartridge

CAUTION:


Always switch off the device 

before installing or removing the battery 

cartridge.

CAUTION:


Hold the battery holder and the 

battery cartridge firmly when installing or remov

-

ing the battery cartridge.

 Failure to hold the battery 

holder and the battery cartridge firmly may cause 

them to slip out of your hands and result in damage 

to the battery holder and battery cartridge and/or a 

personal injury.

► 

Fig.2:


1.

 Red indicator 

2.

 Button 

3.

 Battery cartridge 

4.

 Battery holder (optional accessory)

To install the battery cartridge, align the tongue on the battery 

cartridge with the groove in the housing and slip it into place. 

Insert the battery cartridge all the way until it locks in place 

with a small click. If you can see the red indicator on the upper 

side of the button, it is not locked completely.
To remove the battery cartridge, slide it from the battery holder 

while pressing the button on the front of the cartridge.

CAUTION:


Always install the battery car-

tridge fully until the red indicator cannot be seen.


Otherwise the battery cartridge may accidentally 

fall out of the battery holder, causing injury to you or 

someone around you.

CAUTION:


Do not forcibly install the battery 

cartridge.

 If the battery cartridge does not slide in 

easily, it is not being inserted correctly.

Attaching the battery holder

You can hang the battery holder on your waist belt.

To prevent the battery holder from dropping acciden-

tally, attach a strap using the strap hole and secure it.

► 

Fig.3:


1.

 Strap hole

For 18V and 14.4V battery holders

The battery holder has an anti-drop function. When 

removing the battery holder from the belt, pull up the 

battery holder while pressing the unlock button.

► 

Fig.4:


1.

 Unlock button

Installing or removing the fan unit

1.


Turn the ring counterclockwise while lifting the 

hook on it. Remove the ring when the mark on the ring 

aligns with the slot on the fan unit.

► 

Fig.5:


1.

 Fan unit 

2.

 Ring 

3.

 Hook 

4.

 Slot 

5.

 Mark

2.


Pass the head of the fan unit into the hole on the jacket. 

Set the ring onto the fan unit and turn it clockwise until the 

mark on the ring aligns with the mark further from the slot.

► 

Fig.6:


1.

 Mark 

2.

 Ring 

3.

 Fan unit

3.


Pass the strip through the loop on the fan unit and 

fasten the snap button.

► 

Fig.7:


1.

 Strip

4.


Attach the other fan unit to the jacket in the same way.

5.


Connect the cable to the fan units. Support the 

cable using the cable holder.

► 

Fig.8:


1.

 Cable 

2.

 Cable holder

6.


Connect the other end of the cable to the battery 

holder.

► 

Fig.9:


1.

 Battery holder

CAUTION:


Always use the strip and snap 

button to secure the fan unit to the jacket.

 If the 

fan unit falls, it may cause an injury, or damage to the 

fan unit.

Follow the installation procedure in reverse when 

removing it.

Attaching the filter set

Optional accessory

The filter set protects the fan unit from dust and powder. 

We recommend that you use the filter set in a dusty or 

powdery work place.

Insert the filter attachment between the jacket and fan 

unit as shown in the figure.

► 

Fig.10:


1.

 Ring 

2.

 Hole in the jacket 

3.

 Filter attach-

ment 

4.

 Fan unit 

5.

 Filter

When tightening the ring, stop it at the mark near the 

slot on the fan unit. After attaching the fan units, cover 

the filter attachments with filters.

► 

Fig.11:


1.

 Mark 

2.

 Slot

NOTICE:


Make sure that the filter fully covers 

the filter attachment. For better protection against 

dust and powder, tuck the skirt of the filter 

between the jacket and filter attachment.

Summary of Contents for DFJ304

Page 1: ...BSANLEITUNG 18 IT Giacca ventilata a batteria ISTRUZIONI PER L USO 24 NL Accuventilatorjas GEBRUIKSAANWIJZING 30 ES Chamarra Ventilada Inalámbrica MANUAL DE INSTRUCCIONES 36 PT Jaqueta Ventilada a Bateria MANUAL DE INSTRUÇÕES 42 DA Akku ventilatorjakke BRUGSANVISNING 48 EL Ζακέτα με φορητό ανεμιστήρα ΕΓΧΕΙΡΙΔΙΟ ΟΔΗΓΙΩΝ 54 TR Kablosuz Fanlı Mont KULLANMA KILAVUZU 60 ...

Page 2: ...3 4 5 6 7 8 9 11 10 3 4 5 7 8 9 11 10 DFJ206 DFJ207 DFJ304 DFJ305 DFJ405 DFJ407 6 1 2 Fig 1 1 2 4 3 Fig 2 18 V 14 4 V 10 8 V 1 Fig 3 2 ...

Page 3: ...1 Fig 4 1 2 3 5 4 Fig 5 1 2 3 Fig 6 1 Fig 7 2 1 Fig 8 3 ...

Page 4: ...1 Fig 9 1 2 3 4 5 Fig 10 1 2 Fig 11 2 1 Fig 12 1 2 Fig 13 1 Fig 14 1 Fig 15 Fig 16 4 ...

Page 5: ...Fig 17 Fig 18 1 Fig 19 1 2 Fig 20 5 ...

Page 6: ...1040B 10 8 V 12V max BL1016 BL1021B BL1041B 14 4 V BL1415 BL1415N BL1430 BL1430B BL1440 BL1450 BL1460B 18 V BL1815 BL1815N BL1820 BL1820B BL1830 BL1830B BL1840 BL1840B BL1850 BL1850B BL1860B Material Outer Polyester 100 Cotton 100 Polyester 100 titanium pearly coating Pocket Cotton 100 Shoulder pad Polyester 65 Cotton 35 Due to our continuing program of research and development the specifications ...

Page 7: ...sleep while wearing the fan jacket A steep decline of body temperature may harm your health 5 Children handicapped persons or anyone who is insensitive to temperature for example someone with poor blood circulation should refrain from using the jacket 6 This appliance is not intended for medical use in hospitals 7 Do not use the jacket other than for its intended purpose 8 If you sense anything un...

Page 8: ...ossible burns and even an explosion 4 If electrolyte gets into your eyes rinse them out with clear water and seek medical atten tion right away It may result in loss of your eyesight 5 Do not short the battery cartridge 1 Do not touch the terminals with any con ductive material 2 Avoid storing battery cartridge in a con tainer with other metal objects such as nails coins etc 3 Do not expose batter...

Page 9: ...y holder from dropping acciden tally attach a strap using the strap hole and secure it Fig 3 1 Strap hole For 18V and 14 4V battery holders The battery holder has an anti drop function When removing the battery holder from the belt pull up the battery holder while pressing the unlock button Fig 4 1 Unlock button Installing or removing the fan unit 1 Turn the ring counterclockwise while lifting the...

Page 10: ...n again but stops soon In this situation remove and recharge the battery cartridge Turbo button By pressing turbo button on the battery holder the jacket works in turbo mode for quick cooling Turbo mode lasts for a minute and then air speed returns to normal Fig 14 1 Turbo button Air flow To maintain a stable air flow close the button at the neck of the jacket Fasten the button on the ribbon for b...

Page 11: ...oration deformation or cracks may result Cleaning the jacket Detach the fan unit s and battery holder from the jacket before washing Follow the instructions on the tag For DFJ304 and DFJ305 Cotton products may shrink when washed Do not wash the jacket with other clothes Doing so may cause color fading or color transfer For DFJ405 and DFJ407 Use a laundry net when using a washing machine OPTIONAL A...

Page 12: ...0 8 à 12 V max BL1016 BL1021B BL1041B 14 4 V BL1415 BL1415N BL1430 BL1430B BL1440 BL1450 BL1460B 18 V BL1815 BL1815N BL1820 BL1820B BL1830 BL1830B BL1840 BL1840B BL1850 BL1850B BL1860B Matériau Extérieur 100 polyester 100 coton Polyester 100 revêtement nacré en titane Poche 100 coton Protège épaule 65 polyester 35 coton En raison de notre programme continu de recherche et développement les spécifi...

Page 13: ...la température corporelle pourrait nuire à votre santé 5 Les enfants les personnes handicapées ou toute personne insensible à la température par exemple les personnes ayant une mau vaise circulation sanguine ne doivent pas utiliser le blouson 6 Cet appareil n est pas conçu pour un usage médical en milieu hospitalier 7 N utilisez pas le blouson à d autres fins que celles prévues 8 Si vous remarquez...

Page 14: ...court Il y a risque de surchauffe de brûlures voire d explosion 4 Si l électrolyte pénètre dans vos yeux rin cez les à l eau claire et consultez immédiate ment un médecin Il y a risque de perte de la vue 5 Ne court circuitez pas la batterie 1 Ne touchez les bornes avec aucun maté riau conducteur 2 Évitez de ranger la batterie dans un conteneur avec d autres objets métal liques par exemple des clou...

Page 15: ...rte batterie tombe accidentelle ment attachez une courroie à l orifice pour courroie et serrez la Fig 3 1 Orifice pour courroie Pour les porte batteries de 18 V et 14 4 V Le porte batterie est pourvu d une fonction anti chute Lorsque vous retirez le porte batterie de la ceinture tirez le vers le haut tout en appuyant sur le bouton de déverrouillage Fig 4 1 Bouton de déverrouillage Mise en place ou...

Page 16: ...5 à 50 0 à 25 Pour les batteries de 14 4 V et 18 V uniquement Chargez la batterie Témoins Charge restante Allumé Éteint Clignotant Pour les batteries de 14 4 V et 18 V uniquement Anomalie possible de la batterie NOTE Selon les conditions d utilisation et la tem pérature ambiante l indication peut être légèrement différente de la capacité réelle Système de protection de la batterie L appareil est p...

Page 17: ...ection ou un entretien ATTENTION Si le blouson ne s allume pas ou en cas de panne alors que la batterie est complètement chargée nettoyez les bornes du porte batterie et de la batterie Si le blouson ne fonctionne toujours pas cor rectement arrêtez de l utiliser et contactez votre centre de service après vente agréé REMARQUE N utilisez jamais d essence ben zine diluant alcool ou autre produit simil...

Page 18: ...BL1016 BL1021B BL1041B 14 4 V BL1415 BL1415N BL1430 BL1430B BL1440 BL1450 BL1460B 18 V BL1815 BL1815N BL1820 BL1820B BL1830 BL1830B BL1840 BL1840B BL1850 BL1850B BL1860B Material Obermaterial Polyester 100 Baumwolle 100 Polyester 100 Titanperlbeschichtung Tasche Baumwolle 100 Schulterpolster Polyester 65 Baumwolle 35 Wir behalten uns vor Änderungen der technischen Daten im Zuge der Entwicklung und...

Page 19: ...Ihrer Gesundheit schaden 5 Kinder behinderte Personen oder jeder der temperaturun empfindlich ist z B jemand mit schwachem Blutkreislauf sollte die Benutzung der Jacke unterlassen 6 Dieses Gerät ist nicht für medizinischen Gebrauch in Krankenhäusern vorgesehen 7 Benutzen Sie die Jacke nur für ihren vorgese henen Verwendungszweck 8 Falls Sie irgendetwas Ungewöhnliches bemer ken schalten Sie die Jac...

Page 20: ...und sogar einer Explosion 4 Falls Elektrolyt in Ihre Augen gelangt waschen Sie sie mit sauberem Wasser aus und begeben Sie sich unverzüglich in ärztliche Behandlung Anderenfalls können Sie Ihre Sehkraft verlieren 5 Der Akku darf nicht kurzgeschlossen werden 1 Die Kontakte dürfen nicht mit leitfähigem Material berührt werden 2 Lagern Sie den Akku nicht in einem Behälter zusammen mit anderen Metallg...

Page 21: ...uhalters zu verhindern ziehen Sie einen Riemen durch die Riemenöse und sichern Sie ihn Abb 3 1 Riemenöse Für 18 V und 14 4 V Akkuhalter Der Akkuhalter hat eine Fallschutzfunktion Wenn Sie den Akkuhalter vom Gürtel entfernen ziehen Sie den Akkuhalter hoch während Sie den Entriegelungsknopf drücken Abb 4 1 Entriegelungsknopf Anbringen oder Abnehmen der Gebläseeinheit 1 Drehen Sie den Ring entgegen d...

Page 22: ...liegt eine Funktionsstörung im Akku vor HINWEIS Abhängig von den Benutzungsbedingungen und der Umgebungstemperatur kann die Anzeige geringfügig von der tatsächlichen Kapazität abweichen Akku Schutzsystem Das Gerät ist mit einem Akku Schutzsystem ausgestat tet Dieses System schaltet die Stromversorgung des Motors automatisch ab um die Akku Lebensdauer zu verlängern Falls die Akku Restkapazität zu n...

Page 23: ...inem voll aufgeladenen Akku festgestellt wird reinigen Sie die Kontakte des Akkuhalters und des Akkus Falls die Jacke noch immer nicht ordnungsgemäß funktioniert brechen Sie die Benutzung der Jacke ab und kontaktieren Sie unser autorisiertes Service Center ANMERKUNG Verwenden Sie auf keinen Fall Benzin Waschbenzin Verdünner Alkohol oder dergleichen Solche Mittel können Verfärbung Verformung oder R...

Page 24: ...www makita com Makita Europe N V Makita Corporation 3 11 8 Sumiyoshi cho Anjo Aichi 446 8502 Japan Jan Baptist Vinkstraat 2 3070 Kortenberg Belgium 885577 991 EN FR DE IT NL ES PT DA EL TR 20170118 ...

Reviews: