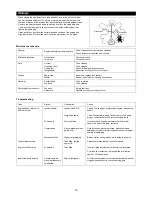
– Hook the center of new nylon cord into the notch in the center of the spool,
with one end of the cord extending about 80mm (3-1/8") more than the other.
Then wind both ends firmly around the spool in the direction of the head
rotation (left-hand direction indicated by LH and right-hand direction by RH on
the side of the spool).
– Wind all but about 100mm (3-15/16") of the cords around the spool, leaving
the ends temporarily hooked through the notch on the side of the spool.
– Mount the spool in the housing so that the grooves and protrusions on the
spool match up with those in the housing. Mount the spool so that the writing
on the spool is visible from above. Next, unhook the ends of the cords from
their temporary position, and feed the cords through the eyelets so that they
protrude from the housing.
– Align the protrusion on the underside of the cover with the slots of the eyelets.
Then push cover firmly onto the housing to secure it.
Servicing instructions
CAUTION: Before performing any type of maintenance work on the Brush
cutter, always switch off the motor and detach the plug cap from the
spark plug (see “checking the spark plug”).
Always wear protective gloves.
CAUTION: Never remove the recoil starter yourself. Doing so may cause an
accident. This procedure should only be performed by an Authorized
Service Agent.
To ensure a long service life and to avoid any damage to the equipment, perform the following maintenance operations regularly.
Daily inspection and maintenance
– Before operation, check the equipment for loose screws or missing parts. Pay particular attention to the tightness of the cutter blade or nylon
cutting head.
– Before operation, always check to make sure that the cooling air passage and cylinder fins are not clogged.
Clean them if necessary.
– Perform the following maintenance operations daily after use:
• Clean the Brush cutter externally and inspect it for damage.
• Clean the air filter. When working under extremely dusty conditions, clean the filter several times a day.
• Check the blade or the nylon cutting head for damage and make sure it is firmly mounted.
• Check that there is sufficient difference between the idling and operating speeds to ensure the cutting tool is at a standstill while the engine
is idling (if necessary, reduce the idling speed).
If the cutting tool continues to rotate during engine idling, consult your nearest Authorized Service Agent.
– Check that the I-O switch, the lock-off lever, the control lever, and the lock button are all functioning correctly.
Servicing instructions
Spool
80mm (3-1/8")
For left hand rotation
Spool
100mm (3-15/16")
Notches
Eyelets
Cover
Protrusion
Slot of eyelet
17
Summary of Contents for DBC260U
Page 2: ......
Page 105: ......
Page 106: ...Makita Corporation Anjo Aichi Japan www makita com 885165 932 ...


