background image

SAFETY INSTRUCTIONS 

 
General Instructions   

• 

To ensure correct and safe operation, the user must read, understand 
and follow this instruction manual to assure familiarity with the handling 
of the blower (1). Users insufficiently informed will risk danger to 
themselves as well as others due to improper handling. 

• 

It is recommended only to loan the blower to people who have proven to 
be experienced with blowers. 

• 

Always hand over the instruction manual. 

• 

First-time users should ask the dealer for basic instructions to familiarize 
oneself with the handling of a blower. 

• 

Children and young persons aged under 18 years must not be allowed 
to operate the blower. Persons over the age of 16 years may however 
use the tool for the purpose of being trained only while under the direct 
supervision of a qualified trainer. 

• 

Use blowers with the utmost care and attention. 

• 

Operate the blower only if you are in good physical condition. 

• 

Perform all work conscientiously and carefully. The user has to accept 
responsibility for others. 

• 

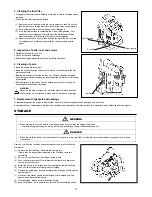
Never use the blower while under the influence of alcohol or drugs (2). 

• 

Do not use the unit when you are tired. 

• 

Save these instructions for future referral. 


Personal Protective Equipment 

• 

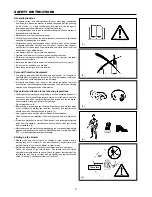
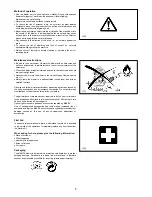
The clothing worn should be functional and appropriate, I. e. It should be 
tight fitting but not cause a hindrance. Do not wear jewelry, clothing or 
long hair which could be drawn into the air intake. 

• 

In order to avoid head-, eye-, hand- or foot injuries as well as to protect 
your hearing the following protective equipment and protective clothing 
must be used during operation of the blower. 


Pay particular attention to the following regulations 

• 

Clothing must be sturdy and snug-fitting, but allow complete freedom of 
movement. Avoid loose-fitting jackets, flared or cuffed pants, scarves, 
unconfined long hair or anything that could be drawn into the air intake. 
Wear overalls or long pants to protect your legs. 
Do not wear shorts. (4) 

• 

Blower noise may damage your hearing. Wear sound barriers (ear plugs 
or ear mufflers) to protect your hearing. Continual and regular users 
should have their hearing checked regularly. (3) 

• 

Use of gloves when working with the blower is recommended. 
Good footing is most important. Wear sturdy shoes with non-slip soles. 
(4) 

• 

Proper eye protection is a must. Even though the discharge is directed 
away from the operator, ricochets and bounce-backs can occur during 
blower operation. (3) 

• 

Never operate a blower unless wearing goggles or properly fitted safety 
glasses with adequate top and side protection which comply with ANSI 
Z 87. 1 (or your applicable national standard). 


Starting up the blower 

• 

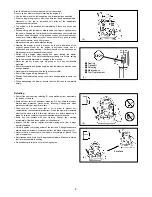
Please make sure that there are no children or other people within a 
working range of 15 meters (5), also pay attention to any animals in the 
working vicinity. Never use the blower in urban areas. 

• 

Before operating, always check that the blower is safe for operation: 
Check the security of the throttle lever. The throttle lever should be 
checked for smooth and easy action. Check for proper functioning of the 
throttle lever lock. Check for clean and dry handles and test the function 
of the l-O switch. Keep handles free of oil and fuel. 


(4)

(3)

(2)

(5)

15 meters

(1)

3

Summary of Contents for BBX7600

Page 1: ...r et respectez scrupuleusement les consignes de s curit Conservez soigneusement ce manuel Importante Lea bien este manual antes de poner el soplador en funcionamiento y observe estrictamente las medid...

Page 2: ...possible results from your MAKITA Blower SYMBOLS It is very important to understand the following symbols when reading this instructions manual WARNING DANGER Fuel Gasoline Read Understand and Follow...

Page 3: ...g the following protective equipment and protective clothing must be used during operation of the blower Pay particular attention to the following regulations Clothing must be sturdy and snug fitting...

Page 4: ...ds supplied with the machine must be used during operation Never operate the engine with a faulty exhaust muffler Shut off the engine during transport 7 Position the blower safely during car or truck...

Page 5: ...tightened Never service or store the blower in the vicinity of open flames sparks etc 11 Always store the blower in a well ventilated locked room and with an emptied fuel tank Observe and follow all r...

Page 6: ...l tank capacity L 1 9 64 2 fl oz Engine oil SAE 10W 30 oil of API Classification Class SF or higher 4 stroke engine for automobile Engine oil volume L 0 22 7 4 fl oz Carburetor Diaphragm carburetor WA...

Page 7: ...2 Control Handle 9 Starter Handle 16 Spark Plug 23 Blower Nozzle L 200 3 Trigger Lever 10 Fuel Tank 17 Oil Cap 24 Hose Band 100 4 Cruise Control Lever 11 Fuel Tank Cap 18 Oil Drain Bolt 25 Hose Band 7...

Page 8: ...aving assembled it completely 1 Assemble straight pipe with swivel 3 into flexible pipe 1 and tighten hose band 76 2 2 Install control handle 4 onto straight pipe with swivel and tighten the clamp scr...

Page 9: ...in the direction of the arrow shown in the drawing while pulling on the strap in the opposite direction After attaching the strap tighten the buckle to the hanger Tug strongly at the strap to make su...

Page 10: ...roximately 0 22 L 220 ml CAUTION If the blower is not stored in an upright position the oil may flow from the level gauge into the engine and give a false reading when checking the oil level This may...

Page 11: ...should be renewed every two to three years WARNING When supplying the fuel be sure to observe the following instructions to prevent ignition or fire Fuel supply must be made in a place free of fire Ne...

Page 12: ...by 7 to 10 pushes If the primer pump is pushed excessively an excess of gasoline returns to the fuel tank 5 Lifting the choke lever of the air cleaner right side close the choke lever 6 Hold the elem...

Page 13: ...ion will increase Turn the adjusting screw to the left and the engine rotation will drop NOTE The engine may be damaged if the choke lever is moved further beyond the CLOSE position If the engine stop...

Page 14: ...used When increasing RPM Pull the trigger lever to increase engine RPM Engine RPM returns to its original setting when the trigger lever is released Increasing the RPM in this manner also increases th...

Page 15: ...ck on when reattaching the drain plug 7 Adding oil during the oil change procedure is performed in the same manner as the separately explained procedure for adding oil whenever the level is insufficie...

Page 16: ...cover Finally push in the projection 2 Removing the spark plug Use an attached box wrench to remove or install the spark plug 3 Checking the spark plug The clearance between two electrodes of spark pl...

Page 17: ...hat the net is attached in place and is free from any damage 7 Replacement of gaskets and packings In reassembling after the engine is dismounted be sure to replace the gaskets and packings with new o...

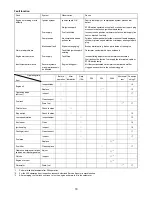
Page 18: ...vent defective fuel supply line interrupted cable or STOP switch faulty Insufficient performance Several systems may simultaneously be affected Engine idling poor Air filter contaminated carburetor co...

Page 19: ...tached plug cap Attach securely Contaminated spark plug Clean Abnormal clearance of spark plug Adjust clearance Other abnormality of spark plug Replace Abnormal carburetor Make request for inspection...

Page 20: ...al wear and tear the tool has been abused misused or improperly maintained alterations have been made to the tool IN NO EVENT SHALL MAKITA BE LIABLE FOR ANY INDIRECT INCIDENTAL OR CONSEQUENTIAL DAM AG...

Page 21: ...ions The graphical representation of the Air Index on the hang tag shows the emissions performance of this engine and can be used to compare the emissions performance with other available engines The...

Page 22: ...cost to you make the necessary diagnosis repair or replacement necessary to ensure that the engine complies with applicable U S EPA regulations EMISSION COMPONENT DEFECT WARRANTY PERIOD The warranty p...

Page 23: ...ESPONSIBILITIES As the engine owner you are responsible for the performance of the required maintenance listed in your owner s manual Makita recommends that you retain all receipts covering maintenanc...

Page 24: ...ther than the parts authorized by Makita are used for maintenance replacements or for the repair of components affecting emission control you should assure yourself that such parts are warranted by th...

Page 25: ...recommends that you retain all receipts covering maintenance on your small off road engine but Makita USA Inc cannot deny warranty solely for the lack of receipts or your failure to ensure the perform...

Page 26: ...charge to the owner at a warranty station 5 Notwithstanding the provisions of Subsection 4 above warranty services or repairs must be provided at all manufacturer distribution centers that are franch...

Page 27: ...for performing the scheduled maintenance described below based on the procedures specified in the 2007 and later Owner s Manual The scheduled maintenance below is based on the normal engine operating...

Page 28: ...oles ci apr s Attention Danger Essence et huile Lire et suivre le manuel de fonctionnement Moteur Mise en marche manuelle Interdit Arr t d urgence Interdiction de fumer Premiers secours Interdiction d...

Page 29: ...ent tre happ s par l entr e d air Pour viter de vous blesser et vous prot ger contre tous les accidents ventuels il est conseill d utiliser les quipements d crits ci apr s Notez notamment que Les v te...

Page 30: ...che ou des mat riaux combustibles Utilisez toujours les l ments de protection fournis avec la machine Ne faites jamais fonctionner la machine si le silencieux pose probl me Coupez l alimentation du mo...

Page 31: ...vitez soigneusement la pr sence de flammes d tincelles ou autres 11 Stockez toujours l appareil dans une pi ce ferm e cl et bien a r e Avant de le stocker videz soigneusement son r servoir Respectez...

Page 32: ...r carburant L 1 9 Huile pour moteur SAE 10W 30 huile de la classification API classe SF ou sup rieure moteur quatre temps pour automobile Volume d huile moteur L 0 22 Carburateur Carburateur diaphragm...

Page 33: ...16 Bougie 23 Gicleur de souffleur L 200 3 D clencheur 10 R servoir carburant 17 Bouchon huile 24 Collier de serrage 100 4 Lever du R gulateur de vitesse 11 Bouchon du r servoir carburant 18 Boulon de...

Page 34: ...ccorder avec la cheville au flexible et serrer le tuyau de soufflerie diam tre 76 2 2 Installer la poign e de contr le 4 sur le tuyau droit avec la cheville et serrer la vis de raccord 5 3 Assembler l...

Page 35: ...de suspension dans la direction de la fl che indiqu e sur la figure tout en tirant la bandouli re dans le sens contraire Apr s avoir fix la bandouli re attachez la boucle la fente de suspension Tirez...

Page 36: ...re Huile moteur 4 temps pour automobiles Capacit d huile Environ 0 22 L 220 ml Pr caution Si le souffleur n est pas rang dans une position debout l huile risque de passer de l indicateur de niveau d h...

Page 37: ...tous les deux trois ans AVERTISSEMENT Lors de l alimentation en carburant s assurer que les instructions suivantes sont respect es pour viter l inflammation ou l incendie L alimentaion en carburant d...

Page 38: ...rburant entre dans la pompe d amor age En g n ral le carburant entre dans le carburateur par 7 10 pouss es Si la pompe d amor age est pouss e excessivement un exc s de l essence retourne au r servoir...

Page 39: ...e Tourner la vis r gulatrice droite La rotation du moteur augmentera Tourner la vis r gulatrice gauche Et alors la rotation du moteur diminuera NOTE Le moteur pourra tre endommag si le levier d trangl...

Page 40: ...utilis Pour augmenter le TPM Soulevez le d clencheur pour augmenter le TPM du moteur Le TPM du moteur revient son r glage initial lorsque le d clencheur est rel ch Le fait d augmenter le TPM de cette...

Page 41: ...um 3 en place en fermant le Boulon de vidange d huile 7 L ajout d huile pour la proc dure de changement de l huile s effectue de la m me mani re que celle pour l ajout d huile lorsque le niveau est in...

Page 42: ...lumage Utiliser la cl douille fournie avec la machine pour monter ou d monter la bougie d allumage 3 V rification de bougie d allumage La distance entre les deux lectrodes de la bougie voir la figure...

Page 43: ...let Avant chaque utilisation v rifier que le filet est bien en place et qu il n est pas endommag 7 Remplacement des joints et garnitures Lors de remontage apr s le d montage du moteur ne pas manquer d...

Page 44: ...e Orifice du r servoir de carburant bouch Tuyau d alimentation en carburant pli c ble ou interrupteur STOP d fectueux Performances insuffisantes Plusieurs circuits sont peut tre affect s Simultan ment...

Page 45: ...d pos e Reposer fermement Bougie d allumage tach e Nettoyer Espace anormal de la bougie d allumage Ajuster l espace D apr s les types d anomalie de la bougie d allumage Remplacer Carburateur anormal...

Page 46: ...outil a t malmen mal utilis ou mal entretenu l outil a subi des modifications MAKITA D CLINE TOUTE RESPONSABILIT POUR TOUT DOMMAGE ACCESSOIRE OU INDIRECT LI LA VENTE OU L UTILISATION DU PRODUIT CET A...

Page 47: ...os s mbolos siguientes es para la lectura de este manual de instrucciones ADVERTENCIA PELIGRO Combustible Gasolina Lea comprenda y siga el Manual de Instrucciones Encendido manual del motor Prohibido...

Page 48: ...ante el uso del soplador Preste una atenci n especial a las siguientes medidas La ropa debe ser resistente y c moda pero debe permitir una completa libertad de movimientos Deben evitarse las chaquetas...

Page 49: ...defectuoso Apagar el motor durante el transporte 7 Colocar el soplador de forma segura durante su transporte en coche o cami n para impedir que pierda combustible Durante el transporte del soplador a...

Page 50: ...efectuar el mantenimiento o almacenaje del soplador cerca de llamas chispas etc 11 Siempre almacene el soplador en una habitaci n cerrada y bien ventilada y con el tanque de combustible vac o Observe...

Page 51: ...oz Aceite del motor Aceite SAE10W 30 de la categor a superior a la clase SF de la clasicficaci n API Aceite de motor de cuatro tiempos para autos Volumen del aceite de motor L 0 22 7 4 fl oz Carburad...

Page 52: ...presi n 23 Boquilla de Soplador Longitud 200 3 Palanca de disparo 10 Tanque de combustible 17 Tap n de aceite 24 Banda manguera 100 4 Palanca de control de crucero 11 Tap nde tanque de combustible 18...

Page 53: ...a el tubo fijo gir ndolo 3 y meti ndolo en tubo flexible 1 y apri telos con la anilla 76 2 2 Instale la empu adura de control 4 sobre el tubo fijo gir ndolo y apret ndolo con el tomillo de la abrazade...

Page 54: ...ido de la flecha que aparece en el dibujo mientras tira de la correa en el sentido opuesto Despu s de instalar la correa apriete la hebilla en el soporte Tire con fuerza de la correa para asegurarse q...

Page 55: ...dad de aceite Aproximadamente 0 22 L 220 ml Precauci n Si no guarda el soplador en posici n vertical el aceite puede fluir del medidor de nivel hacia el motor y producir una lectura falsa cuando inspe...

Page 56: ...alg n defecto o da o en el tap n del tanque sustituirlo El tap n del tanque que es una pieza de consumo debe ser renovado cada los dos a os ALARMA Observe bien los siguientes puntos cuando se abastec...

Page 57: ...e un exceso de la gasolina vuelve al tanque de combustible 5 Levante la palanca del estrangulador situada en el lado derecho del filtro de aire y cierre el estrangulador 6 Sujete la cubierta del eleme...

Page 58: ...ornillo de ajuste en la figura de la derecha usando un destornillador Philips Gire el tornillo de ajuste a la derecha para aumentar la velocidad del motor G relo a la izquierda para disminuir la veloc...

Page 59: ...do aumente las rpm Tire de la palanca de disparo para aumentar las rpm del motor Las rpm del motor vuelven a su ajuste original cuando suelta la palanca de disparo El aumento de las rpm de esta forma...

Page 60: ...perno de drenaje de aceite 7 El agregado de aceite durante el procedimiento de cambio de aceite se hace de la misma forma que el procedimiento explicado por separado para el agregado de aceite cuando...

Page 61: ...uj a se ponga encima de la tapa del motor 2 Quitar la buj a de alta tensi n Para quitar y montar la buj a de alta tensi n utilice la llave de rosca adjunta 3 Inspecci n de la buj a de alta tensi n La...

Page 62: ...oplador sin la red para el soplador Antes de cada uso verifique que la red est instalada en su lugar y que no tiene aver as 7 Cambio de juntas y retenes Al montar el motor despu s de haberlo desmontad...

Page 63: ...terrumpida El interruptor o el cable STOP fallan Rendimiento pobre VariosSistemas pueden verse afectados Motor en vacio Filtro de aire contaminado carburador contaminado silenciador obturado conducto...

Page 64: ...za de buj a suelta Inst lela firmemente Buj a sucia L mpiela Distancia anormal del electrodo de la buj a C mbiela o ajuste la buj a Otras anormalidades de la buj a Cambie Carburador anormal Solicite l...

Page 65: ...a sido abusada mal usada o mantenido indebidamente se hayan hecho alteraciones a la herramienta EN NING N CASO MAKITA SE HAR RESPONSABLE DE NING N DA O INDIRECTO FORTUITO O CONSE CUENCIAL DERIVADO DE...

Page 66: ...Exhaust from this product contains chemicals known to the state of California to cause cancer birth defects or other reproductive harm 6679500900 07 09 Makita Corporation 3 11 8 Sumiyoshi cho Anjo Ai...

Reviews: