background image

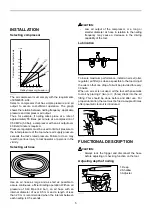
To adjust the depth of nailing, turn the adjuster. The depth 
of nailing is deeper when turning the adjuster to the 


symbol side on the tool. It will become shallower when 
turning the adjuster to the 

 symbol side. The depth 

can be changed in approx. 1.0 mm increments per 
graduation. If nails cannot be driven deep enough even 
when turning the adjuster fully to the 

 symbol side, 

increase the air pressure. If nails are driven too deep 
even when turning the adjuster fully to the 

 symbol 

side, decrease the air pressure. Generally speaking, the 
tool service life will be longer when the tool is used with 
lower air pressure and the adjuster set to a lower number. 

ASSEMBLY 


CAUTION: 

• 

Always lock the trigger and disconnect the hose 
before carrying out any work on the tool. 

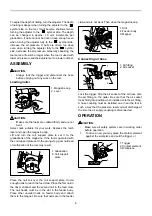
Loading nailer 

1

2


005714 

CAUTION: 

• 

Make sure that nails are collated firmly and are not 
bent. 

Select nails suitable for your work. Depress the latch 
lever and open the magazine cap. 
Lift and turn the coil support plate to set it to the 
graduations of the magazine. If the tool is operated with 
the coil support plate set to the wrong step, poor nail feed 
or malfunction of the tool may result. 

1

2


005715 

Place the nail coil over the coil support plate. Uncoil 
enough nails to reach the feed claw. Place the first nail in 
the driver channel and the second nail in the feed claw. 
The nail heads must be in the slot in the feeder body. 
Place other uncoiled nails on feeder body and attach 
them to the magnet. Be sure that nails are in the feeder 

claw and are not bent. Then close the magazine cap. 

1

2

3


005716 

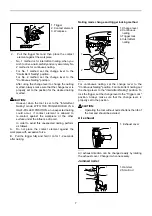
Connecting air hose 

1

2


005717 

Lock the trigger. Slip the air socket of the air hose onto 
the air fitting on the nailer. Be sure that the air socket 
locks firmly into position when installed onto the air fitting. 
A hose coupling must be installed on or near the tool in 
such a way that the pressure reservoir will discharge at 
the time the air supply coupling is disconnected. 

OPERATION 


CAUTION: 

• 

Make sure all safety systems are in working order 
before operation. 

1. 

To drive a nail, you may place the contact element 
against the workpiece and pull the trigger, or 

1

2

3


005718 

1. Trigger 
2. Contact element 
3. Workpiece 

1. Air fitting 
2. Air socket 

1. Slot 
2. Feeder body 
3. Magnet 

1. Graduation 
2. Coil support 

plate 

1. Magazine cap 
2. Lever 

Summary of Contents for AN504

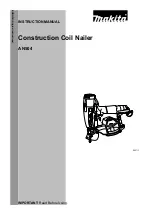
Page 1: ...1 ENGLISH Original instructions INSTRUCTION MANUAL IMPORTANT Read Before Using Construction Coil Nailer AN504 005711 ...

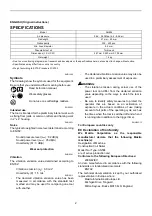
Page 2: ... m s2 Uncertainty K 1 5 m s2 ENG901 1 The declared vibration emission value has been measured in accordance with the standard test method and may be used for comparing one tool with another The declared vibration emission value may also be used in a preliminary assessment of exposure WARNING The vibration emission during actual use of the power tool can differ from the declared emission value depe...

Page 3: ...t the tool as a working implement 5 No horseplay 6 Do not hold or carry the tool with a finger on the trigger 7 Do not load the tool with fasteners when any one of the operating controls is activated 8 Do not operate the tool with any power source other than that specified in the tool operating safety instructions An improperly functioning tool must not be used Sparks sometimes fly when the tool i...

Page 4: ... or strike a knot in the wood The nail may be thrown and hit someone or the tool itself can react dangerously Place the nails with care Do not leave the loaded tool or the air compressor under pressure for a long time out in the sun Be sure that dust sand chips and foreign matter will not enter the tool in the place where you leave it setting Do not point the ejection port at anyone in the vicinit...

Page 5: ...94 Use an air hose as large and as short as possible to assure continuous efficient nailing operation With an air pressure of 0 49 Mpa 4 9 bar an air hose with an internal diameter of over 6 5 mm and a length of less than 20 m is recommended when the interval between each nailing is 0 5 seconds CAUTION Low air output of the compressor or a long or smaller diameter air hose in relation to the naili...

Page 6: ...ted with the coil support plate set to the wrong step poor nail feed or malfunction of the tool may result 1 2 005715 Place the nail coil over the coil support plate Uncoil enough nails to reach the feed claw Place the first nail in the driver channel and the second nail in the feed claw The nail heads must be in the slot in the feeder body Place other uncoiled nails on feeder body and attach them...

Page 7: ... the influence of recoil In order to avoid this unexpected nailing perform as follows A Do not place the contact element against the workpiece with excessive force B Pull the trigger fully and hold it on for 1 2 seconds after nailing Nailing mode change and trigger locking method 1 2 3 4 005720 For continuous nailing set the change lever to the Continuous Nailing position For intermittent nailing ...

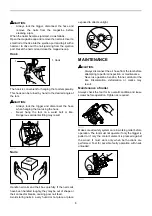
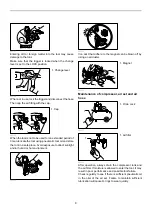
Page 8: ...0 Handle nail coils and their box carefully If the nail coils have been handled roughly they may be out of shape or their connector breaks causing poor nail feed Avoid storing nails in a very humid or hot place or place exposed to direct sunlight Nail Humid Hot 004311 MAINTENANCE CAUTION Always disconnect the air hose from the tool before attempting to perform inspection or maintenance Never use g...

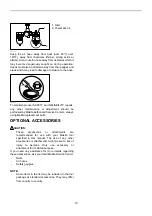
Page 9: ...ace Avoid exposure to direct sunlight and or humid or hot environment 005730 005731 Iron dust that adhere to the magnet can be blown off by using an air duster 1 005732 Maintenance of compressor air set and air hose 1 004317 1 004318 After operation always drain the compressor tank and the air filter If moisture is allowed to enter the tool It may result in poor performance and possible tool failu...

Page 10: ...ormed by Makita Authorized Service Centers always using Makita replacement parts OPTIONAL ACCESSORIES CAUTION These accessories or attachments are recommended for use with your Makita tool specified in this manual The use of any other accessories or attachments might present a risk of injury to persons Only use accessory or attachment for its stated purpose If you need any assistance for more deta...

Page 11: ...11 ...

Page 12: ...12 Makita Corporation Anjo Aichi Japan www makita com 884556C225 ...

Reviews: