15 ENGLISH
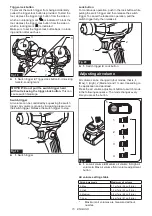
Trigger-lock button
To prevent the switch trigger from being accidentally
pulled, the trigger-lock button is provided. To start the
tool, depress the trigger-lock button from the side on
which an unlocking mark ( ) is indicated. To lock the
tool, depress the trigger-lock button from the side on
which a locking mark ( ) is indicated.
Make sure to set the trigger-lock button back in a lock-
ing position after each use.
1
2
1
2
3
4
Fig.18
►
1.
Switch trigger
2.
Trigger-lock button
3.
Unlocking
mark
4.
Locking mark
NOTICE:
Do not pull the switch trigger hard
without releasing the trigger-lock button.
This can
cause switch breakage.
Switch trigger
Air volume can be controlled by squeezing the switch
trigger. Air volume is grown by increasing pressure on
the switch trigger. Release the switch trigger to stop.
1
Fig.19
►
1.
Switch trigger
Lock button
For continuous operation, push in the lock button while
pulling the switch trigger and then release the switch
trigger. To cancel the locked-on operation, pull the
switch trigger fully, then release it.
1
2
Fig.20
►
1.
Switch trigger
2.
Lock button
Adjusting air volume
Air volume can be changed in four modes, that is, 4
(Max), 3 (High), 2 (Medium) and 1 (Low), depending on
the application and workload.
Press the air volume adjustment button to switch mode
in the following sequence. The mode changes every
time you press the button.
1
2
3
4
5
Fig.21
►
1.
Low air volume
2.
Medium air volume
3.
High air
volume
4.
Max air volume
5.
Air volume adjustment
button
Air volume settings table
Air volume mode
Maximum air volume
4: Max
1.1 m
3
/min (39 cu.ft./min)
3: High
1.0 m
3
/min (35 cu.ft./min)
2: Medium
0.8 m
3
/min (28 cu.ft./min)
1: Low
0.6 m
3
/min (21 cu.ft./min)
*
Maximum air volumes are measured without
nozzles.


