5
ASSEMBLY
CAUTION:
• Always be sure that the tool is switched off and
unplugged before carrying out any work on the tool.
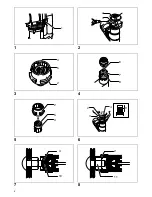
Removing the outer and inner sleeves
(Fig. 2)
CAUTION:
• Be careful not to allow foreign matter to enter the
insides of the tool when removing or installing the outer
and inner sleeves.
The outer sleeve M24 and inner sleeve M24 are factory -
installed. If you need other sizes for your work, replace the
sleeves as follows.
Loosen the two screws while holding the outer sleeve.
The outer and inner sleeves will be pushed up by the
springs built into the tool.
Press the pin down to remove the inner sleeve from the
outer sleeve. Be careful not to drop the inner sleeve when
removing it. Do not remove the inner sleeve spring, tip rod
and tip rod spring from the tool.
(Fig. 3 & 4)
Installing the outer and inner sleeves
Hold the inner sleeve with the pin facing upward. Place
the outer sleeve over the inner sleeve. Press the pin to
allow inserting the inner sleeve, then release the pin to
secure the inner sleeve.
(Fig. 5)
Insert the outer and inner sleeves into the tool while
rotating the inner sleeve alternately clockwise and
counterclockwise until there is no gap between the outer
sleeve and the tool. See the figure. Then tighten the two
screws securely.
(Fig. 6)
OPERATION
Bolt installation
Slip the tool onto the bolt so that the inner sleeve
completely covers the bolt tip.
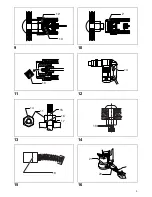
(Fig. 7)
CAUTION:
• Be careful when fitting the sleeve onto the bolt tip.
Striking the tip can damage it so that it will no longer fit
inside the sleeve properly.
• First tighten bolts preliminarily by using a hand wrench
and then tighten them with this tool. Use this tool only
after preliminary tightening without starting the
tightening with this tool.
Keep forward pressure on the tool while sliding it further
forward until the outer sleeve fits completely over the nut.
If the tool fails to fit completely over the nut, twist the tool
slightly right and left while pushing forward.
(Fig. 8)
Pull the switch trigger. The outer sleeve turns to begin
tightening the nut.
When the specified torque is attained, the bolt tip will be
sheared at its notched portion. The bolt tip will remain
inside the inner sleeve.
(Fig. 9)
Release the switch trigger and withdraw the tool in a
straight line.
(Fig. 10)
CAUTION:
• Do not force the tool down excessively. Apply the
downward force to the degree just needed to hold the
tool firm.
Pull the tip ejector (tip lever) to eject the bolt tip from the
tool. Catch the sheared bolt tips to prevent them from
falling dangerously below. Keep the tips off of the ground,
floor, walkways, etc. to prevent injury from tripping or
falling.
(Fig. 11 & 12)
CAUTION:
• Washer and nut have head and tail. Head has
identification mark for nut and chamfer for washer.
When placing them, be careful not to place in reverse.
(Fig. 13)
• Replace nut, bolt and washer all together at one time
when these rotate together, nut rotates excessively or a
bolt protrude from nut surface too much or less.
• Do not reuse used nut, bolt and washer.
• Choose shear bolts according to the thickness of
workpiece to be fastened. Range for the remaining
length of bolts that are obtained after cutting off chips
are determined by bolt size. Refer to the table below for
details.
(Fig. 14)
CAUTION:
• Use bolts with the remaining length within the range
shown in the table above as bolts with different size
have different maximum and minimum remaining
length. Be careful not to use bolts beyond the specified
range which causes the tool damage.
MAINTENANCE
CAUTION:
• Always be sure that the tool is switched off and
unplugged before attempting to perform inspection or
maintenance.
• Never use gasoline, benzine, thinner, alcohol or the
like. Discoloration, deformation or cracks may result.
Replacing carbon brushes (Fig. 15)
Remove and check the carbon brushes regularly. Replace
when they wear down to the limit mark. Keep the carbon
brushes clean and free to slip in the holders. Both carbon
brushes should be replaced at the same time. Use only
identical carbon brushes.
Use a screwdriver to remove the brush holder caps. Take
out the worn carbon brushes, insert the new ones and
secure the brush holder caps.
(Fig. 16)
To maintain product SAFETY and RELIABILITY, repairs,
any other maintenance or adjustment should be
performed by Makita Authorized Service Centers, always
using Makita replacement parts.
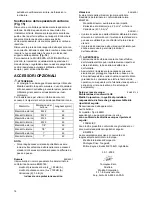
OPTIONAL ACCESSORIES
CAUTION:
• These accessories or attachments are recommended
for use with your Makita tool specified in this manual.
The use of any other accessories or attachments might
present a risk of injury to persons. Only use accessory
or attachment for its stated purpose.
Bolt size
Maximum
remainig length
Minimum
remainig length
M22
26 mm
7 mm
M24
23 mm
10 mm

