Step 2.4: Radio calibration
Next up is the radio calibration. APM refers to the transmitter as
a radio, so from here on we use the two terms interchangeably.
Click the Radio Calibration button in the left-hand menu (see
). This will display the calibration page in the main
application window. The general idea here is to allow Mission
Planner to talk with your radio and figure out the limits of each
channel. During calibration you will be asked to push the sticks,
switches, and knobs to their minimum and maximum settings
so that the application can learn the range of each channel. A
green bar graph will represent each channel of the radio, and
they will move with the controls of the radio (see
):
a. If you haven’t done so already, power up your radio
transmitter.
b. Click the green Calibrate Radio button under the Radio 8 bar
graph in the main application window.
c. When directed, move all radio controls to their maximum
and minimum settings. This includes any and all controls
that you will use such as sticks, switches, knobs, and sliders
(depending on what radio you own) that are on the transmit-
ter. You will notice that fine red lines will appear on the bar
graph for each channel showing its min-max setting.
d. Once this is complete, click the Click when Done button
(same as the calibrate button, the label just changed).
After you have completed the calibration, a small pop-up will
appear that gives you the min-max values for each channel of
the radio (see
). Click OK to get rid of this screen and
move on to the next step.
142 Make: Getting Started with Drones
Summary of Contents for Belinda Kilby
Page 1: ......
Page 3: ...Make Getting Started with Drones Terry Kilby and Belinda Kilby...
Page 26: ......
Page 90: ......
Page 126: ......
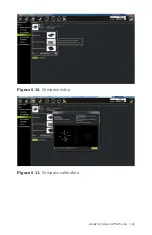
Page 153: ...Figure 9 10 Compass setup Figure 9 11 Compass calibration ArduPilot Mega APM Setup 141...
Page 198: ......


