56, chemin de la Flambère · 31300 Toulouse · FRANCE · T é l . 3 3 ( 0 ) 5 6 1 3 1 8 6 8 7
F a x 3 3 ( 0 ) 5 6 1 3 1 8 7 7 3 · [email protected] · www.majorcom.fr
56, chemin de la Flambère · 31300 Toulouse · FRANCE · T é l . 3 3 ( 0 ) 5 6 1 3 1 8 6 8 7
F a x 3 3 ( 0 ) 5 6 1 3 1 8 7 7 3 · [email protected] · www.majorcom.fr
6
7
EMAGP16
EMAGP16
0
0
::::@
@
::::
@
@
@
@
@
@
@
Usermanual V1.1
Usermanual V1.1
•
Three EMAGPE16units, with different or equal priority levels, can work simul
-
taneously on the same PXN88SG or PXN1212SG matrix
•
programming of paging station(s) functionality from the web application embedded
in the ePXN1616 matrix: enabled paging zones, chime melodies, priorities, pro
-
grammable keys, etc.
5.
INSTALLATION
5.1.
Installation with ePXN1616 matrix
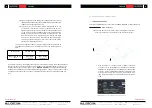
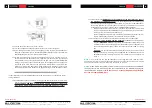
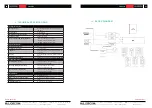
To install an EMAGPE16unit, connected to an ePXN1616 matrix (RS-485 bus connection),
follow these steps:
•
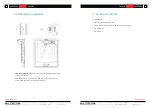
Remove the back cover of the unit by unscrewing the screws that hold it to the chassis
to gain access to the connectors inside:
o
RJ45 connector
(1):
connect a CAT5 or higher cable from this connector direct
-
ly (point-to-point wiring) to the PAGER A or PAGER B port of the ePXN1616 unit.
o
Power connector
(2)
: connect a backup power supply (
WP24-PSU model
)
if necessary (see maximum cable length and recommendations below)
o
Check that both jumpers shown in the diagram below are
positioned in the
485 position
•
Screw the back cover back onto the unit chassis.
•
Insert the supplied microphone into the XLR connector on the front panel


