26
3
OPERATIONAL MANUAL
CONTENTS
Notes on Installation
.............................................................................. 4
Precautions ............................................................................................. 5
Wiring Connection
................................................................................ 6
Location of Controls ............................................................................... 7
Basic Operation .....................................................................................10
Playing a CD/MP3
..............................................................
20
Card Remote Control .................... ......................................................... 8
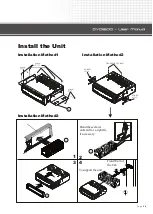
Install the Unit ....................................................................................... 25
Specification .......................................................................................... 26
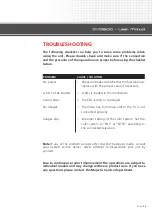
Simple Troubleshooting Guide ............................................................. 27
Maintenance
..................................................................... 24
....................
Playing a DVD
.....................................................................................11
.
......................
Playing a VCD
..............................................................
22
...............
.
.
...
..
...
...
...
...
.
....
...
...
....
...
.....
.
....
OPERATIONAL MANUAL
OPERATIONAL MANUAL
Specification
VCD/CD Player Section
VCD Signal System
PAL/NTSC
75dB
70dB(1KHz)
0.1%
General
Power Requirement
Approx.175x178 x50
mm
14.4V DC
10K
2V/CH
(d/w/h)
Approx.165 182 53
x
x
mm
Approx.1.25kg
Note:
Due to continuous product improvement,
specifications and design are subject to
change without prior notice.
(11-16V allowable)
Load Impedance
Max.Level Output
Dimensions
Mounting
Dimensions
Weight
(d/w/h)
Signal-to-noise Ratio
Separation
Distortion
DVD Player Section
Number of channel
20Hz 20,000Hz
98dB
90(JIS)
Frequency Response
Dynamic Range
Signal-to-Noise Ratio
2 channels
Less than
measurable limit
Wow and Flutter
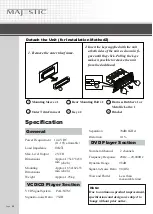
1. Remove the outer trim frame.
2. Insert the keys supplied with the unit
at both sides of the unit as shown in fi-
gure until they click. Pulling the keys
makes it possible to remove the unit
from the dashboard.
1
Mounting Sleeve x1
2
Rear Mounting Bolt x1
3
Harness Rubber x1 or
Metallic Lath x 1
4
Outer Trim Frame x1
5
Key x2
6
Bracket
Detach the Unit (for Installation Method 2)
4
Page
25
Summary of Contents for DVD2100
Page 1: ......


