background image

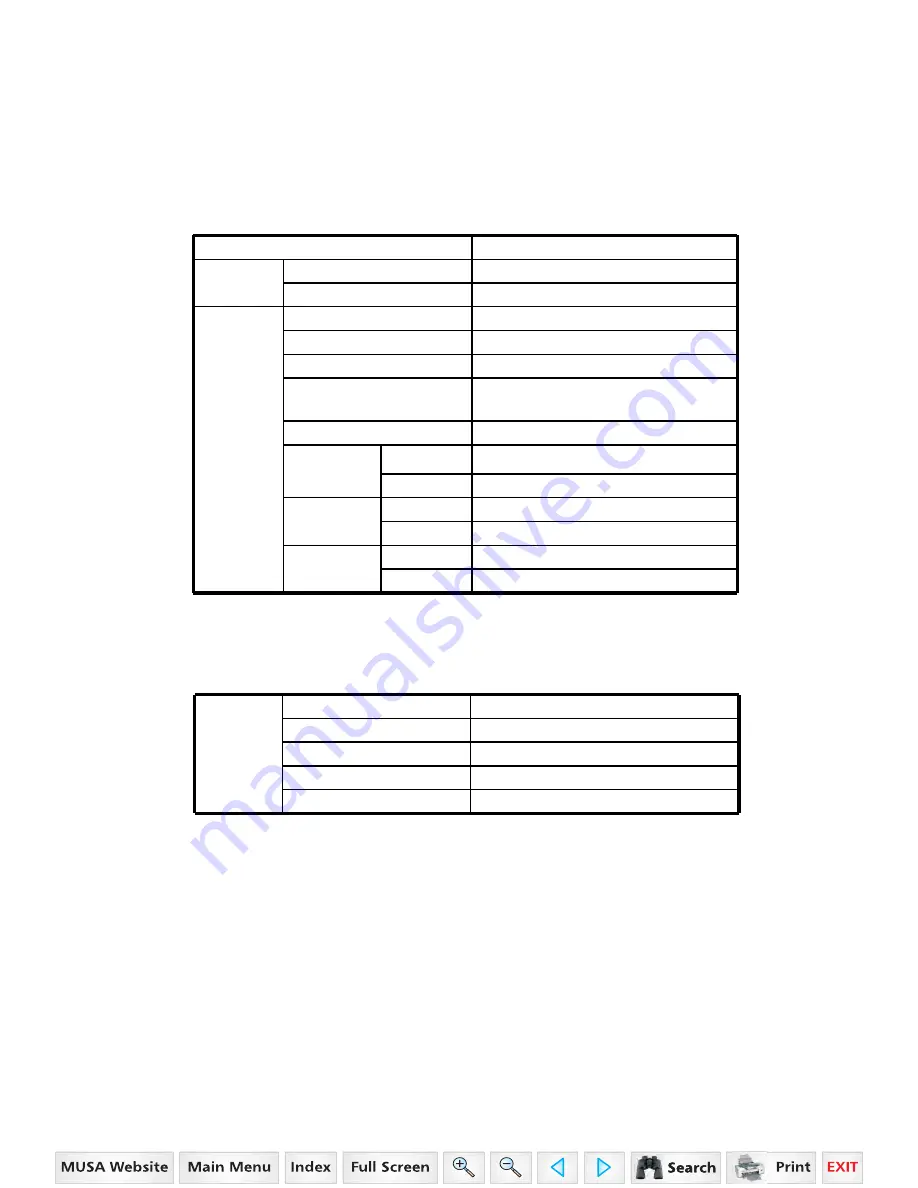
MODEL

4010 HST

Clutch

Main

Damper

PTO  

Multiple wet disk

Dimensions

Overall length(mm)

3030 (119.3”)

Overall width (mm)

1520  (59.8”)

Overall Height (mm)

2400 (94.5”)

Wheel base (mm)

(Distance between shafts)

1680 (66.1”)

Min. Ground Clearance (mm)

323 (12.8”)

R1

Front

8.0-16

Rear

12.4-24

R4

Front

10-16.5

Rear

43x16.00-20

Axle type

Front

Center pin

Rear

Central  axle

Implement

Operation 

Hydraulic

Mounting method

3-Point hitch

Drawing method

Trailer hitch

3-Point hitch category

Category 1

Hydraulic-control

Position

79

Summary of Contents for 4010 HST

Page 1: ...Click here to go on INDEX Main Menu 10 Series Operator s Manual 4010 HST The Mahindra Group Mahindra USA Inc 9020 Jackrabbit Road Houston Texas 77041 1 877 499 7771 www mahindrausa com ...

Page 2: ... Mahindra USA Inc 5203 Aeropark Drive Houston TX 77032 281 449 7771 www mahindrausa com ...

Page 3: ...eriod of five years or 3000 hours of operation whichever occurs first for all engines rated at 19 kw and greater except as noted below In the absence of a device to measure hours of use the engine shall be warranted for a period of five years For all engines rated less than 19 kw and for constant speed engine rated under 37 kw with rated speeds higher than or equal to 3000 rpm the period of two ye...

Page 4: ...uired to make the warranty repair This includes diagnosis and labor to remove and install the engine if necessary Owner s Warranty Responsibilities As the Daedong USA INC off road compression ignition engine owner you are responsible for the performance of the required maintenance listed in your Owner s Manual Daedong USA INC recommends that you retain all receipts covering maintenance on you Daed...

Page 5: ...ce of required emission control maintenance as outlined in your Owner Manual Parts or accessories used in applications for which they were not designed or not approved for use on the engine by Daedong USA INC Parts not supplied by Daedong USA INC or damage to other parts caused directly by non Daedong parts or non equivalent parts The charge for diagnostic labor which does not lead to the determin...

Page 6: ...and for constant speed engines rated under 37 kW with rated speeds greater than or equal to 3 000 rpm the warranty period is 1 500 hours or 2 years of use whichever first occurs after date of delivery to initial owner For all other engines rated at or above 19 kW the warranty period is 3 000 hours or 5 years of use whichever first occurs after date of delivery to the initial owner If any emission ...

Page 7: ...n control and engine performance depends on adherence to proper operation and maintenance recommendations and use of recommended fuels and lubricating oils It is recommended that major adjustments and repair be made by your authorized Daedong engine dealer Various chemical fuel additives which claim to reduce visible smoke are available commercially Although additives have been used by individuals...

Page 8: ...enance repairs and other non warranty work or have it done at any repair facility Such non warranty work need not be performed at a designated warranty station in order for the warranty to remain in force CUSTOMER ASSISTANCE EMISSION CONTROL SYSTEM WARRANTY Daedong USA INC aims to ensure that the Emission Control Systems Warranty is properly administrated In the event that you do not receive the w...

Page 9: ...ARNING CALIFORNIA Proposition 65 Warning The Engine Exhaust from this product contains chemicals known to the state of California to cause cancer birth defects or other reproductive harm WARNING SIGNS IN THIS MANUAL The following warning signs in this manual draw additional attention to items of importance for the safe and correct operation of the tractor SIGN MEANING OF THE SIGN Serious hazard wi...

Page 10: ...tenance Section C 11 Specifications 12 Fuel saving Tips 13 Wiring Diagram 14 Power Train 15 Tractor History Card 16 Service record 17 Daily operating Log 18 Part replacement record Sr No Description Page No All information illustrations and specifications in this manual are based on latest information available at the time of publication The right is reserved to make changes at any time without no...

Page 11: ...his product and full details of the warranty are provided on a separate warranty schedule SERVICE Service is available from any Mahindra dealer in the country PARTS To obtain spare parts please contact your nearest dealer and give him the details listed below Tractor model Tractor serial number Tractor engine number Part number and description Quantity required Stamped position of the Engine type ...

Page 12: ...cified in this manual are carried out at the recommended intervals Read this Manual carefully and keep it in a convenient place for future reference If at any time you require advice concerning your Tractor do not hesitate to contact your Authorized Mahindra dealer Distributor He has trained personnel genuine parts and necessary equipments to undertake all your service requirements Mahindra policy...

Page 13: ...istributors are kept informed of the latest methods of servicing Tractors They stock genuine spare parts and are backed by the Company s full support Through this manual The use of the terms LEFT RIGHT FRONT and REAR must be understood to avoid any confusion when following the introductions The LEFT and RIGHT means left and right sides of the Tractor when facing forward in the driver s seat Refere...

Page 14: ...rd reverse control Tractor with Independent Power Take Off is fitted with electro hydraulic Clutch Assy The Rear PTO and Mid PTO can be operated both or separately by a lever Brakes Mahindra tractors are provided with independent disc brakes operated by two road travel A foot brake lever is fitted for parking Rear axle Wheels This is mounted on ball bearings and is enclosed in removable housing wh...

Page 15: ... problem and request assistance When additional assistance is needed Your Dealer Distributor has direct access to your office If you cannot obtain satisfaction by doing this contact the Mahindra Office and provide them with Your name address and telephone number Model and Tractor serial number Dealer Distributor Name Address Machine purchase date and Hours used Nature of problem Before contacting ...

Page 16: ...e care when lowering the upper section of the ROPS frame and take extreme care while driving the tractor with the ROPS frame lowered Do not wear the seat belt with the ROPS lowered and please remember that the fold down facility is for special circumstances only and must not be lowered for general use Use of the tractor with the ROPS lowered can cause fatal injuries As the ROPS frame or cab togeth...

Page 17: ... ROPS Never attach chains ropes to the ROPS for pulling purposes this will cause the Tractor to tip backwards Always pull from the Tractor drawbar Be careful when driving through door opening or under low overhead objects Make sure there is sufficient overhead clearance for the ROPS fatal injuries If the ROPS is removed or replaced make certain that the proper hardware is used to replace the ROPS ...

Page 18: ...ger 16 FOR SLIDING SEAT Sliding Seat type Lift lever A and slide the seat to the position you want Release the lever Make sure the seat is locked in position NOTE Do not use solvents to clean the seat Use warm water with a little detergent added Before operating a Tractor it is important to adjust the seat to the most comfortable position check whether it is properly locked in its position Figure ...

Page 19: ... Keep all safety signs in good condition Replace missing or damaged safety signs Keep your tractor in proper condition and do not allow any unauthorized modifications to be carried out on the Tractor which may impair the function safety and affect Tractor life PROTECTION CHILDREN Keep children and others away from the Tractor while operating BEFORE YOU REVERSE Look behind Tractor for children Do n...

Page 20: ... be worn during machine operation when the machine is equipped with a certified ROPS Failure to do so will reduce or eliminate protection for the operator in the event of a roll over PRECAUTION TO AVOID TIPPING Do not drive where the Tractor could slip or tip Stay alert for holes and rocks in the terrain and other hidden hazards Slow down before you make a sharp turn Driving forward out of a ditch...

Page 21: ...nt on public roads unless prohibited by state or local regulations Use slow moving vehicle SMV sign when driving on public road during both day night time unless prohibited by law PRACTICE SAFE MAINTENANCE Understand service procedure before doing work Keep the surrounding area of the Tractor clean and dry Do not attempt to service Tractor when it is in motion Keep body and clothing away from rota...

Page 22: ... enough to burn skin cause holes in clothing and cause blindness if found entry into eyes For adequate safety always 1 Fill batteries in a well ventilated area 2 Wear eye protection and acid proof hand gloves 3 Avoid breathing direct fumes when electrolyte is added 4 Do not add water to electrolyte as it may splash off causing severe burns If you spill acid on yourself 1 Flush your skin with water...

Page 23: ...d safety switch is provided on HST Tractors which allow the starting system to become operational only when the master brake pedal is fully pressed 2 Do not By pass this safety starter switch or work on it Only Authorized Dealers are recommended to work on safety starter switch 3 On some models Safety Starter switch is provided on transmission High low shifter lever and in PTO shifter lever The tr...

Page 24: ...re that the operator wears clothing which will not get entangled in the moving parts of the tractor or machine and protect him or her from the elements When spraying or using chemicals please ensure that clothing and protective equipment is worn which prevents respiratory or skin problems For full details consult the manufacturer of the chemicals To avoid lengthy exposure to noise ensure that ear ...

Page 25: ... area ensure that the area is well ventilated as exhaust gases are very harmful and can cause death 6 Do not work under raised implements 7 When changing wheels or tires ensure that a suitable wheel stand is placed under the axle prior to removing the wheel and the wheels are chocked 8 Where guards or shields need to be removed to perform a service or repair ensure that the guard or shield is corr...

Page 26: ...kers are not injured In particular they should take care during dusty operations which will reduce visibility substantially 9 Never start the tractor unless the transmission is out of gear the operator is in the seat and all round safety has been checked 10 Only operate the tractor seated in the drivers seat and never turn or brake suddenly at high speed as this can cause a roll over and serious i...

Page 27: ...place all missing illegible or damaged safety signs 8 Keep safety signs clean of dirt and grease Servicing the Tractor 1 Keep the tractor in good operating condition for your safety An improperly maintained Tractor can be hazardous 2 Stop the engine before performing any service on the tractor 3 The cooling system operates under pressure which is controlled by the radiator cap It is dangerous to r...

Page 28: ...7 Do not operate the tractor in an enclosed building without adequate ventilation Exhaust fumes can cause death 8 Do not park the tractor on a steep slope 9 If power steering or Engine seizes to operate stop the tractor immediately 10 Pull only from the swinging draw bar or the lower link drawbar in the down position Use only a drawbar pin that locks in place Pulling from the tractor rear axle car...

Page 29: ...ing brake and block the rear wheels from front and rear side 4 To avoid injury always move down flip part of PTO Do not clean adjust or service PTO driven equipment when the tractor engine is running 5 Make sure the PTO master shield is installed at all times and always replace the PTO shield cap When the PTO is not in use Diesel fuel 1 Keep the equipment clean and properly maintained 2 Under no c...

Page 30: ...r when filling the tank DO Attend to minor adjustments and repairs as soon as necessity is apparent DO Allow the engine to cool before removing the radiator filler cap and adding water remove the radiator cap slowly DO Shift into low gear when driving down steeps hills DO Latch the brake pedals together when driving on a highway DO Keep draft control lever fully down when not in use Don ts For saf...

Page 31: ...ON T Mount or dismount from the right side of the tractor DON T Temper the hydraulic control levers upper limit stops DON T Use draft control lever for lifting of implements DON T Start the engine with the PTO engaged DON T Use the governor Control Lever Hand throttle while driving on roads DON T Move the hydraulic levers rearward 29 ...

Page 32: ... should be kept with the machine at all times as reference data This symbol means ATTENTION YOUR SAFETY IS INVOLVED The message that follows the symbol contains important information about safety Follow recommended precautions and safe operating practice DECALS ON THE DASH COVER 30 ...

Page 33: ...DECALS ON THE CHASSIS 31 ...

Page 34: ...32 DECALS AROUND THE SEAT ...

Page 35: ... Slow or minimum Setting Engine coolant temperature Warning Hare fast or maximum setting Fuel level Hazard warning Transmission oil pressure Engine Stop control Neutral Turn signal Lights Fan Transmission oil temperature Horn Power take off engaged Parking brake Engine oil pressure Power take off disengaged Work lamps Air filter Lift arm raise Differential lock Battery charge Lift arm lower See op...

Page 36: ... location and function of all the features of your New Tractor Do not start the engine or attempt to drive or operate the Tractor until you are fully accustomed to all the controls It is too late to learn once the Tractor is moving If in doubt about any aspect of the operation of the tractor consult your Mahindra Tractor Dealer Distributor Particular attention should be paid to the recommendations...

Page 37: ...ber START The starter motor is engaged When the key is released it will return to the ON position HEAD LAMP TURN SIGNAL SWITCH AND HORN HEAD LAMP SWITCH High and low beam are operated On the main switch Position Low beam Position High beam TURN SIGNAL SWITCH Pull the turn signal lever down to signal a left turn Push the turn signal lever up to signal a right turn HORN Push the Red button 35 ...

Page 38: ...oblem HOUR METER The hour meter consists of digits with the last digit indicating 1 10th of an hour Symbol Illuminates when Hour meter is operated HAZARD WARNING SIGNAL SWITCH Push the hazard warning signal once to operate the hazard warning light Left and right turn indicators flash Push the hazard warning light switch again to switch off the hazard warning lights CRUISE CONTROL SWITCH Push this ...

Page 39: ...and get expert advice PTO monitor Lamp Shows the revolution of PTO Refer to monitor lamp on Page 38 High beam lamp is operated on the combination switch Low beam lamp is operated on the combination switch Glow signal Lamp indicates preheating Parking brake lamp is operated when footbrake is engaged 4WD drive lamp is operated on when front wheel drive is engaged Fuel Level If it comes on while the ...

Page 40: ...able explains how the PTO operates at the two different Manual Auto positions of the PTO Control switch with the PTO ON OFF switch in the on position PTO monitor Lamp Engaging Cruise Control DO NOT engage cruise control when reversing Engage the cruise control as follows Depress the forward speed control pedal until the required speed is achieved Press the cruise control switch to engage cruise co...

Page 41: ... ground with the position control prevents the damage to the implement or the PTO shaft 1 When the PTO control switch is in manual position the PTO does not stop rotating until turn off the PTO ON OFF switch If working on hard soils pavements with a rotary implement the PTO ON OFF switch must be put to the OFF position to stop the PTO from rotating If this is not done the rotating blades of the im...

Page 42: ...ward The speed control pedal will return in neutral position and the tractor will stop when the speed control pedal is released THROTTLE LEVER HAND THROTTLE The hand operated throttle lever is located on the RHS of the Dash cover To increase the engine speed Pull the lever downward To decrease the engine speed Push the lever upward The Lever can be left in any position between idle and maximum as ...

Page 43: ...eed as using one side only can cause rollovers When servicing the tractor ensure that the adjustment on both sides in the same TURN BRAKE PEDAL C Tight Turns in the field To make a tight turn at low speed use both the steering wheel and the turn brake pedal at the same time For left turn use the left turn brake pedal and for right turn use the right turn brake pedal Perform tight turns only at a s...

Page 44: ... the lock is disengaged before turning the steering wheel Danger Do not use high engine RPM when engaging Diff lock If the diff lock does not release after removing the foot from the diff lock pedal alternatively brake with the left and right brake until it gets released Traveling with the parking brake on will damage the brakes important SUB GEAR LEVER RANGE SHIFT LEVER important SUB GEAR LEVER R...

Page 45: ...ull the Male Fitting A from the Buckle B Adjusting the Seat Belt Make Sure the belt is across your hip and not over your stomach To adjust the male fitting A 1 Pull toggle D down the strap by the required distance a To make the strap longer pull end E as far as it will go b To make the strap shorter pull end F as far as it will go Operating the Safety Switch If you do not sit the your seat when yo...

Page 46: ...it When making adjustments to the implement stop the engine to avoid serious injury When leaving the tractor stop the engine and remove the key Set the parking brake Mid PTO Lever is located on the RHS of Operator Rear PTO Lever is located on the LHS of Operator Ensure that the tilt lever has locked before moving the tractor Danger TILT LEVER To adjust the inclination of the steering wheel with a ...

Page 47: ...h an engine driven hydraulic pump and controlled with a position control lever mounted beside the driver HYDRAULIC POSITION CONTROL LEVER Hydraulic Position Control Lever is located on the RHS of operator Implements can be raised and lowered with the hydraulic position control lever and can be stopped at any position by stopping the lever To ensure a consistent working depth the adjustable stop A ...

Page 48: ... when 1 Traveling on the road 2 Replacing tires or blades on an implement 3 Making adjustments to an implement Sudden dropping of an implement due to hydraulic problems can cause serious injury or death Caution HYDRAULIC REMOTE CONTROL VALVE COUPLER CONNECTING DISCONNECTING IF EQUIPED Connecting 1 Clean both couplers 2 Remove dust plugs 3 Insert the implement coupler to the tractor hydraulic coupl...

Page 49: ... OPERATING THE 3 POINT LINKAGE TPL 47 ...

Page 50: ...ngthening or shortening the top link will change the angle of the implement The locating hole of the top link varies with the type of implement used The most common locations are the 2nd and 3rd hole from the top ADJUSTMENT OF THE CHECK CHAIN To adjust the check chain turn the turnbuckle to lengthen or shorten the chain and tighten the lock nut when the correct adjustment is achieved Turn buckle F...

Page 51: ...ower links to suit the implement in use Attach the left lower link then attach the right lower link using the adjusting handle on the leveling box if required Attach the top link Attach the PTO shaft to the tractor if used making sure that it is locked in place Adjust the check chains to suit the implement and tighten the locknuts To remove an implement reverses the procedure ADJUSTMENT OF THE YOK...

Page 52: ...e 9 Ensure that all the warning lights are off with the engine running Never turn the key to the start position while the engine is running as this can cause serious damage to the starter and engine flywheel Only engage the starter for a period of not more than 10 seconds If Engine does not start rest the starter for about 20 seconds and try again for a maximum of 10 seconds If the engine does not...

Page 53: ...Above 50 F 5 10 min 50 F 32 F 10 20 min 32 F 14 F 20 30 min 14 F 4 F 30 40 min Below 4 F Over 40 min Ensure the handbrake Foot brake is on during the warming period Failure to warm up correctly can result in problems When the engine is warm up engage the range gear levers to the required position Push down on the brake pedals and release the handbrake Increase the engine revolutions and press down...

Page 54: ...he steering wheel and the brake pedal at the same time For a left turns use the left pedal and a right turn the right pedal Perform tight turns only at a slow safe speed Doing so at a high speed can cause rollovers and very serious injury or death Caution NORMAL BRAKING AND PARKING Let the engine come back to idle and at the same time press the master brake pedal When the tractor has come to a hal...

Page 55: ...ase after removing the foot from the pedal use the left and right brake pedals in turn to release it Do not try to engage or use the diff lock on tight turns as serious damage can result UPHILL STARTS ON A STEEP SLOPE With the pedals connected together press down the brake pedals Set range gear levers to low and the throttle to medium engine speed Release the brake pedals and press down the forwar...

Page 56: ...s trailer lighting warning lamp etc When traveling on public or farm roads connect both brake pedals and allow for the weight of any mounted implement to ensure that the unit is not unbalanced Also allow for the width when passing other road users Where fitted use the hazard lights provided Strictly follow the local traffic regulations Caution When operating near others with an implement attached ...

Page 57: ...t track can be set in 1 position The rear track can be set in positions as illustrated 55 Marking is STANDARD Tread Tread TYPE DIVISION TYRE TREAD AG FRONT 8 0 16 46 19inch 1170mm REAR 12 4 24 42 94inch 1090mm IND FRONT 10 16 5 53 13inch 1349 5mm REAR 43x16 00 20 48 06inch 1220mm ...

Page 58: ...n Maintenance This section gives full details of the service procedures necessary to maintain your Tractor at peak efficiency while the lubrication and maintenance chart provides a ready reference to these requirements 56 ...

Page 59: ...s up to the filler neck and that it is clean with the correct anti freeze or anti corrosion inhibitor in it If the coolant is a rusty color drain the system completely and refill with the correct mixture of water and anti freeze or corrosion inhibitor ENGINE OIL Pull out the stick wipe it and dip in the oil sump Ensure that oil level is between the upper and lower mark near the upper mark If too l...

Page 60: ...hat the tire pressures are correct and in accordance with the table on page 55 To make a visual judgment see the drawing on the right It is strongly recommended that tire pressures are checked with a proper gauge only visual inspections are relied upon Excess tire pressure can cause accidents Danger TRANSMISSION OIL Check the level with the dipstick on top of the transmission in rear of the seat I...

Page 61: ...orn lights and indicators INSTALLING LOADER 1 Connect P port of loader control valve to the line on the tractor marked P from the PTO valve 2 Connect the T port on the loader control valve to the line on the tractor marked T 3 Connect the remaining line from the control valve to the line on the tractor marked P1 to the transmission housing DETACHING THE LOADER LOADER VALVE OR LOADER CONNECTING POR...

Page 62: ...he dipstick Air cleaner Clean every 100 hours Radiator coolant Check daily top up if required See page 68 Radiator Check daily for damages leakage Fuel Everyday and before work Fill tank Fuel filter Every 300 hours or 12months Fan belt Check daily See page 72 Battery Check daily Oil filter Every 150 hours or 12months after first 50 hours Loose nuts and bolts Check daily Tighten Radiator hose clamp...

Page 63: ...e pedals Check daily Operation of each lever Check daily Free play of steering wheel Check daily About 50mm 1 97 in on circumstance Toe in Check after every 300 hours 0 to 4mm 0 0 157in Grease in front wheel hub Grease every 300hours Grease each nipple Replenish every 50 hours everyday in dusty conditions Check the steering wheel joint Adjust every 300 hours Wheel nut fastening torque Check daily ...

Page 64: ... 0 50 0 55 0 60 0 Chassis Operation of the instrument Check daily Adjustment of the throttle pedal HST oil Filter Change every 500 hours Hydraulic oil filter 4WD front axle housing oil Check after every 100hrs Replace every 500hrs after first 50hrs Replace if leaking Rubber pipes Check after every 100 hours 62 ...

Page 65: ...or 10W 30 0 C to 25 C 32 F to 77 F SAE20 or 10W30 Below 0 C 32 F SAE 10W or 10W 30 MAHINDRA HEAVY DUTY SAE 15W 40 5 ℓ 1 32 US gal 3 TRANSMISSION CASE See next page 35ℓ 9 25 US gal 4 FRONT AXLE API GL 4 Grades Gear oil 80 or 90 MAHINDRA EP GEAR OIL SAE 80W 90 8 2ℓ 2 166US gal 5 FINAL DRIVE CASE B API GL 4 Grades Gear oil 80 or 90 MAHINDRA UNIVERSAL TRACTOR FLUID 6 BALL JOINT Grease As required 7 FU...

Page 66: ...le to contamination by dust or water Ensure that all dust and water is kept well away from the fuel tank important 64 Pull the lower center lever of the front grille counter clock wise pull the lower edges of hood panel upward and pull the whole panel forward till guide hook lock is hooked to groove Opening the Side cover To open grasp the side cover Pull the forward panel upward to separate from ...

Page 67: ...the fuel injection pump 7 The engine is now ready to start If the engine runs smoothly for a short time and then begins to run roughly leave at idle until it runs smoothly BLEEDING THE FUEL SYSTEM Fuel Filter 1 Close the fuel cock 2 Remove the fuel filter element 3 Wash the fuel filter element in clean diesel fuel If necessary replace it 4 Fit cleaned or new fuel filter element 5 Open the fuel coc...

Page 68: ...n to the correct level on the dipstick with new oil Qty 35ℓ 9 25 US gal CHANGING THE OILS IN THE TRACTOR Always use quality oils as engine or transmission oil Refer to the table on page 60 and 61 for the change frequency CHANGING ENGINE OIL Park tractor on level surface shut off engine Remove sump plug drain oil Replace and check the sump plug and refill he engine with oil to the correct level on ...

Page 69: ...the fact that it takes a while for the oil to run into the final drives Opening the Vent plugs helps to speed this up important CHANGING OIL IN THE FRONT AXLE 1 Drain the oil from the center diff plug and the drain plug in each drive 2 Replace and tighten all drain plugs 3 Remove the Fill Lever Plugs from each final drive to vent air from final drives 4 Remove the dip stick from the filter hole an...

Page 70: ... again and top up if required Do not remove the radiator cap on a hot engine Allow the engine to cool down and then turn the cap slowly to ensure that there is no excessive pressure in the radiator Caution Serious burns can result from the contents of pressurized hot radiators Allow the engine to cool down completely before opening radiator cap Caution HYDRAULIC OIL FILTER AND ENGINE OIL FILTER CA...

Page 71: ...ution flush the radiator Mix the anti freeze solution in accordance with the instructions applicable to the brand of anti freeze and the locals climate Replace the solution in the radiator In case of loss of solution due to evaporation or overflow replace with the original mixture ratio Water or air under high pressure can distort the cooling fins on the radiator and reduce its efficiency Speed Co...

Page 72: ...s to ensure even braking GAP ADJUSTMENT Uneven adjustment of the left and right pedal will result in one sided braking when the pedals are connected and can cause serious accidents especially at high speeds Double check to ensure free play is the same on both pedals Caution ADJUSTING THE THROTTLE LEVER If this lever is either loose or difficult to move please consult your dealer for rectification ...

Page 73: ...e battery and keep it in a cool dry room If it is on the tractor while stored disconnect the negative terminal Batteries will self discharge if left for a period of without use time To keep them in good condition charge them once a month in summer and every second month in winter When replacing the original battery ensure that the replacement battery is the same size Failure to do so can cause pro...

Page 74: ...t the rubber is not perished Renew if necessary To remove dust from the dust valve squeeze it between thumb and fingers Wipe around the dust valve to remove dust collected on the outside Cleaning Changing the Element Release the two clips on the Air Cleaner end cover and Remove the element Remove dust by blowing compressed air through the element Check the element for damage if necessary change th...

Page 75: ...cover the area with a good quality insulation tape Where wiring comes out of it s fitting replace it correctly with the standard fitting Incorrect wiring or fuses can cause fires to both the tractor and surrounding area so get the dealer to check it annually Likewise fuel pipes and wiring age with use Ask your dealer to check it at least once every 2 years and replace as required REPLACING FUSES T...

Page 76: ...VER USE WIRE in place of correct grade fuse SERVICE PRIOR TO DAILY AND SHORT TERMS STORAGE Wash the tractor and keep it clean Fill the tank to avoid condensation and rust Lower any attached implement to the ground before parking the tractor For long term storage consult your dealer important 74 ...

Page 77: ...rcuits and fires Remove the ignition key and store in a safe place Re use after long term storage Carry out a full check of all oils and coolant Refit the battery and run the engine at idle for 30 min to ensure optimum engine life When washing the tractor ensure that the water does not get near electrical components or the oil filter points To prevent short circuits remove the ignition key Do not ...

Page 78: ... one of continuous improvement and the right to change prices specifications or equipment at any time without notice is reserved All date given in this book is subject to production variations Dimensions and weights are approximate only and the illustrations do not necessary show Tractors in standard condition For exact information about any particular Tractor please consult your Mahindra Authoriz...

Page 79: ...y starter switch Alternator 12V 50A Instrumentation Hour meter Tacometer Fuel gauge Water Temperature Gauge Warming Lights Lighting Head lights Turn Signal Indicator Lamp Rear Parking Brake Lamp Tail Lamp CLUTCH Type Damper TRANSMISSION Type synchro mesh No of gears 3 Speed forward 3 Speed reverse with high and low selection lever with HST unit STEERING Type Hydraulic power Power steering POWER TA...

Page 80: ...rication type Forced circulation Cooling system Water cooled Forced circulation Coolant capacity 7ℓ 1 85 US gal Air cleaner Dry Dual Element Muffler Horizontal Fuel Diesel fuel Fuel Tank capacity 34ℓ 9 0 US gal Electrical Battery 12V80AH Starting system Starter motor with pre heater Starter Capacity 2 0KW Drive Train Alternator 12V 50A Transmission Hydraulic Mechanical 3 range gear with constant m...

Page 81: ... 94 5 Wheel base mm Distance between shafts 1680 66 1 Min Ground Clearance mm 323 12 8 R1 Front 8 0 16 Rear 12 4 24 R4 Front 10 16 5 Rear 43x16 00 20 Axle type Front Center pin Rear Central axle Implement Operation Hydraulic Mounting method 3 Point hitch Drawing method Trailer hitch 3 Point hitch category Category 1 Hydraulic control Position 79 ...

Page 82: ...needle to be in the green zone 2 If excessive black smoke is visible then the paper element of air cleaner Fuel injection Pump or nozzles should be checked 3 Do not run the engine without load for more than 2 minutes It is better to stop the engine rather than run it idle This will help in saving of fuel C Brakes 1 If the Tractor has to be stopped for a long period it is advisable to bring the tra...

Page 83: ...ot remove the thermostat but replace with a new one if required 5 Do not change the radiator water often Note 1 Always stop any fuel or oil leakages 2 Carry out the regular maintenance failure to do so might increase the fuel consumption by 25 3 Carry out the torque of cylinder head bolt adjustment of valve clearance regularly Consult your dealer for this 4 Check the tire pressure inflate as recom...

Page 84: ... Contact dealer for repair Engine revolutions are irregular Air in the fuel system Faulty injector Fuel pipe leak Bleed the system Contact dealer for repair The engine stops at low revolution Poor fuel injection Faulty injection pump Wrong valve clearance Wrong idle setting Faulty injector Contact dealer for repair Contact dealer for repair Contact dealer for repair Contact dealer for repair Conta...

Page 85: ...aler for repair Contact dealer for repair Contact dealer for repair Contact dealer for repair Fill the tank and check fuel quality Clean the element Oil warning light comes on with the engine running Low oil level Wrong oil Faulty light or switch Clogged oil filter Fill to correct level Change to correct oil Replace faulty part Contact dealer for repair Alternator light comes on with the engine ru...

Page 86: ...g in from a pipe Clogged suction filter Faulty pump Faulty hydraulic valve Faulty cylinder Increase engine revs Top up the oil to the correct level Repair or replace pipe or replace O ring on joint and tighten Clean and change oil Contact dealer for repair Contact dealer for repair Contact dealer for repair Oil leak from pipe Loose pipe joint Cracked pipe Tighten joint Replace or repair pipe When ...

Page 87: ...eeded Contact dealer for repair Contact dealer for repair Replace or adjust Before anything else check the electrolyte level of the battery and the connections Top up it required and clean and retighten the terminal Dim head lights Low battery Faulty wiring Charge or replace Repair or replace as needed Headlights not working Blown bulb Blown fuse Faulty contact Replace bulb Replace fuse Repair or ...

Page 88: ... 12V 3 4W C Turn Signal Lamp 12V 21W Tail Lamp 21 5W D Stop Lamp 21 5W Turn Signal Lamp 12V 21W E Working Lamp 12V 25W Main Fuse 1 Light Horn 15A 2 Panel 5A 3 Turn Signal Lamp 10A 4 Working Light 7 5A 5 Hazard 10A 6 Coupler 15A 7 Controller Glow Timer 5A 8 PTO Cruise Engine Stop 7 5A 9 Stop Lamp 5A 10 Spare 11 Spare 12 Spare 13 Spare 86 ...

Page 89: ... POWER TRAIN 87 38PS ...

Page 90: ...DATE JOB CARD NO NATURE OF DEFECT PARTS REPLACEMENT W CLAIM NO AND DATE REMARKS TRACTOR HISTORY CARD 88 ...

Page 91: ...DATE TRACTOR HOURS NATURE TYPE OF REPAIR SERVICE CARRIED OUT SERVICE RECORD 89 ...

Page 92: ...DATE JOB DONE MACHINE HOURS FUEL CONSUMPTION ENGINE OIL TOPPED UP REMARKS START END DAILY OPERATION LOG 90 ...

Page 93: ...PART REPLACEMENT RECORD DATE PART DESCRIPTION Q TY COST DATE PART DESCRIPTION Q TY COST 91 ...

Page 94: ...4010 HST Operator s Manual for Tractors Code No 1265 940 001 0 Printed on December 2011 1st Edition ...

Page 95: ...Click here to go on INDEX Main Menu Operator s Manual Engine 4010 Gear HST The Mahindra Group Mahindra USA Inc 9020 Jackrabbit Road Houston Texas 77041 1 877 499 7771 www mahindrausa com ...

Page 96: ...iesel engine In addition this engine should be maintained in proper ways according to the Owner s Manual in order to operate the engine with excellent performance high efficiency economy and long term usage If the information you seek is not found in this manual your DAEDONG diesel engine dealer will be happy to help you Please feel free to contact DAEDONG IND CO LTD DAEDONG USA INC with your ques...

Page 97: ...condition may result in damage to your vehicle or its equipment if the caution is not heeded Follow the advice provided with the caution WARNING This indicates that a condition may result in harm serious injury or death to you or other persons if the warning is not heeded Follow the advice provided with the warning This mark indicates emphasis on notable characteristics of working procedures and i...

Page 98: ...m We then require that all employees understand and implement the system Furthermore we will improve the quality management system continuously to satisfy requirements of ISO9001 2000 KS A9001 and 2001 and observe national and international laws and regulations in the manufacturing process At the same time we will set and achieve additional mid and long term quality goals internally Our chief of q...

Page 99: ...m by saving resources and observing internal standards including requirements of environmental regulations and ISO 14001 1996 We will achieve environmental goals based on policies that contribute to the protection of the environment by improving related regulations continuously We publish those policies to the public and interested parties and examine periodically whether the environment managemen...

Page 100: ...e this goal all of our employees understand the product safety and management policies fully and try to exceed the level required by national or international regulations or standards Our chief of service unit has responsibility and authority from the CEO for periodically examining the effective operation of product safety and management policies and taking actions to correct any discrepancies ...

Page 101: ...enting a safety and management system to make a workplace with no disasters and observing internal standards including the requirements of health regulations and OHSAS18001 1999 to achieve additional safety and health goals internally We publish those policies to all employees and interested parties and examine periodically whether all em ployees understand and implement effectively the safety and...

Page 102: ...he environment 1 Customers using this product should read this manual carefully and avoid any overloaded work Overloaded work may reduce the service life of products and emissions combusted incompletely due to overloaded work are a major cause of air pollution which is the environment of the earth where we breathe 2 When you replace the used engine oil with new oil don t dispose of the used oil in...

Page 103: ......

Page 104: ...SAFETY PRECAUTION PRECAUTION BEFORE OPERATION OPERATION THE ENGINE BREAK IN AND CHECK MAINTENANCE TROUBLESHOOTING SPECIFICATION INDEX SECTION 1 2 3 4 5 6 7 8 9 ...

Page 105: ......

Page 106: ...1 SAFETY PRECATIONS PRECAUTIONS BEFORE OPERATION 1 2 1 ...

Page 107: ...igued sick or under the influence of medicine others who are not qualified for any reasons to operate this machine Do not operate the machine while fatigued Take a rest if necessary Please wear appropriate working clothes You may be entangled in moving parts or slip on the machine due to the above mentioned clothing which may cause serious injuries Towel tucked around the waist Cigarette Muffler S...

Page 108: ...that the engine is stopped when repairing the machine performing maintenance work or refilling the fuel Don t open the caps of the radiator or auxiliary tank while operating the engine or just after the engine is stopped If opened hot water is ejected which may cause burning injuries to people around Open the radiator cap 10 minutes after the engine is stopped 7 Make sure that all drains and caps ...

Page 109: ...or batteries in with 051O105B 8 When separating or dissembling connecting pipes joints or related parts remove the pressure from the systems for air engine oils or coolants When removing a component in a pressurized system be careful of the pressure For example do not use your hand to check pressure leakage There may be damages due to oil or fuel with high pressure 051O104B 9 If you always replace...

Page 110: ...es 14 Do not allow the battery fluid to contact your skin and clothing In case of acid contact with eye skin or tools rinse thoroughly with water Get medical attention immediately if acid contacts your eye or is swallowed The battery has acid that can burn your skin eyes or clothing T91O117A T91O118A household wastes Determine the appropriate disposal method before removing hazardous materials fro...

Page 111: ...terminal Doing so can cause a short circuit which leads to skin burning or fire Use only a recommended battery Do not mix the positive and negative battery cables 16 The cover and other parts rem oved for inspection and repair should be installed again after the work is done You can be trapped or entangled into the engine system and get injured 051O106B T91O128A ...

Page 112: ...2 EXTERIOR VIEW 2 2 SERVICING 2 3 PRECAUTIONS BEFORE OPERATION 2 ...

Page 113: ...n Pump 3 Oil Fill Cap 4 Speed Control Lever 5 Fuel Feed Pump 6 Oil Level Dipstick 7 Electronic Pick up Sensor 8 Engine Stop Solenoid 9 Cooling Fan 10 Fan Drive Pulley 11 Oil Pan 12 Oil Filter Catridge 13 Alternator 14 Exhaust Manifold 15 Oil Pressure Switch 16 Oil Drain Plug ...

Page 114: ...The engine serial number is stamped on the mounting surface of the injec tion pump SERVICING 1 Engine Serial Number 051O202B Should your engine require parts or service please contact your local DAEDONG dealer Your dealer will need the following information in order to assist you 1 Engine make model number and se rial number 2 Names and code numbers of parts to be ordered 3 Make and model number o...

Page 115: ......

Page 116: ...3 3 PRE START ENGINE CHECKS 3 2 STARTING AND STOPPING THE ENGINE 3 2 CHECK DURING OPERATION 3 3 OPERATING THE ENGINE ...

Page 117: ...or goes off Verify that the oil pressure and charge lights are on The engine may be started with out preheat in normal tempera ture above 15o C but with pre heat for 15 or 10 seconds in cold temperature 23o C Provided it may be varied according to the installed condition of the en gine 4 Turn the key to the START posi tion to engage the starter motor Release the key immediately as the engine start...

Page 118: ...urn the speed control le ver to the IDLE position 2 Turn the starter switch to OFF and remove the key Return the engine stop solenoide to the START position for the next start CHECK DURING OPERA TION While operating the engine keep checking whether all parts of the en gine are operating smoothly and properly COOLING SYSTEM If steam or coolant is escaping from the overflow tube stop the engine allo...

Page 119: ...0 rpm immediately stop the en gine and check the following items 1 Check the engine oil level page 5 4 FUEL The fuel tank should never be al lowed to become completely emp ty An empty tank will allow air into the fuel system and the engine will not operate without bleeding the fuel system EXHAUST SMOKE The engine exhaust should be color less during normal operation within the rated output of the e...

Page 120: ...ion Shut the engine down immediately HOW TO TELL WHEN THE EN GINE RUNS BACKWARDS 1 Oil pressure will drop suddenly The oil pressure light will come on 2 The sound of the engine will change Exhaust gases will come out of the air intake 3 A loud knocking sound will be heard REMEDIES 1 Stop the engine immediately using the engine stop lever 2 Check the air cleaner and rubber parts of the air intake s...

Page 121: ......

Page 122: ...4 DAILY CHECKS 4 2 BREAK IN 4 2 PERIODIC CHECKS 4 3 BREAK IN AND CHECKS 4 ...

Page 123: ...f operation See pages 6 3 to 6 4 2 In cold weather always allow the engine to warm up before using ITEM PAGE Parts which had trouble in previous operation By walking a r o u n d the ma chine Oil or water leaks 5 7 Engine oil level and contamina tion 5 4 Amount of fuel 5 4 Amount of coolant 5 8 Dust in air cleaner 5 12 Damaged parts a n d l o o s e n e d bolts and nuts By start i n g t h e engine C...

Page 124: ... Change Every 2 Year 5 10 10 Fuel line Check Every 100 Hr 5 2 Replace Every 2 Year 5 2 11 Intake air line Check Every 200 Hr Replace Every 2 Year 12 Engine valve clearance Adjust Every 800 Hr 13 Cooling system Flush Every 2 Year 14 Coolant Anti freeze Replace Every 2 Year 5 11 15 Fuel airbleeding Check Service as required 16 Radiator screen Clean Daily The items marked must be done after the first...

Page 125: ......

Page 126: ...5 FUEL 5 2 ENGINE OIL 5 4 RADIATOR OPTIONAL 5 7 AIR CLEANER OPTIONAL 5 12 BATTERY OPTIONAL 5 12 FAN BELT 5 14 LONG TERM STORAGE 5 15 MAINTENANCE 5 ...

Page 127: ...Avoid open flames and sparks while refueling FUEL FUEL LEVEL CHECK AND REFU ELING 1 Always refuel before the fuel level reaches EMPTY 2 Use diesel fuel only Other fuels and fuel mixtures will degrade per formance and may damage the engine Use the correct grade of diesel fuel for the ambient temper ature Use Diesel Fuel No 2 CHECKING THE FUEL LINES 1 Air vent cock 2 Fuel pump To avoid serious injur...

Page 128: ...ing service to prevent dirt and other contaminants from entering and damaging the fuel system REPLACING THE FUEL FILTER 1 Fuel cock 2 Fuel filter container 3 O ring 4 Filter element 5 Spring 6 O ring T91OA26A 7 Filter container 8 Screw ring A Close B Open C Bleeder 1 Replace the fuel filter cartridge ev ery 400 hours 2 Apply a thin layer of fuel oil on the gasket Install and hand tighten Replacing...

Page 129: ...ty and maximum service life of the machine make a thorough daily inspection before starting the engine WALK AROUND INSPECTION Look around and under the tractor for such items as loose bolts trash build up oil or coolant leaks or bro ken or worn parts CHECKING ENGINE OIL LEVEL 1 Oil Inlet 2 Oil gauge A Oil level is acceptable within this range To avoid personal injury Be sure to check and service t...

Page 130: ... oil completely when changing Never mix differ ent oils or engine damage may re sult 1 Change the oil after the first 50 hours of operation 2 Remove the drain plug from the oil pan and allow all of the oil to drain Draining the oil will be easier when the engine is slightly warm 3 Ensure that the oil level on the dip stick is at the upper mark 4 Change the oil after every 150 hours of operation th...

Page 131: ...ith the sealed place fasten it with hands If you fasten it with wrenches the fastening force may be greater than necessary 3 2 2 Oil Filter 3 Remove wiht filter wrench Hand tighten only 051O602B 5 The level of engine oil is lowered when replacing cartridges So check whether any oil leakage is in sealed places when operating the engine for a while and then check the oil level If necessary replenish...

Page 132: ...l cause serious injury to you or any bystanders Always check the engine coolant level when the engine is cold To avoid personal injury always stop the engine and al low it to cool before changing the coolant or performing any other cooling system service 1 051O603B 1 Pressure Cap 1 Without a reserve tank remove the radiator cap while the engine is cold The coolant level should be just below the fi...

Page 133: ...ve tank if equipped When coolant is added start the engine and check again be fore it gets hot It may require additional coolant 1 To discharge coolants always open plugs for discharge that are located on the side of the crank case and lower part of radiator and open the radiator cap too You cannot discharge coolant ful ly when the cap is closed To dis charge coolant from reservoir tank separate t...

Page 134: ...professional radia tor service CHECKING RADIATOR HOSES 1 Inspect radiator hoses every 6 months or 200 operating hours whichever comes first Check for leaks and repair or re place promptly Tighten hose clamps regularly Hoses that are cracked swol len or brittle must be re placed as failure is eminent Hose fail ure will result in engine over heating and possible injury 2 Replace cooling system hoses...

Page 135: ...the engine to cool before troubleshooting and re pair Stay away from an overheat ed engine until it cools as steam or hot coolant may escape violently without warning 5 After the engine cools consult the Troubleshooting section of this manual to determine the cause Make repairs and adjustments as required 1 2 051O606B 1 Radiator Hose 2 Hose Clamp Clean the cooling system every 500 hours or as need...

Page 136: ...tifreeze These volumes of anti freeze when mixed with pure water will reduce the freez ing point of the coolant mixture as shown When adding coolant during dai ly service use only water or an ti freeze mixed with water to en sure that the mix ratio stays at or below 50 anti freeze Keep unused anti freeze in a clean tightly sealed container Do not use radiator cleaning agents when anti freeze has b...

Page 137: ...ng 6 Replace the element yearly or af ter 6 cleanings 2 2 3 3 1 4 051O607B Ensure that the wing nut for the filter element is tight A loose element or loose cover will allow dust ingestion that can severely damage the en gine Always check air intake clamps for tightness BATTERY OPTIONAL To avoid personal injury Avoid contact with battery electrolyte Sulfuric acid will burn the skin and destroy clo...

Page 138: ...move the negative ground ca ble first and reconnect it last Never remove a battery cable while the engine is running Charging system damage may result 4 When charging the battery always follow the charger manufacturer s instructions Be careful to observe the correct polarity to prevent bat tery damage or possible explosion 1 2 3 051O608B 1 Larger Red Cable 2 Ground Cable 3 Battery Case IMPORTANT ...

Page 139: ...ery life 4 Hightest Level 5 Lowevst Level 6 Lowevst Level LONG TERM STORAGE 4 5 7 8 6 051O610B BELT TENSION ADJUSTING Loosen both bolts that attach the al ternator Move the alternator to ad just belt tension Retighten the bolts and nut after adjustment 1 Fan Belt 2 Bolt Nut A 7 9mm Low belt tension can result in engine overheating and insufficient battery charging The correct tension can be determ...

Page 140: ...s be sure to discharge the coolant from the engine 2 Drain the engine oil and replace with clean oil Run the engine for 5 minutes 3 Repair any leaks Ensure that all bolts and screws are tight 4 Separate the battery from the ma chine check the electrolytes and recharge the battery The battery should be kept in a dry place with out direct sunlight 5 Run the engine every 2 to 3 months with no load fo...

Page 141: ......

Page 142: ...GINE IS HARD TO START 6 2 ENGINE SUDDENLY STOPS RUNNING 6 3 LOW ENGINE POWER OUTPUT 6 4 EXHAUST SMOKE OR DARK EMISSIONS 6 5 THE ENGINE MUST BE STOPPED IMMEDIATELY 6 6 ENGINE OVERHEATS 6 7 TROUBLESHOOTING 6 ...

Page 143: ...ter or dirt in fuel Clean the injection nozzle and check the nozzle inject for damage Check that the nozzle is working properly Install new nozzle if necessary Incorrect valve clearance Adjust the valve clearance with the engine cold Intake 0 15mm Exhaust 0 15mm 3C093LWS 3C093LWG 3C100LWS Intake 0 25mm Exhaust 0 30mm 3A139LWS 3A150LWS 3A150LWG 3A165LWS 3B183LWS 4A200LWS 4A220LWS 4A220LWG 4B243LWS ...

Page 144: ...tractor and keep it in an indoor environment in cold weather Install the battery when you use the tractor THE ENGINE MUST BE STOPPED IMMEDIATELY Possible causes Actions Insufficient fuel Drain and replace with proper fuel Check whether there is air or leakage in the fuel system Faulty nozzle Replace new part as required Moving parts overheating due to poor oil and insufficient oil Check the level ...

Page 145: ...ilter screen or element with debris will degrade the lubricant cleaning screen Replace the element Check the injection timing Proper injection timing crank angle before top dead center BTDC 18 3C093LWS 3C100LWS 3A139LWS 3A150LWS 3A150LWG 3A165LWS 3B183LWS 4A200LWS 4A220LWS 4A220LWG BTDC 24 3C093LWG BTDC 22 CTD main 4B243LWS BTDC 12 sub port 4A200TLWS 4A220TLWS In correct valve adjustment Check and...

Page 146: ...heck the injection pump and valve assembly Replace as required ABNORMAL EXHAUST FUME COLOR Possible causes Actions Poor fuel governor system Consult with a dealer for repair Poor fuel quality Select good quality fuel Use the diesel oil only Poor nozzle Replace with a new nozzle if necessary Unstable burn Poor spraying improper injection timing abnormal injection system poor valve adjust ment or co...

Page 147: ...Exhaust smoke or dark emissions appear Check the fuel injection system Especially check the nozzle Overheating the bearing Check for lubricating system leaks Oil pressure warning light comes on Check the lubrication system Check if the engine bearing clearance meets the specification Check the oil pressure relief valve Check the oil pressure switch Check the filter base gasket ...

Page 148: ...ti freeze concentration too high Clean dirt and debris from radiator core and radiator guard Cooling air obstructed Flush and clean system Replace parts as required Cooling system dirty or corroded Flush and clean system Replace parts as required Defective radiator cap Replace defective cap Faulty thermostat Check and replace thermostat nd replace if necessary Defective temperature gauge or send i...

Page 149: ......

Page 150: ...7 SPECIFICATIONS 7 2 SPECIFICATIONS 7 ...

Page 151: ...umber of cylnders 3 Total displacement cc cu 927 56 6 927 56 6 1 007 61 5 1 393 84 9 Turbocharger Bore and stroke mm in Ø 75x70 2 95x2 76 Ø 75x70 2 95x2 76 Ø 75x76 2 95x2 99 Ø 80x92 4 3 15x3 6 Method of Combustion Vortex chamber Compression ratio 22 1 22 1 21 1 22 1 Injection timing BTDC 18 BTDC 24 BTDC 18 BTDC 18 Injection order 1 2 3 Injection pressure kPa kgf 14710 15690kPa 150 160kgf Intake ex...

Page 152: ...le diesel engine Number of cylnders 3 Total displacement cc cu 1 500 91 5 927 56 6 1 647 100 5 1 826 111 4 Turbocharger Bore and stroke mm in Ø 83x92 4 3 3x3 6 Ø 83x92 4 3 3x3 6 Ø 87x92 4 3 4x3 6 Ø 102 4x92 4 4 0x3 6 Method of Combustion Vortex chamber Compression ratio 21 7 1 22 1 Injection timing BTDC 18 Injection order 1 2 3 Injection pressure kPa kgf 14710 15690kPa 150 160kgf Intake exhaustcle...

Page 153: ...gine Number of cylnders 4 Total displacement cc cu 1 999 122 0 2 197 134 1 2 197 134 1 2 435 148 6 Turbocharger Bore and stroke mm in Ø 83x92 4 3 3x3 6 Ø 87x92 4 3 4x3 6 Ø 87x92 4 3 4x3 6 Ø 102 4x92 4 4 0x3 6 Method of Combustion Vortex chamber Compression ratio 21 7 1 22 1 Injection timing BTDC 18 BTDC 22 CTM main Injection order 1 3 4 2 Injection pressure kPa kgf 14710 15690kPa 150 160kgf Intake...

Page 154: ...ne Number of cylnders 4 Total displacement cc cu 1 999 122 0 2 197 134 1 Turbocharger Turbo Bore and stroke mm in Ø 83x92 4 3 3x3 6 Ø 87x92 4 3 4x3 6 Method of Combustion Vortex chamber Compression ratio 21 8 1 21 1 1 Injection timing BTDC 12 sub port Injection order 1 3 4 2 Injection pressure kPa kgf 14710 15690kPa 150 160kgf Intake exhaustclearance mm Intake 0 20 Exhaust 0 20 Direction of rotati...

Page 155: ......

Page 156: ...8 INDEX 8 2 INDEX 8 ...

Page 157: ...G LEVEL ADDING AND CHANGING COOLANT 5 7 CHECKING THE FUEL LINES 5 2 CLEANING THE RADIATOR 5 10 D DAILY CHECKS 4 2 E ENGINE IS HARD TO START 6 2 ENGINE OIL 5 4 ENGINE OVERHEATS 6 7 ENGINE SUDDENLY STOPS RUNNING 6 3 EXHAUST SMOKE OR DARK EMISSIONS 6 5 EXTERIOR VIEW 2 2 F FAN BELT 5 14 FUEL 5 2 L LONG TERM ENGINE STORAGE 5 15 LONG TERM STORAGE 5 14 LOW ENGINE POWER OUTPUT 6 4 P PERIODIC CHECKS 4 3 PR...

Page 158: ...OR OPTIONAL 5 7 REPLACING THE FUEL FILTER 5 3 REPLACING THE OIL FILTER 5 6 S SERVICING 2 3 SPECIFICATIONS 7 2 STARTING 3 2 STARTING AND STOPPING THE ENGINE 3 2 STOPPING 3 3 T THE ENGINE MUST BE STOPPED IMMEDIATELY 6 6 ...

Page 159: ......

Reviews: