background image

24


BA364501-en 


4.4.3


Lowering Process and CE Stop 


Before lowering the vehicle, remove tools, support stands or similar obstacles from 
the working area of the lift. 
The operator is responsible for ensuring that nobody is within the danger area. 


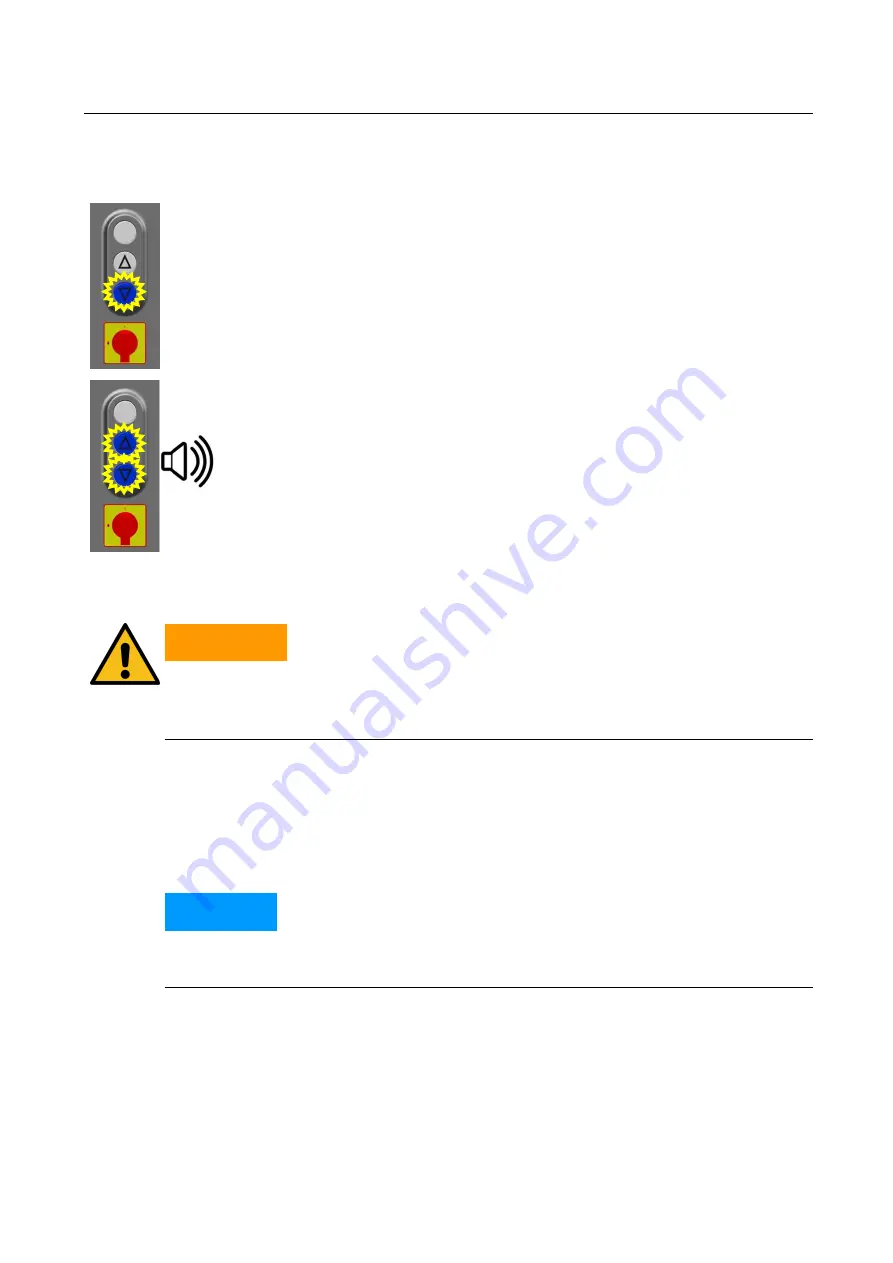
Press and hold the lit DOWN button until the desired lifting height is reached. 


The lift automatically stops when it has reached the CE-defined stop height. 


For full lowering back to the initial position, release the DOWN button after 
reaching the CE stop and press it again. 


UP and DOWN buttons are lit. A signal sound is activated when lowering 
within the CE-defined height range. 


4.5


Vehicle in Raised Position 


WARNING


When installing or removing heavy vehicle parts, ensure that the centre of gravity does 
not shift to a dangerous extent! The vehicle may tip off the lift. 
Secure vehicle by lashing it to the support arms with straps. 


4.6


Driving off the Lift and Changeover 


After the lift has been lowered completely, turn the support arms out to the side 
and bring them back into starting position. 


Then drive the vehicle off the lift. 


NOTICE


There is a risk of damage to the toothed segments and their function if the support 
arms come into contact with the wheels or other vehicle parts! 


Summary of Contents for MA STAR 3.5 A

Page 1: ...erden soll Fehler Verwenden Sie die Registerkarte Start um Name dem Text zuzuweisen der hier angezeigt werden soll Fehler Verwenden Sie die Registerkarte Start um Name dem Text zuzuweisen der hier ang...

Page 2: ...he event of the grant of a patent utility model or design The contents of this edition have been checked with great care However errors cannot be fully excluded Subject to technical change without not...

Page 3: ...ns 7 2 3 2 Intended Use 8 2 3 3 Overall View with Components 9 2 4 Technical Data 10 2 4 1 Technical Data MA STAR 3 5 A 10 2 4 2 Safety Zone MA STAR 3 5 A 10 2 4 3 Installation Diagram MA STAR 3 5 A 1...

Page 4: ...Cycles 23 4 4 1 Inspection of the Load Pick up Points and Support Arm Locks 23 4 4 2 Continuation of the Raising Process 23 4 4 3 Lowering Process and CE Stop 24 4 5 Vehicle in Raised Position 24 4 6...

Page 5: ...lift The relevant regulations regarding accident prevention and health and safety must be observed 1 2 Symbols and Signal Words 1 2 1 Personal Injury DANGER indicates an immediate hazard which if not...

Page 6: ...o Where did the accident happen address workshop o What happened o How many are injured o What injuries have occurred o Who is reporting the accident Keep calm and answer questions 1 5 Requirements o...

Page 7: ...cording to the manufacturer s specifications 2 3 General Machine Description 2 3 1 Design and Basic Functions The MA STAR 3 5 A S two post lift consists of two industrially rolled columns with welded...

Page 8: ...e lowering process Proximity switches detect end positions asynchronism and nut breakage The relevant direction button light turns off to indicate when an end position has been reached 2 3 2 Intended...

Page 9: ...mponents A Control column a Toothed belt drive B Opposite column b Trapezoidal spindle C Cable bridge c Nut package D Control unit d Lifting carriage with support arm brackets E Drive motor F Support...

Page 10: ...time depending on load approx 40 s Drive power 2 x 3 0 kW S3 20 Power supply 3 x 400 V N PE Circuit breaker C16A RCD 30 mA Weight without packaging 650 kg Packaging dimensions L x W x H 2925 x 1100 x...

Page 11: ...11 BA364501 en 2 4 3 Installation Diagram MA STAR 3 5 A Dimensions refer to the recommended drive through width of 2400 mm...

Page 12: ...s Drive power 2 x 3 0 kW S3 20 Power supply 3 x 400 V N PE Circuit breaker C16A RCD 30 mA Weight without packaging 650 kg Packaging dimensions L x W x H 2925 x 1100 x 710 mm Required concrete grade C...

Page 13: ...13 BA364501 en 2 4 6 Installation Diagram MA STAR 3 5 S Dimensions refer to the recommended drive through width of 2400 mm...

Page 14: ...lift can be equipped with a second control unit on the opposite column The arrangement and function of the operating buttons and fault indicator remain the same there is also an additional emergency...

Page 15: ...re suspended or loaded properly and in a fall proof manner taking into account their size weight and centre of grav ity Observe transport regulations 3 2 Standard Delivery Each lift is dispatched from...

Page 16: ...ions L x W x H 2925 x 1100 x 710 mm Weight 740 kg 3 3 2 Packaging MA STAR 3 5 S Dimensions L x W x H 2925 x 1100 x 710 mm Weight 720 kg 3 3 3 Centre of Gravity of the Packaged Lift Centre of gravity o...

Page 17: ...kaged lift are shown in the section Packaging Information Lift in transport rack on pallet pick up points marked 3 5 Storage The packages must be stored in a covered location and protected from direct...

Page 18: ...mpletely Otherwise damage to the equip ment may occur Driving onto the lift should be at walking pace only and as close to the centre of the columns as possible Vehicles may only be lifted with suppor...

Page 19: ...l carry power even after the system has been switched off There is a risk of tripping on floor mounted lifting equipment and on the foundation anchor of the lift Parts must not be placed on the lift o...

Page 20: ...isual indication of the lift s available options regarding direction of movement Status Lift switched off Only raising pos sible Raising and low ering possible Only lowering possible Fault lift not re...

Page 21: ...ning of the Vehicle Carefully drive the vehicle forwards centrally between the lift columns and then apply the parking brake The centre of gravity of the vehicle should be as central as possible betwe...

Page 22: ...STAR 3 5 A MA STAR 3 5 S 4 3 4 Support Disc Raisers The support disc raisers partly optional are available in the lengths 50 mm 100 mm 150 mm and 200 mm By inserting the support disc raisers the supp...

Page 23: ...contact with the pick up points of the vehicle Check the position of the support discs and correct if necessary Check that support arms lock securely If necessary move the support arms slightly until...

Page 24: ...UP and DOWN buttons are lit A signal sound is activated when lowering within the CE defined height range 4 5 Vehicle in Raised Position WARNING When installing or removing heavy vehicle parts ensure...

Page 25: ...en after the system has been switched off Maintenance and repair work may only be carried out when the lift is load free Only use original replacement parts Substances that are hazardous to the enviro...

Page 26: ...handbook Check all components for damage Brake torque is measured directly on the motor s drive shaft as part of the annual operating equipment inspection The toothed belt must be removed for this Bra...

Page 27: ...d set up work may only be carried out when the machinery is stationary The unit must be disconnected from the power supply and secured against being switched on again Work on the electrical part of th...

Page 28: ...y be lowered Signal sound when UP button is pressed again a Under heavy load max load exceeded b Ceiling impact protection triggered a Lower the lift by pressing the DOWN button reduce the load b Lowe...

Page 29: ...d a disposal of the device be necessary it must be done in adherence with locally applicable legal regulations regarding environmental protection Remove all materials properly sorted out and bring the...

Page 30: ...named company beforehand Model VP Number MA STAR 3 5 A VP 251230 VP 251232 MA STAR 3 5 S VP 251231 VP 251233 Designation Two Post Lift Rated Load Capacity 3500 kg Directives 2006 42 EC 2014 30 EU Sta...

Reviews: