background image

Foreword 

These operating instructions must be carefully read in order to quickly familiarize yourself with your bicycle. The knowledgeable treatment, 
regular maintenance, and care of the bicycle is essential for its preservation and safety. 
For reasons of safety, please also pay attention to the information on chargers, accessories and other spare parts. 

Note to Magnum dealers:

 Please provide the operating instructions for the new owner when selling the bicycle. 

The factory is constantly working on the further development of all models. Please understand that changes to the scope of delivery in form, 
equipment and technology are possible at times. 
All texts, illustrations, and instructions in this manual are based on information at the time of printing. 

All graphics are renderings and may have 

differences from the actual product. 

The information contained in this manual is valid at the time of issue.  

Reproduction, duplication or translation of this user manual is prohibited without explicit permission from Magnum Bikes. All rights under the 
copyright law remain expressly reserved. 

Symbols used 

Important notes for your safety are specially marked. Be sure to follow these instructions to avoid injury and damage to the unit: 

“WARNING” 

Warns of dangers to your health and indicates possible risk of injury. 

DANGER”

 Indicates a potential hazard to the unit or others. 

NOTE” 

Highlights tips and information for the user. 

Summary of Contents for Cruiser Ci6

Page 1: ...MAGNUM CRUISER CI6 USER GUIDE Please read before use www magnumbikes com 1 ...

Page 2: ...ent and technology are possible at times All texts illustrations and instructions in this manual are based on information at the time of printing All graphics are renderings and may have differences from the actual product The information contained in this manual is valid at the time of issue Reproduction duplication or translation of this user manual is prohibited without explicit permission from...

Page 3: ...re pressure 15 Riding 16 Support level 16 Range 16 Brakes 16 Leaving the bike 17 Display overview 18 DRIVING Safety instructions 23 Transport with car 24 Carrying loads 24 Antitheft 24 Vehicle Care Vehicle care and care products 25 Winter care and maintenance 26 Corrosion protection 26 Disposal 26 Tire care 27 Technical changes accessories spare parts 27 MAINTENANCE Maintenance and care 28 Cranks ...

Page 4: ... Motor 2 Brakes 7 Derailleur 3 Seatpost 8 Crankset 4 Battery 9 Pedals 5 Disk brake Function and operation of handlebar components 1 Display 4 Right grip 2 Left grip 5 Right shift lever 3 Left brake lever 6 Right brake lever USE 4 ...

Page 5: ... handlebars Adjustable handlebar 1 Install the handlebars as shown and tighten the upper screw 3 Move the handlebar up or down to the desired position If it is too loose or too tight please adjust the screw on the handlebars 5 ...

Page 6: ...2 Adjust the handlebar to the desired position and tighten the screws on the right side 4 Close the cover plate to complete the setting USE 6 ...

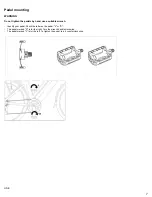
Page 7: ...als by hand use a suitable wrench Identify your pedal Check the letter on the pedal L or R The pedal marked R is for the right Turn the wrench handle clockwise The pedal marked L is for the left To tighten the pedal turn it counterclockwise USE 7 ...

Page 8: ...e saddle height is correct when the foot is resting on the pedal at the lowest position while the leg is not fully extended The tips of the toes should be able touch the ground Raising or lowering the seat to the height of the rider s hip while they are standing on the ground next to the bike is a good starting point Too high Too low Ideal USE 8 ...

Page 9: ...se lever 1 measure the saddle height to the rider s hip and tighten the clamp to close By adjusting the nut 2 on the quick release lever the clamping tension can be increased or decreased The quick release lever 1 must close with a noticeable pressure Adjusting the saddle The saddle can also be tilted and adjusted in the longitudinal direction Loosen the screw 4 Place the saddle in the desired hor...

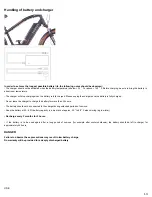
Page 10: ...id damage to the cable and the risk of electric shock Make sure the power cord is unrolled or unwound after use so as not to damage the cord Do not operate the charger with a damaged cable or plug Ensure immediate replacement by the dealer if damaged Do not operate the charger after it has been damaged Do not disassemble the charger yourself Faulty repair may result in electric shock or fire To pr...

Page 11: ...r defective in any way If the battery will not charge Unplug the charger from the outlet then plug it back in Check that the outlet your charger is plugged into is functioning properly if necessary connect other devices to it to confirm Check the contacts of the plug connections If charging is still not possible please have the battery and charger checked by a Magnum Bikes licensed dealer Importan...

Page 12: ...vy load Before charging a battery that has heated up please cool to room temperature or allow to cool for approx 30 minutes WARNING Keep out of reach of children Do not open or disassemble the battery Do not short circuit metallic objects on the battery Do not immerse in any liquid Do not incinerate There is a risk of explosion NOTE A battery pack contains toxic heavy metals and is therefore subje...

Page 13: ...rged Do not leave the charger to charge the battery for more than 24 hours The battery should not be connected to the charger during extended periods of non use Keep the battery at 40 60 battery capacity in a dry place at approx 50 to 68 F when storing eg in winter Recharge every 3 months for 2 hours If the battery is to be used again after a long period of non use for example after winter shutdow...

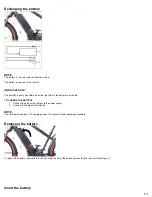
Page 14: ...the battery near the top TO CHARGE THE BATTERY 1 Connect the plug of the charger to the power supply 2 Connect the charger to the battery NOTE The USB port provides 5V 1A charging power Cell phone tablet charging is possible Removing the battery To pull out the battery insert and turn the key Hold the key in the unlock position 2 and then pull out battery 1 Insert the battery 14 ...

Page 15: ...d green 2 The battery is about 2 4 charged green 1 The battery is almost empty you should charge it soon about 1 4 residual capacity red The battery is empty Tire pressure To avoid flats keep tire pressure at the recommended PSI On off road terrain a slightly lower PSI will provide more grip but flats can occur WARNING Caution should be exercised when inflating tires with compressor air pressure e...

Page 16: ...ntially become so hot that the current is reduced by the temperature sensor in the motor The internal heat sensor may cut out the electrical system of the e bike if it overheats If the e bike cuts out let the system rest for a few minutes and resume riding while being sure to pedal in order to alleviate the stress on the electrical system Range per charge The achievable range with a charge of the ...

Page 17: ...as this could cause skidding The right brake lever 2 controls the rear wheel The left brake lever 1 controls the front brake Parking the bike WARNING When unfolding the kickstand 1 always make sure that the stand is stable and firm before leaving the bike in place so as to prevent the bike from falling over Do not place additional weight on the bike when the kickstand is in use NOTE Be sure that y...

Page 18: ...For other accessories and other parts we can not assess a usability despite ongoing market observations and are not liable for it Lighting Electric bicycles do not need lighting equipment during the day but only when they are not recognized by other road users in time Resting light forward white backwards red However a forward and a rearward directed reflector of at least 2 square inches of lumino...

Page 19: ...wear a helmet Make sure that your helmet complies with the safety standards SNELL and ANSI or the new ECE standard Wear a bicycle glasses to protect your eyes Transport with car WARNING The bicycle may only be mounted on the wheels for transportation on appropriate loading areas passenger cars other transport vehicles roof trusses or trunk carriers trailers Before transporting your bike be sure to...

Page 20: ...ssure can lead to damage to the bearings seals battery and the entire electrical system Cleaning For washing use only a soft sponge and clean water Only polish with soft cloth Do not wipe the dust or dirt with a dry cloth scratches in the lacquer and on the panels Care products If necessary the bicycle should be treated with commercially available preservatives and care products Prevent corrosion ...

Page 21: ...t at the end of their service life to the appropriate public collection points or to the specialist dealer Details of this are governed by the respective national law The symbol on the product indicates this requirement By recycling recycling or other forms of recycling of old equipment you are making an important contribution to the protection of our environment Batteries are subject to disposal ...

Page 22: ... The retailer carries out this work conscientiously Before purchasing any accessories or technical modifications always consult the dealer DANGER In your own interest we recommend using only expressly approved accessories and original spare parts for Magnum bicycles For these accessories and these parts safety suitability and reliability have been specially tested for the vehicle For other accesso...

Page 23: ...e Before driving Monthly Yearly If necessary Check all bolts and nuts which are important for driving safety and function if necessary Axle nut steering bearing handlebar saddle seatpost brakes pedal crank F F H F H Clean chain and lubricate with chain spray Check the rear wheel if necessary F H F H Check the steering bearing F F Check steering bearing adjust if necessary Grease and adjust if nece...

Page 24: ...s NOTE If the cranks have already loosened the inner quadrant is mostly knocked out The pedal cranks and if necessary the spindle must then be re tightened Only dismantle the crank handle with a crank puller never pull it out with force When installing the square bearing surfaces of crank and axle must be completely free of grease Pedals Check regularly whether the pedals 4 are firmly screwed onto...

Page 25: ...an not be ruled out A fall with serious injuries could result Check Use the handbrake lever 3 to move the bicycle back and forth If there is play in the steering bearing 1 it must be adjusted NOTE The front fork 4 must not become stuck in the steering position and must swing easily in both directions DANGER The adjustment must be made by the dealer 30 ...

Page 26: ...onsibility of the specialist Check battery fuse Under no circumstances should a stronger fuse be used or the fuse be repaired Improper handling can destroy the entire electrical system If the fuse is blown for any reason contact your dealer NOTE The fuse for the battery is located on the left side When replacing the fuse use a 30A fuse Replace fuse Press the ON OFF button to switch off the display...

Page 27: ...ektro hydraulic disc brakes derailleur Shimano Acera sprocket Shimano Acera M360 8 speed tire Schwalbe Big Ben 26 2 25 Components Metro motor DAS KIT 48V 500W 28 mph rear hub motor battery pack I6 48V 13Ah with USB connection display DAS KIT C7 LCD display fork RST Neon TNL with oil suspension and lock out Brake lever Tektro with cut off sensor brakes Tektro hydraulic disc brakes derailleur Shiman...

Page 28: ...ing Depending on the pavement texture and care wear is possible over 300 miles Contamination of the wheel hub reduces the service life Control at every maintenance Do not wash with the high pressure cleaner Cables cable connections switches Depending on care from 300 miles Control at every maintenance Cleaning and lubrication of the chain After 300 miles and every cleaning Pinions chain wheels cha...

Page 29: ...urposes Defects due to normal wear and tear unless we voluntarily provide goodwill within the first 6 months without recognizing a right hand wear for wear parts such as Saddle suspension fork brakes brake pads disc brakes spokes luggage carriers brake cables handlebar grips tubes tires bells reflectors front and rear lights pedal arms pedals kickstands gear shifters bottom bracket sprockets casse...

Reviews: