background image

© 

2013 Magnum Energy, Inc.

Page 26

Installation

2.6.2 

System Bonding Jumper

The MSH-RE Series inverter does not include an internal bond between the grounded conductor 

(AC neutral/DC negative) and the equipment grounding terminals. This bond [system bonding 

jumper (SBJ)] is usually done in the main distribution panel for each electrical system.

CAUTION:

 There should be one and only one point in each electrical system (both 

AC and DC) where the grounded conductor is attached to the grounding electrode 

conductor.

AC Side

 – The size of the system bonding jumper (SBJ) in the AC electrical system is based on 

the area of the largest AC ungrounded conductor. In accordance with the NEC, use Table 2-4 to 

determine the system bonding jumper size compared to the largest AC ungrounded conductor.

DC Side

 – The size of the system bonding jumper (SBJ) in the DC electrical system must not be 

smaller than the DC grounding electrode conductor (GEC–DC) used, which is determined from the 

grounding method that will be used (see Section 2.6.1).

2.6.3 

Equipment Grounding Conductor

The inverter case and all other noncurrent-carrying exposed metal surfaces in the entire electrical 

system that may be accidentally energized must be grounded. The equipment-grounding conductor 

must be sized to safely carry the maximum ground-fault current likely to be imposed on it from 

where a ground-fault may occur. In accordance with the NEC, use Table 2-4 to size the equipment-

grounding conductors. This table requires that the equipment-grounding conductor be sized 

according to the rating of the overcurrent device protecting the circuit.

CAUTION:

 The connections and wiring for the equipment-grounding conductor must 

be continuous to allow fault currents to properly operate overcurrent devices. Where 

equipment is removed and this disconnects the bonding connection between the grounding 

electrode conductor and exposed conducting surfaces, a bonding jumper must be installed 

while the equipment is removed.

AC Side

 – Where the AC output from the inverter is connected to an AC load center, there should 

be an equipment grounding conductor connected between the inverter case and the grounding 

point in the AC load center. The AC equipment grounding conductor (EGC–AC) is sized per Table 

2-4 and is connected to the inverter’s AC equipment grounding terminal shown in Figure 2-8.

DC Side

 – Since the currents on the DC side are higher than the AC side (5 times at 24 volts), 

the equipment grounding needs are different. The DC equipment grounding conductor (EGC–DC) 

is sized per Table 2-4 and connected to the DC equipment grounding terminal on the inverter as 

shown in Item 7, Figure 1-2.

Table 2-4, Equipment Grounding Conductor Sizing

Rating of Overcurrent 

Device

Minimum Size of Copper 

Ground Wire

15 amps

#14 AWG (2.1 mm

2

)

20 amps

#12 AWG (3.3 mm

2

)

30 - 60 amps

#10 AWG (5.3 mm

2

)

100 amps

#8 AWG (8.4 mm

2

)

200 amps

#6 AWG (13.3 mm

2

)

300 amps

#4 AWG (21.1 mm

2

)

400 amps

#3 AWG (26.7 mm

2

)

Summary of Contents for MagnaSine Hybrid

Page 1: ...MagnaSine Hybrid Renewable Energy Series Pure Sine Wave Inverter Charger MSH RE Series Owner s Manual TM ...

Page 2: ... All rights reserved Permission to copy distribute and or modify this document is prohibited without express written permission from Magnum Energy Inc Document Information Description MSH RE Series Owner s Manual Part Number and Revision 64 0059 Rev A Date Published May 2013 This manual is printed without color for cost savings However this entire manual is available for download with many of the ...

Page 3: ...e Use insulated tools to reduce the chance of electrical shock or accidental short circuits There are no user serviceable parts contained in this product This unit is provided with integral protection against overloads Live power may be present at more than one point since an inverter utilizes both DC batteries PV etc and AC utility or generator power To reduce risk of electric shock ensure all DC...

Page 4: ...eyes and skin Have plenty of fresh water and soap nearby and thoroughly wash in case battery acid contacts skin clothing or eyes In the event of exposure to the eyes flood them for at least 15 minutes with running water and seek immediate medical attention Baking soda neutralizes lead acid battery electrolyte and vinegar neutralizes spilled NiCad and NiFe battery electrolyte depending on your batt...

Page 5: ...ccidentels Il n y a pas réparable par l utilisateur contenues dans ce produit Cet appareil est fourni avec une protection intégrale contre les surcharges Puissance en direct peuvent être présents à plus d un point depuis un onduleur utilise à la fois DC piles PV etc et AC utilitaire ou générateur d alimentation Pour réduire le risque de choc électrique assurez vous que tout le câblage DC et AC est...

Page 6: ... et la peau Ayez suffisamment d eau fraîche et de savon à proximité et se laver dans le cas d acide contact avec la peau de la batterie les vêtements ou les yeux Dans le cas d exposition pour les yeux les inonder pendant au moins 15 minutes à l eau courante et consulter immédiatement un médecin Le bicarbonate de soude neutralise l acide de plomb électrolyte de la batterie et le vinaigre neutralise...

Page 7: ...Inverter Fan Operation 40 3 10 Using a Remote with the MSH RE Series Inverter 40 4 0 Maintenance and Troubleshooting 41 4 1 Recommended Inverter and Battery Care 41 4 2 Troubleshooting 42 4 3 Performing an Inverter Reset 43 4 4 Performing a Power Reset 43 Appendix A Specifications and Optional Equipment 44 A 1 Inverter Charger Specifications 44 A 2 Performance Graphs 45 A 3 Optional Equipment and ...

Page 8: ...ic 4 Stage Charging Graph 33 Figure 3 5 MSH Current Flow Inverting 34 Figure 3 6 MSH Current Flow Charging and AC Pass thru 34 Figure 3 7 MSH Current Flow Charger Back off 35 Figure 3 8 MSH Current Flow Load Support AAC 35 Figure 3 9 MSH Current Flow Load Support VDC 35 Figure 3 10 BTS Temperature to Charge Voltage Change 36 Figure 3 11 Power Switch and Status Indicator 38 Figure 4 1 Power Reset 4...

Page 9: ...when using the Battery Temperature Sensor for optimum charging even during extreme temperature changes Overcurrent over temperature and high low battery voltage protection The following accessories are also available for use with the MSH RE Series inverter charger ME AGS N Automatic Generator Start Module Network version automatically starts stops your generator ME ARC50 Advanced Remote Control ea...

Page 10: ...erator freezer In some areas where utility power is not available this inverter can be used in a standalone renewable power system The inverter allows AC electrical appliances to be run from the storage battery bank When the battery bank becomes discharged either renewable DC sources solar wind or hydro power can be used to recharge the batteries or a generator can be connected to the inverter to ...

Page 11: ...ation 3 Stack Accessories Connection Port red label a RJ11 port that accepts optional accessories Note The MSH RE does not have the ability to be stacked 4 Network Connection Port green label a RJ11 port that accepts optional network capable accessories i e Auto Gen Start or Battery Monitor 5 Remote Connection Port blue label a RJ11 port that allows an optional remote control to be connected 6 Bat...

Page 12: ...d on the front side and at the front on the right side see Figure 2 3 for the locations of the air vents 10 Positive DC Terminal red provides a 360 degree connection point for the positive cable from the battery bank consists of a 5 16 18 x 5 8 bolt with a Kep or Flange nut that holds the battery cable to the DC terminal 11 Negative DC Terminal black provides a 360 degree connection point for the ...

Page 13: ...s CB1 CB2 these circuit breakers protect the unit s internal charger wiring and pass thru relay while in Standby mode The circuit breakers pop out when they open press in to reset The input circuit breakers are not branch rated therefore branch rated circuit breakers must be installed in the inverter s input and output wiring 17 AC Output Circuit Breaker CB3 this 60 amp AC circuit breaker protects...

Page 14: ...n in the beginning the better your inverter needs will be met 2 1 1 Unpacking and Inspection Carefully remove the MSH RE Series inverter charger from its shipping container and inspect all contents Verify the following items are included The MSH RE inverter charger Red and black DC terminal covers with Phillips screws AC access cover with two Phillips screws Two 5 16 Kep or Flange nuts installed o...

Page 15: ...anel ME BMK Battery Monitor with shunt Magnum Accessory DC Shunt Generator Power 120VAC Output 60 Amps Utility Power 120VAC Output 60 Amps BTS 30A 30A ME SBC Smart Battery Combiner Magnum Accessory SELECT TECH AGS METER SETUP SHORE INVERTE R CHARGER INV CHG FAULT PWR ON OFF ON OFF Remote Controls Magnum Accessories ME RC50 ME ARC50 ME AGS N Auto Gen Start Controller Magnum Accessory Flux Capacit o...

Page 16: ...Item 13 Figure 1 3 Allow at the minimum an airspace clearance of 6 15 2 cm at the intake and exhaust vents and 3 7 6 cm everywhere else to provide adequate ventilation If installed in an enclosure a fresh air intake opening must be provided directly to the front side intake vents of the inverter and an exhaust opening on the back side exhaust vents of the inverter This allows cool air from the out...

Page 17: ...ns as shown in Figure 2 3 or use the base of the inverter as a template to mark your mounting screw locations After marking the mounting screw locations mount the unit with appropriate mounting hardware Noncombustible surface A surface made of material that will not ignite burn support combustion or release flammable vapors when subjected to fire or heat as per the ASTM E136 standard For the most ...

Page 18: ...ypes may fail to operate properly when connected to this inverter equipment CAUTION To prevent fire do not cover or obstruc ventilation openings Do not mount in zero clearanc compartment Overheating may result WARNING MORE THAN ONE LIVE CIRCUIT SEE DIAGRAM PROVIDED WITH I NTEGRAL PROTECTION AGAIN OVERLOADS Bottom Left Side Right Side Front 2 5 1 cm 4 12 4 cm 4 12 4 cm 13 34 9 cm 12 32 1 cm 12 30 5...

Page 19: ...that includes the necessary AC and DC inverter breakers that allow both the AC and DC conduit to be connected to the inverter Info The strain reliefs can be removed and replaced with 3 4 grommets if you are using either a conduit box ME CB or MPX CB or the MMP enclosure and the AC wires are individual conductors i e not jacketed 2 3 2 Wiring Requirements All conductors that are at risk for physica...

Page 20: ... and reduces the effects of inductance which improves the inverter waveform and reduces the wear of the inverter s filter capacitors Crimped and sealed copper ring terminal lugs with a 5 16 hole should be used to connect the DC wires to the inverter s DC terminals The battery bank voltage MUST match the DC voltage required by the inverter i e 24 volt battery bank for a 24 volt inverter or the inve...

Page 21: ...arger bottom view Battery Temp Sensor Cable Inverter s DC Negative Busbar Inverter s DC Positive Busbar Inverter s Equipment Ground Wire BTS BTS MMP enclosure for single inverter installations includes DC disconnect breaker DC shunt for battery monitor and inverter DC busbars Battery Bank Battery Bank s Equipment Ground Wire Battery Bank s Negative Cable Battery Bank s Positive Cable ...

Page 22: ...t protection and a disconnect switch If a circuit breaker is used as the overcurrent protection device it can also be used as the required DC disconnect If a fuse is used as an overcurrent device a Class T type or equivalent is recommended This fuse type is rated for DC operation can handle high short circuit currents and has a time delay that allows for momentary current surges from the inverter ...

Page 23: ...y melt the cable and terminal connections Refer to Figures 2 5 and 2 6 to connect the DC cables and to stack the hardware correctly Tighten the terminal connections from 10 to 12 ft lbf 13 6 to 16 3 N m CAUTION The DC terminal and Flange Kep nuts are made of stainless steel which have a high likelihood of seizure To help prevent the bolt and nut from seizing causing the bolts to strip or snap brea...

Page 24: ...bles Info DO NOT connect the DC wires from the battery bank to the inverter until 1 all DC and AC wiring is complete 2 the correct DC and AC overcurrent protection has been installed and 3 the correct DC voltage and polarity have been verified Info For the MSH RE Series inverter charger to perform optimally a minimum battery bank of 200 AH is recommended for moderate loads 1000W and greater than 4...

Page 25: ... be extended using a RJ11 connector female to female and a standard phone cable with RJ11 connectors to a maximum length of 40 feet 12 m However your inverter to battery cable length should not exceed the recommended distance provided in Table 2 2 To install the BTS 1 Attach the ring terminal end of the Battery Temperature Sensor to the negative battery terminal see Figure 2 5 for proper connectio...

Page 26: ... breaker or fuse assembly as near as practical to the batteries and leave open i e no power to inverter WARNING DO NOT close the DC circuit breaker or connect the fuse to connect battery power to the inverter at this time This will occur in the Functional Test after the installation is complete CAUTION If connecting live battery cables to the inverter DC terminals a brief spark or arc may occur th...

Page 27: ...t temperature of 30 C 86 F WARNING To reduce the risk of fire do not connect this inverter to an AC load center circuit breaker panel having multi wire branch circuits connected 2 5 2 AC Wire Size and Overcurrent Protection The AC input and output wiring must be sized per the local electrical safety code requirements to ensure the wire s ability to safely handle the inverter s maximum load current...

Page 28: ...33 6 mm2 CU stranded wire or two 14 to 8 AWG 2 1 to 8 7 mm2 CU stranded wires Each connection uses a 1 4 28 screw and the maximum tightening torque is 32 in lbf 3 6 Nm Info The inverter s NEUTRAL IN and NEUTRAL OUT terminals are electrically connected to each other and either connection can be for the input or output neutrals The AC ground terminals can accept one 14 to 6 AWG 2 1 to 13 mm2 CU stra...

Page 29: ...lamp securely on the wires Always leave a little extra slack in the wiring Refer to Figure 2 9 2 Connect the HOT2 wire black from the generator s dedicated breaker to the inverter s AC2 GEN IN terminal 3 Connect the NEUTRAL2 white from the generator s neutral busbar to the inverter s NEUTRAL IN terminal 4 Connect the GROUND2 green or bare copper wire from the inverter s AC GROUNDS terminal to the ...

Page 30: ...oads ON OFF 120 VAC 120 VAC 120 VAC 120 VAC ON OFF ON OFF ON OFF ON OFF AC Terminal Block AC Input and Output Wiring Generator GRID IN AC1 from utility GEN IN AC2 from generator NEUTRAL IN OUT NEUTRAL IN OUT NEUTRAL IN OUT HOT OUT to Sub Panel Loads AC GROUNDS to from GRID GEN All neutrals connected in common 60 60 A maximum 60 amp single pole breaker is required on the inverter s AC input A maxim...

Page 31: ...l parts of equipment that might be accidentally energized to the grounding electrode system or to the grounded conductor This wire or the ends of this wire should be green or green with a yellow stripe this wire can be bare copper Grounding Electrode Conductor GEC The wire cable that does not normally carry current and connects the grounded conductor and or the equipment grounding conductor to the...

Page 32: ...will be used to connect the DC and AC grounding points in the inverter s two electrical systems to the common earth ground Method 1 Figure 2 11 This method uses a separate grounding electrode for the DC system and the AC system In this method since there are multiple connections to the DC grounding electrode GEC DC the size of the DC grounding electrode conductor cannot be smaller than the largest...

Page 33: ... Ground Rod Method 2 Method 3 Figure 2 13 The AC grounding electrode conductor GEC AC is bonded to the DC ground point and the DC grounding electrode conductor GEC DC is the only connection to the grounding electrode which must be a rod pipe or plate electrode In this method since there is only one connection to the ground rod the DC grounding electrode conductor is not required to be larger than ...

Page 34: ...ault may occur In accordance with the NEC use Table 2 4 to size the equipment grounding conductors This table requires that the equipment grounding conductor be sized according to the rating of the overcurrent device protecting the circuit CAUTION The connections and wiring for the equipment grounding conductor must be continuous to allow fault currents to properly operate overcurrent devices Wher...

Page 35: ...lled in a building facility or structure the NEC National Electrical Code requires a label or plaque to be provided This label plaque is required to be easily visible and provide information that informs personnel on the location of all electrical system disconnects This is to ensure all power to a building is quickly located and shut down in an emergency There are also specific requirements for t...

Page 36: ...ve fasteners to prevent chafing or damage from movement and vibration 2 Verify strain reliefs or grommets are in place to prevent damage to the wiring or conduit where it passes through walls bulkheads or other openings 3 Verify all AC connections are correct and torqued to a maximum of 32 in lbf 3 6 N m 4 Replace the covers on the main electrical distribution panel 5 Replace the chassis access co...

Page 37: ...s refer to the Troubleshooting section in this manual Figure 2 16 AC Voltage Checks 3 0 60 60 AC Terminal Block AC Output 120VAC 5 Neutral to Ground 0 5VAC 60 CB3 60A AC OUTPUT CB2 60A AC2 INPUT CB1 60A AC1 INPUT 2 9 Functional Test After all electrical connections to the inverter batteries AC source and sub panel have been completed follow these steps to test the installation and the inverter s o...

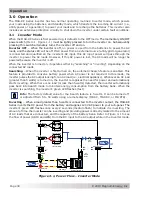
Page 38: ...ture is provided to conserve battery power when AC power is not required In this mode the inverter pulses the AC output looking for an AC load i e electrical appliance Whenever an AC load greater than 5 watts is turned on the inverter recognizes the need for power and automatically starts inverting When there is no load or less than 5 watts detected the inverter automatically goes back into Search...

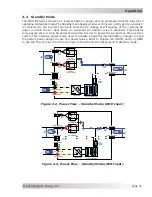
Page 39: ...s within the AC input limits an automatic AC transfer relay is activated This transfer relay passes the incoming AC power through the inverter to power the AC loads on the inverter s output This incoming power is also used to activate a powerful internal battery charger to keep the battery bank charged in case of a power failure Refer to Figures 3 2 GRID and 3 3 GEN to see the flow of power from t...

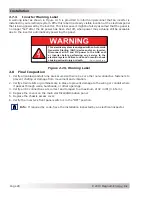
Page 40: ...voltage The Charge mode provides up to four separate charging stages Bulk Charging Absorb Charging Float Charging and Full Charge Bulk Charging This is the initial stage of charging While bulk charging the charger supplies the battery with controlled constant current The charger will remain in bulk charge until the absorption charge voltage determined by the Battery Type selection is achieved The ...

Page 41: ...be connected 2 The inverter must be enabled INV LED is on 3 The battery voltage must be 0 5 volts for a 12 volt system or 1 0 volts for a 24 volt system than the LBCO setting Info If using a remote and the unit is in load support the status will display as Load Support AAC or Load Support VDC There are two modes of operation within Load Support Load Support AAC In this mode the AC loads connected ...

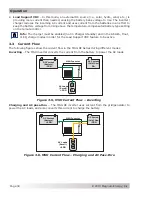
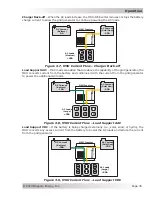
Page 42: ...res show the current flow in the MSH RE Series during different modes Inverting The MSH inverter converts the current from the battery to power the AC loads Load Support VDC In this mode an external DC source i e solar hydro wind etc is providing more current than needed causing the battery bank voltage to rise The inverter charger reduces the incoming AC current and uses current from the batterie...

Page 43: ...rrent Flow Load Support VDC MSH Inverter AC Loads Large 30A AC Current Grid Gen 20A DC Current Battery 10A Load Support VDC If the battery is being charged externally i e solar wind or hydro the MSH converts any excess current from the battery to power the AC loads and reduce the current from the grid generator Figure 3 7 MSH Current Flow Charger Back off MSH Inverter DC Current Battery 0A AC Load...

Page 44: ...g 3 5 Battery Temperature Sensor Operation The plug in Battery Temperature Sensor BTS is used to determine the battery s temperature This information allows the multi stage battery charger to automatically adjust the battery charge voltages for optimum charging performance and longer battery life With a BTS installed if the temperature around the BTS is below 77 F 25 C the absorb and float charge ...

Page 45: ...h battery fault condition occurs The inverter will automatically restart when the battery falls to the HBCI High Battery Cut In level Refer to Table 3 1 to determine the HBCO and HBCI levels for your inverter model Info High battery voltage may be caused by excessive or unregulated voltage from the solar panels or other external charging sources Overload During inverter and standby operation the i...

Page 46: ...ing section to help diagnose the fault condition Slow Flash On blinks on for 4 seconds then off for 4 seconds Indicates float charging and the inverter is in Standby mode the external AC power that is connected to the inverter s input is passing through the inverter and powering the inverter s AC loads Medium Flash On blinks on once every second When AC power is not connected to inverter input Ind...

Page 47: ...fter the battery voltage has been below this setting for more than one minute This protects the batteries from over discharge and the AC loads from unregulated power brown outs Absorption Time This setting allows the user to determine how long to charge the batteries in the Absorb Charge stage Battery Type Sets the type of batteries being used in the system This information tells the charger what ...

Page 48: ...er 1 Obtain your inverter s software revision Note To view the inverter s software revision level push the TECH button on your ME ARC remote and access the Revisions menu 2 Use the chart below to determine the inverter s compatibility level L1 L2 L3 or L4 based on your inverter s software revision Table 3 3 Inverter Compatibility Level INV CHG Models Level 1 L1 Level 2 L2 Level 3 L3 Level 4 L4 MSH...

Page 49: ...s leaks or swelling replace if necessary Use baking soda to clean and remove any electrolyte spills or buildups Check and tighten all battery hold down clamps if applicable Clean and tighten all battery terminals and connecting cables 10 to 12 ft lbf 13 6 to 16 3 N m Check and fill battery water levels liquid lead acid batteries only Check individual battery voltages load test those that have a vo...

Page 50: ...inverter has turned off because the connected loads are larger than the inverter s output capacity or the output wires are shorted Reduce the AC loads connected to the inverter or remove all AC output wiring and restart the inverter Internal fault this fault occurs when an internal fault is detected To clear this fault an inverter reset is required see Section 4 3 to perform an inverter reset No o...

Page 51: ...sing and releasing Be careful not to apply too much force when pushing or the switch might break 4 4 Performing a Power Reset To perform a power reset also known as a hard reset 1 Remove all AC power utility or generator power to the inverter 2 Open all the inverter DC disconnects or disconnect the positive battery cable to the inverter 3 Ensure the inverter and the remote are disconnected from al...

Page 52: ...minal Power factor 0 95 General Features and Capabilities Transfer relay capability 60 AAC maximum each input Five stage charging capability Bulk Absorb Float Equalize requires remote and Battery Saver Battery temperature compensation Standard with available temp sensor connected battery temp 0 50 C Internal cooling 0 to 120 cfm variable speed drive using dual 92 mm brushless DC fan Overcurrent pr...

Page 53: ...ficiency while operating resistive loads Motors and other inductive loads run less efficiently due to the impact of power factor losses Figure A 1 MSH RE Series Efficiency Chart 2 8 3 0 3 2 3 4 3 6 3 8 4 0 4 2 4 4 4 6 20 10 0 10 20 30 40 50 60 Temperature in Degrees Celcius Power kW Figure A 2 MSH4024RE Inverting Temperature Curve A 2 2 Inverting Temperature Curve The following curve shows the MSH...

Page 54: ...our generator based on low battery condition or high temperature Adjustable settings when using the ME ARC include starting the generator based on battery voltage time of day battery State of Charge or high temperature Battery Monitor Kit The ME BMK and ME BMK NS Battery Monitor Kit is a single battery bank amp hour meter that monitors the condition of the battery provides information to let you k...

Page 55: ...oose the batteries best suited for the inverter installation and cost Use only the same battery type for all batteries in the bank For best performance all batteries should be from the same lot and date This information is usually printed on a label located on the battery B 3 Battery Temperature Battery performance of lead acid type batteries is greatly affected by extreme temperatures When a lead...

Page 56: ...d each day for all the loads Add all the Average Daily Watt Hours Per Load together Total Daily Watt Hours Total Daily Watt Hours Total Amp Hours 3 Determine the battery amp hour capacity needed to run all the loads before recharging Divide the Total Daily Watt Hours by the nominal battery volt age of the inverter i e 12 24 volts then Multiply this by how many days the loads will need to run witho...

Page 57: ...re B 3 below four 6 VDC 200 AH batteries are combined into two strings resulting in a 12 VDC 400 AH battery bank Series Parallel Battery Wiring combines battery voltage and capacity 200 AH 6 VDC 200 AH 6 VDC 200 AH 6 VDC 200 AH 6 VDC 400 AH 12 VDC add voltage in series 6 VDC 200 AH 6 VDC 200 AH 6 VDC 200 AH 6 VDC 200 AH 12 VDC 400 AH 200 AH 12 VDC 200 AH 12 VDC add capacity in parallel add voltage...

Page 58: ... String 6 VDC 6 VDC 6 VDC 6 VDC Parallel String 200 AH 200 AH 24 volt battery bank two strings of two 12 volt batteries wired in series and connected in parallel 12 VDC battery 100 AH overcurrent protection to 24 VDC inverter total capacity 200 AH Series String 12 VDC 12 VDC 12 VDC battery 100 AH 12 VDC battery 100 AH 12 VDC battery 100 AH Series String 12 VDC 12 VDC Parallel String 100 AH 100 AH ...

Page 59: ... a particular appliance the best advice is trial and error Your MSH RE Series inverter has a built in safeguard that automatically protects your batteries from over discharge Table C 1 Typical Appliance Power Consumption Device Load Device Load Device Load Blender 400W Coffee Maker 1200W Light Flo 10W Computer 300W Color TV 150W Microwave 1000W Drill 500W Hair Dryer 1000W Light Inc 100W Hot Plate ...

Page 60: ...Cycle Battery A battery designed to be routinely discharged to 20 of its maximum capacity without damage This type of battery is recommended for use with an inverter system Derating As an inverter or charger is used above its normal temperature it s capacity to power loads or charge continuously is decreased Digital Volt Meter DVM True RMS A voltmeter that incorporates a RMS converter to read true...

Page 61: ...ng this energy Shorepower The process of providing shoreside electrical power to a boat while its main and auxiliary engines are turned off The source for shorepower may be grid power from an electric utility company or from an external remote generator Stacking Series Two inverters operating together to produce twice the power and voltage of a single inverter Required when operating 240 VAC loads...

Page 62: ... cosmetic or decorative or any structural or non operative parts Magnum Energy s limit of liability under this warranty shall be the actual cash value of the product at the time the original purchaser returns the product for repair determined by the price paid by the original purchaser Magnum Energy shall not be liable for any other losses or damages 4 Upon request from Magnum Energy the original ...

Page 63: ...ct directly to Magnum Energy for repair you must 1 Return the unit in the original or equivalent shipping container 2 Receive a Return Materials Authorization RMA number from the factory prior to the return of the product to Magnum Energy for repair 3 Place the assigned RMA numbers clearly on the shipping container or on the packing slip When sending your product for service please ensure it is pr...

Page 64: ...Magnum Energy Inc 2211 West Casino Rd Everett WA 98204 Phone 425 353 8833 Fax 425 353 8390 Web www magnumenergy com MSH RE Series Owner s Manual PN 64 0059 Rev A ...

Reviews: