background image

– 19 –

ES

Espa

ñ

ol

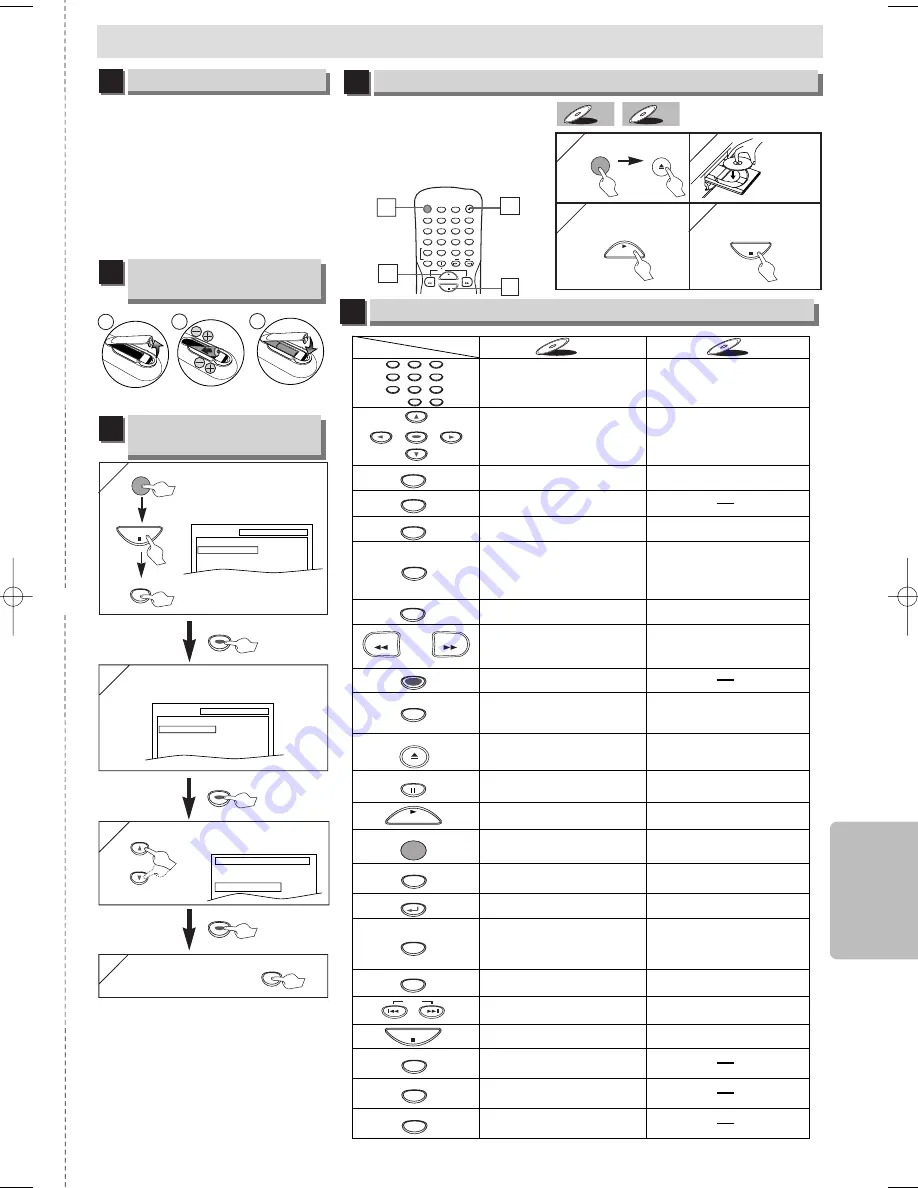
Si su televisor tiene entradas
de AUDIO/VIDEO vea la sec-
ción “Connection to a TV” en la
página 6 en el Manual de
Manejo. En caso contrario, vea
la sección “Connecting to RF
Modulator” en la página del
frente en el Manual de Manejo.

STANDBY–ON

AUDIO

SUBTITLE

ANGLE

REPEAT

CLEAR

A-B

PAUSE

SLOW

SKIP

OPEN/CLOSE

DISPLAY

SEARCH

MODE

1

2

3

4

5

6

7

8

9

0

+10

PLAY

REV

FWD

STOP

Español

CD

CD

DVD-V

DVD-V

Conexiones

4   

4   

Para salir del menú.

3

3

SETUP

Seleccione el idioma deseado para

las indicaciones en la pantalla.

PLAYER MENU

ENGLISH
FRANCAIS
ESPAÑOL

1

Para cambiar el idioma
en la pantalla

3

Reproducción

4

2

2

Confirme que ha seleccionado “PLAY-
ER MENU”.

SETUP

QUICK

PLAYER MENU
TV ASPECT
PROGRESSIVE
DOLBY DIGITAL

ENGLISH
4:3 LETTER BOX
OFF
BITSTREAM

ENTER

ENTER

ENTER

ENTER

ENTER

ENTER

1

1

4

4

3

3

Antes.

¡

Encienda el televisor, amplificador y
otros equipos conectados a esta
unidad. Asegúrese que el televisor y el
sintonizador de audio (de venta en los
comercios) están en el canal correcto.

Para encender o apagar la 
unidad.

Para encender o apagar la 
unidad.

Para mostrar el modo de 

disco actual.

Para mostrar el modo de 

disco actual.

Para abrir o cerrar la bandeja 
del disco.

Para abrir o cerrar la bandeja 
del disco.

Para hacer una pausa en la 
reproducción del disco.

Para empezar la 
reproducción del disco.

Para empezar la 
reproducción del disco.

Para seleccionar 
directamente el capítulo o 
título.

Para seleccionar 
directamente la canción.

Para seleccionar los ángulos 
de cámara en un disco.

Para seleccionar subtítulos 
en un disco.

Para seleccionar idiomas de 
audio en un disco.

Para seleccionar ESTÉREO 
L-ch o R-ch. 

Para repetir entre su punto A 
y B seleccionado.

Para repetir entre su punto A y B 
seleccionado. 

Para reproducir 
repetidamente un capítulo o 
título.

• 

Para reproducir repetidamente

 una canción o disco. 

Para activar/desactivar el 
nivel del negro.

Para disponer el orden de reproducción 
o la reproducción aleatoria.

Para llamar el Menú en un 

disco.

Para llamar el menú inicial 
en un disco.

Para ampliar la imagen de 
vídeo en DVD. (x2/x4)

Para activar/desactivar el 
ambiental virtual.

Para activar/desactivar el 
ambiental virtual.

Para volver a la operación 
anterior en el menú.

Para volver a la operación 
anterior en el menú.

Para buscar un capítulo, título 
o tiempo.

Para colocar o buscar los 
marcadores.

Para buscar una canción.

Para buscar el tiempo. 

Para colocar o buscar los 
marcadores. 

Para borrar los marcadores.

Para borrar los marcadores. 

Para eliminar el Nº de estado

  en la entrada de programa.

Para borrar los números mal

  entrados.

Para borrar el punto para la

  repetición A-B.


Para borrar los números mal

  entrados.

Para borrar el punto para la

  repetición A-B.

Para buscar en avance/

retroceso por un disco.

Para empezar la reproducción 

en avance lento/retroceso 

durante el modo de pausa.

Para buscar en avance/

retroceso por un disco.

Para avanzar la reproducción un cuadro 
cada vez.

Para hacer una pausa en la reproducción.

• 

Para parar la reproducción.

• 

Para parar la reproducción.

• 

Para saltar capítulos.

• 

Para saltar canciones.

Para llamar el menú de 
ajustes de DVD.

Para llamar el menú de 
ajustes de DVD.

Para mover el cursor y 
determinar la posición.

Para mover el cursor y 
determinar la posición.

STANDBY–ON

DISPLAY

MENU

TOP MENU

ZOOM

SUBTITLE

MODE

ANGLE

SEARCH

MODE

REPEAT

A-B

AUDIO

CLEAR

1

2

3

4

5

6

7

8

9

0

+10

PAUSE

PLAY

STOP

SETUP

DVD-V

DVD-V

CD

CD

Botón

(Orden alfabético)

Disco

ENTER

RETURN

REV

FWD

OPEN/CLOSE

SKIP

Control remoto

5

SETUP

QUICK
CUSTOM
INITIALIZE

SETUP

STOP

Confirme que ha selec-
cionado “QUICK”.

Instalación de las pilas
en el control remoto

2

1

1

2

3

1

1

1

STANDBY–ON

or

1

1

3

3

4

4

2

2

STOP

STANDBY–ON

OPEN/CLOSE

PLAY

Ponga un
disco con
la etiqueta
hacia
arriba.

Para empezar la
reproducción

Para parar la
reproducción

E6150UD_ENSP.qx33  05.4.5 14:24  Page 19

Summary of Contents for MSD125

Page 1: ...OTHERS Setting 16 Reset to the Default Setting except for PARENTAL Setting 17 Information Troubleshooting Guide 17 Specifications 18 Language List 18 Limited Warranty 18 Español 19 Quick Use Guide 20 Table of Contents Connecting to RF Modulator If your TV has AUDIO VIDEO input jacks see the section Connections on page 6 If not it is still possible to connect this unit to your TV by using a STEREO ...

Page 2: ...G This equipment may generate or use radio frequency energy Changes or modifications to this equipment may cause harmful interference unless the modifications are expressly approved in the man ual The user could lose the authority to operate this equipment if an unauthorized change or modification is made CAUTION TO PREVENT ELECTRIC SHOCK MATCH WIDE BLADE OF PLUG TO WIDE SLOT FULLY INSERT ATTENTIO...

Page 3: ...e of the polarized plug 13 Power Cord Protection Power supply cords should be routed so that they are not likely to be walked on or pinched by items placed upon or against them paying particular attention to cords at plugs convenience receptacles and the point where they exit from the product 14 Lightning For added protection for this product during a lightning storm or when it is left unattended ...

Page 4: ...opyright Symbols Used in This Manual Manufactured under license from Dolby Laboratories Dolby and the double D symbol are trade marks of Dolby Laboratories SERVICING Please refer to relevant topics on the Troubleshooting Guide on page 17 before returning the product If this unit becomes inoperative do not try to correct the problem by yourself There are no user service able parts inside Turn off u...

Page 5: ... finalized can be played back Unfinalized discs cannot be played back Depending on the recording status of a disc the disc may not be played back at all or normally the picture or sound may not be smooth etc 9 If there is too much recording space left on a disc the used portion is less than 55 mm across it may not play back properly 10 Do not glue paper or put stickers on to the disc These may dam...

Page 6: ...ual accompanying your TV INPUT MODES FOR COMMON TV BRANDS Example Listed below are inputs for common brand name TV s Admiral AUX Curtis Mathis LINE1 LINE2 00 90 91 92 93 GE INPUT TV VCR 00 90 91 92 93 Hitachi INPUT AUX JVC A V CHANNEL INPUT1 SVIDEO INPUT2 Kenwood AUX LXI Series 00 Magnavox AUX CHANNEL Panasonic TV VIDEO RCA INPUT TV VCR 00 90 91 92 93 Samsung TV VIDEO Sanyo VIDEO Sharp 00 Sony VID...

Page 7: ...o source on a disc in a Dolby Digital 5 1 channel sur round format cannot be recorded as digital sound by an MD or DAT deck By hooking this unit up to a Multi channel Dolby Digital decoder you can enjoy high quality Dolby Digital 5 1 channel surround sound as heard in the movie theaters Playing a DVD using incorrect settings may generate noise dis tortion and may also damage the speakers AUDIO OUT...

Page 8: ...kward through a disc To begin slow forward reverse playback during the pause mode To search forward backward through a disc To advance playback one frame at a time To pause disc playback To pause disc playback To stop playback To stop playback To skip chapters To skip tracks To begin disc playback To begin disc playback To call up the DVD setup menu To call up the DVD setup menu To move the cursor...

Page 9: ...wo layered disc pictures may stop for a moment This happens while the 1st layer is being switched to the 2nd layer This is not a malfunction Operations described after this section are mainly based on the remote control use Some operations can be carried out on main unit 1 1 Playback Hint Hint On DVDs set STILL MODE to FIELD in the Display menu if pic tures in the pause mode are blurred Refer to p...

Page 10: ...0 1 23 45 T L1 BIT RATE The amount of audio and video data currently being read ALL Current track number Total tracks Elapsed time of the current chapter Remaining time of the current chapter Elapsed time of the current title Remaining time of the current title Layer numbers appears only when playing a two layered Disc L0 Layer 0 is playing L1 Layer 1 is playing Elapsed time of the current track R...

Page 11: ...rrent Chapter CH or SKIP TT 1 TT2 TT3 TT4 Current Title TT SKIP SKIP SKIP Using SKIP Using SKIP H H H H G G G G SKIP SKIP Hint Hint When there is no need to enter a number 0 appears automatically For example 0 0 appears in the Time Search display if the total time of the title or track is less than 10 minutes Hit CLEAR to erase the incorrect input at step 2 Hint Hint Depending on the disc being pl...

Page 12: ...hit REPEAT repeatedly until TRACK appears during playback To repeat the entire random selections hit REPEAT repeatedly until ALL appears during playback Hint Hint Hit CLEAR at step 2 to erase the most recently entered track To erase all programmed tracks at once select ALL CLEAR and hit ENTER at step 2 While a program is being played back STOP C C works as follows Hit STOP C C and PLAY B B next so...

Page 13: ... 1 1 8 ANGLE ON OFF Black Level Setting Adjust the Black Level Setting to make the dark areas of the TV picture brighter DVD V DVD V Virtual Surround You can enjoy stereophonic virtual world on your existing 2 channel stereo system CD CD DVD V DVD V 2 2 OFF ON Makes the dark areas brighter OFF Shows the original picture as recorded 3 3 RETURN SUBTITLE 2 2 1 1 Natural effect 2 Emphasized effect OFF...

Page 14: ...DIGITAL ON ON BITSTREAM SETUP DISPLAY TV ASPECT STILL MODE PROGRESSIVE 4 3 LETTER BOX AUTO OFF SETUP LANGUAGE AUDIO SUBTITLE DISC MENU PLAYER MENU ORIGINAL OFF ENGLISH ENGLISH Select the desired item 1 1 SETUP QUICK CUSTOM INITIALIZE SETUP STOP SETUP QUICK PLAYER MENU TV ASPECT PROGRESSIVE DOLBY DIGITAL ENGLISH 4 3 LETTER BOX OFF BITSTREAM Q QUICK SETUP Men UICK SETUP Menu u Refer to the sections ...

Page 15: ...WN SAMPLING DOLBY DIGITAL ON ON BITSTREAM AUDIO Setting Choose the appropriate audio settings for your equipments It only affects during the playback of DVD discs Follow steps 1 to 3 in the CUSTOM Menu section on page 14 Select the desired item C AUDIO menu 5 5 6 6 To exit the menu SETUP DRC Dynamic Range Control Default ON Set to ON to compress the range between soft and loud sounds DOLBY DIGITAL...

Page 16: ...s Follow steps 1 to 3 in the CUSTOM Menu section on page 14 4 4 Select the desired item E OTHERS menu 6 6 To exit the menu ANGLE ICON Default ON Set to ON to show the angle icon when multiple camera angles are available during DVD playback AUTO POWER OFF Default ON Set to ON to turn this unit off automatically after 30 minutes of no use ANGLE ICON ON AUTO POWER OFF ON ON OFF ANGLE ICON ON AUTO POW...

Page 17: ... digital connections Check if the audio format of the selected audio language matches your receiver capabilities No DTS audio is output This unit does not support DTS audio This is not a malfunction Picture freezes momentarily Check the disc for fingerprints scratches and during playback clean with a soft cloth wiping from center to edge Clean the disc Disc can t be played Clean the disc Ensure th...

Page 18: ...ip as follows DURATION PARTS FUNAI CORP will provide parts to replace defective parts without charge for one 1 year from the date of original retail purchase Certain parts are excluded from this warranty LABOR FUNAI CORP will provide the labor without charge for a period of ninety 90 days from the date of original retail purchase LIMITS AND EXCLUSIONS This warranty is extended only to the original...

Page 19: ...ra reproducir repetidamente una canción o disco Para activar desactivar el nivel del negro Para disponer el orden de reproducción o la reproducción aleatoria Para llamar el Menú en un disco Para llamar el menú inicial en un disco Para ampliar la imagen de vídeo en DVD x2 x4 Para activar desactivar el ambiental virtual Para activar desactivar el ambiental virtual Para volver a la operación anterior...

Page 20: ...level on off To set virtual surround on off To arrange the playing order or play randomly To set virtual surround on off To call up the Menu on a disc To call up the Top Menu on a disc To magnify part of a picture x2 x4 To return to the previous operation in menu To search chapter title or time To set or search the markers To search track To search time To set or search the markers To clear the ma...

Reviews: